Secure your application from Argo CD to Kubernetes
JJ Ng
Pas Apicella
2022年10月12日
0 分で読めますGitOps is a popular framework for managing and securing the application development pipeline. For many who have embarked on a GitOps journey, a common question is: “how can I secure my pipeline when everything is automated?”
The GitOps framework is a concept where any code commits or changes are done through Git, which then triggers an automated pipeline that builds and deploys applications on Kubernetes. Because there are few touch points for development and security teams in the pipeline, its security needs to be mandated to ensure the deployed applications have as few vulnerabilities as possible.
This blog covers how Snyk can provide application security in GitOps, focusing on a popular tool, Argo CD. In this scenario, Snyk runs an IaC scan to ensure the to-be-deployed application is safe before deployment, and stops the build if it is not. Snyk also can monitor the deployed applications across different namespaces in Kubernetes in an automated fashion.
What is Argo CD?
Argo CD is a declarative, Kubernetes-native continuous delivery (CD) tool which tracks a repository and detects changes, or "drift". It then applies the required changes to the Kubernetes cluster configuration.
Setting up Argo CD to work with Snyk
This is a demo for starting your GitOps process with Argo CD, using Snyk to provide security coverage on the application and monitoring of Kubernetes workloads. You’ll take the following steps:
Prerequisites
A Snyk account with a Business or Enterprise plan is required to run Snyk tests on Argo CD, and to auto-import Kubernetes workloads into Snyk. If you don’t have a Snyk account, you can start a free trial of our Business plan.
A running Argo CD instance in your Kubernetes cluster. Setup details are in the Argo CD documentation.
A running Kubernetes cluster (for example, EKS, AKS, GKE, Red Hat OpenShift, or any supported flavor).
Step 1: Clone your Git repository
This demo uses a flask polling application where the source code is hosted at https://github.com/jiajunngjj/flask-polling-app. Clone the repository to your own environment.
git clone https://github.com/jiajunngjj/flask-polling-app.git
Step 2: Configure Argo CD
Add your Kubernetes cluster into Argo CD:
argocd cluster add CONTEXTNAME
In this demo, Argo CD resides inside this Kubernetes cluster, so it is automatically connected using the internal K8s hostname (kubernetes.default.svc):

Next, make sure the previously mentioned repository is also added to Argo CD:
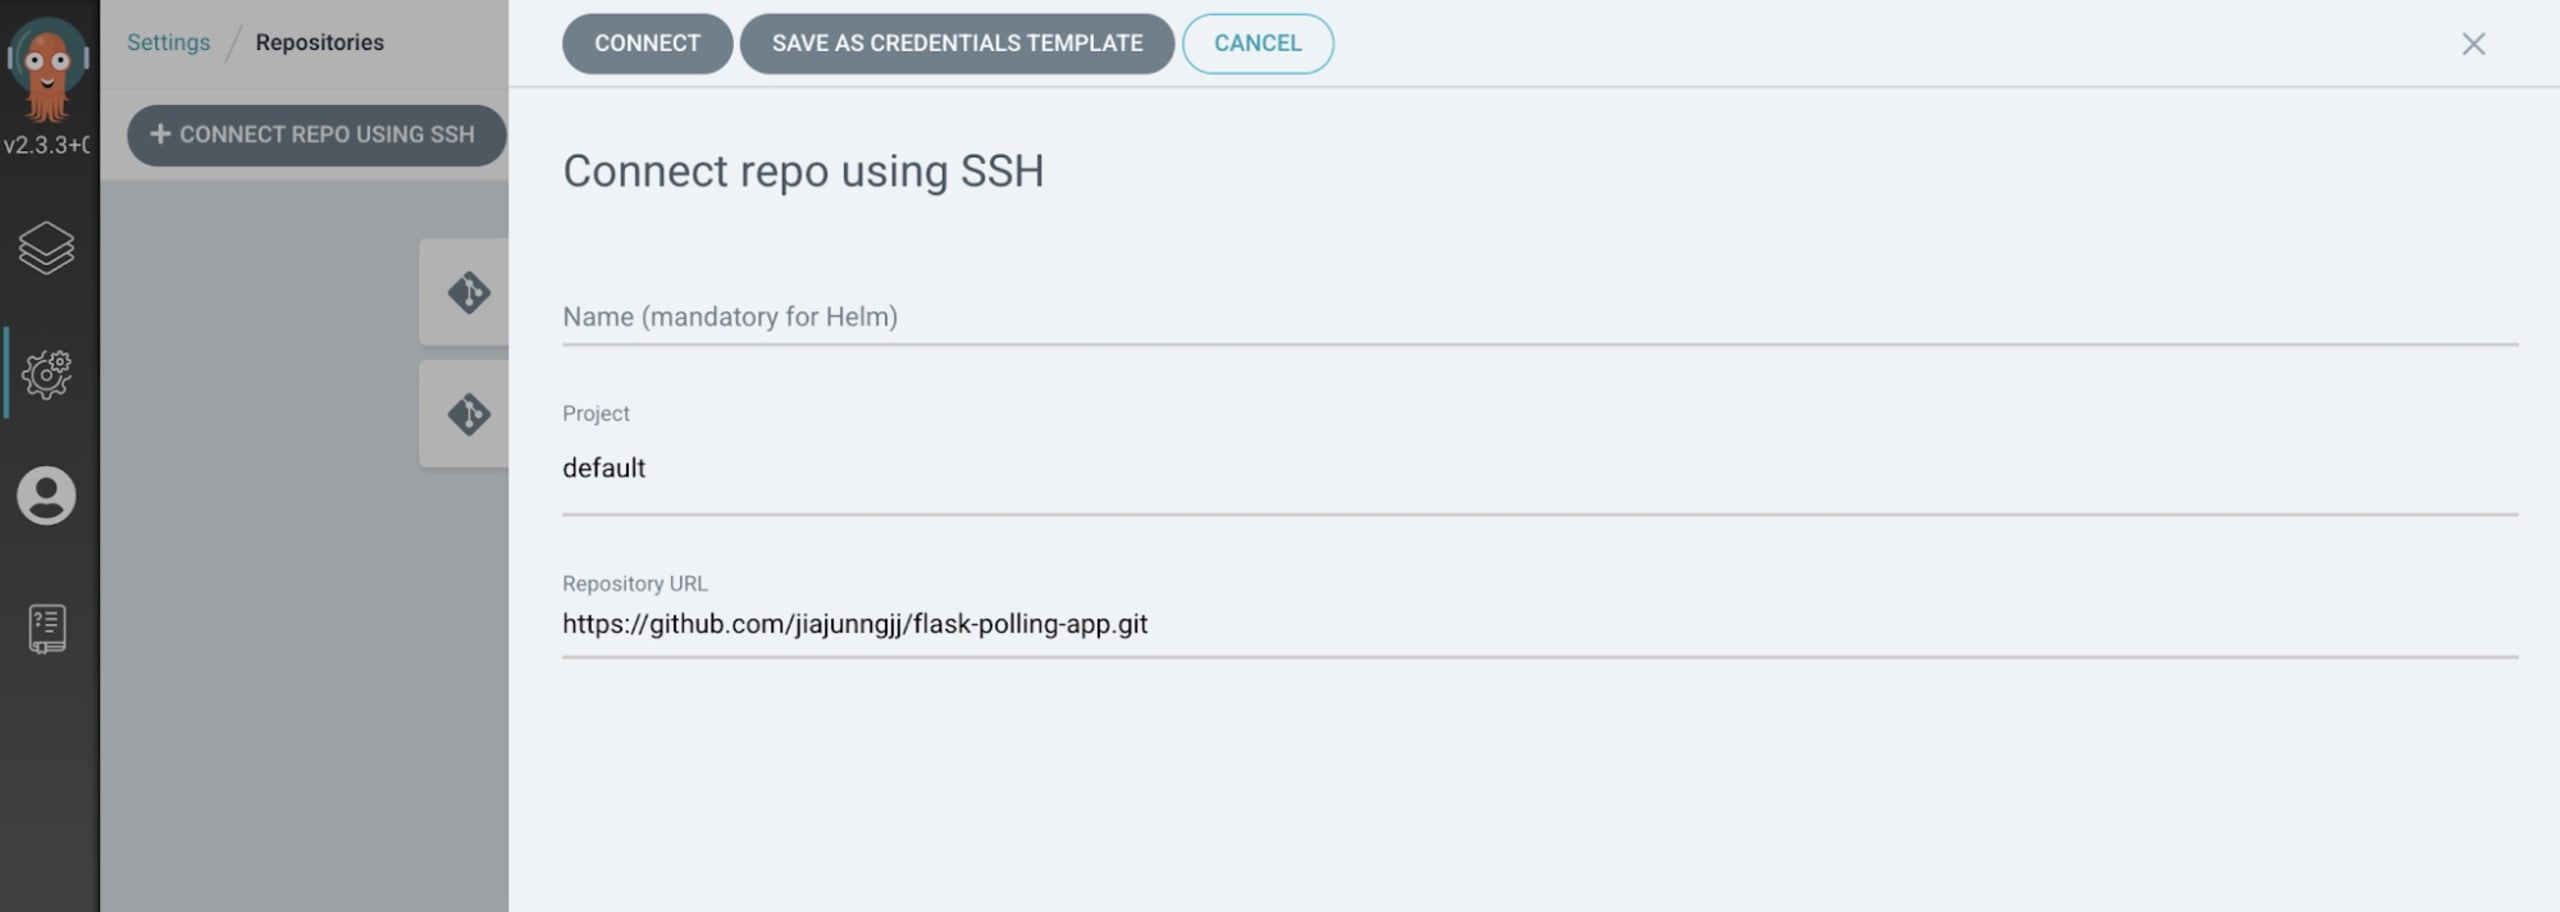
When the repository is added successfully, you should see something like this:

Step 3: Deploy the application using Argo CD
Create a Kubernetes namespace to deploy the application. In this case, we’re creating the argocd-demo namespace to run the flask-polling-app:
kubectl create ns argocd-demo
Use the Argo CD command line to create the application (or do it via the Argo CD UI after you have added the repository):
argocd app create snyk-demo \ --repo https://github.com/jiajunngjj/flask-polling-app.git \ --path argocd \ --dest-server https://kubernetes.default.svc \ --dest-namespace argocd-demo
Here's a breakdown of the command:
repo — Source code management (SCM) repository
path — The directory that has the Kubernetes manifest
dest-server — The Kubernetes cluster
dest-namespace — The namespace in Kubernetes to deploy the application
After the application is created on Argo CD, the created application on the UI shows an OutOfSync status:
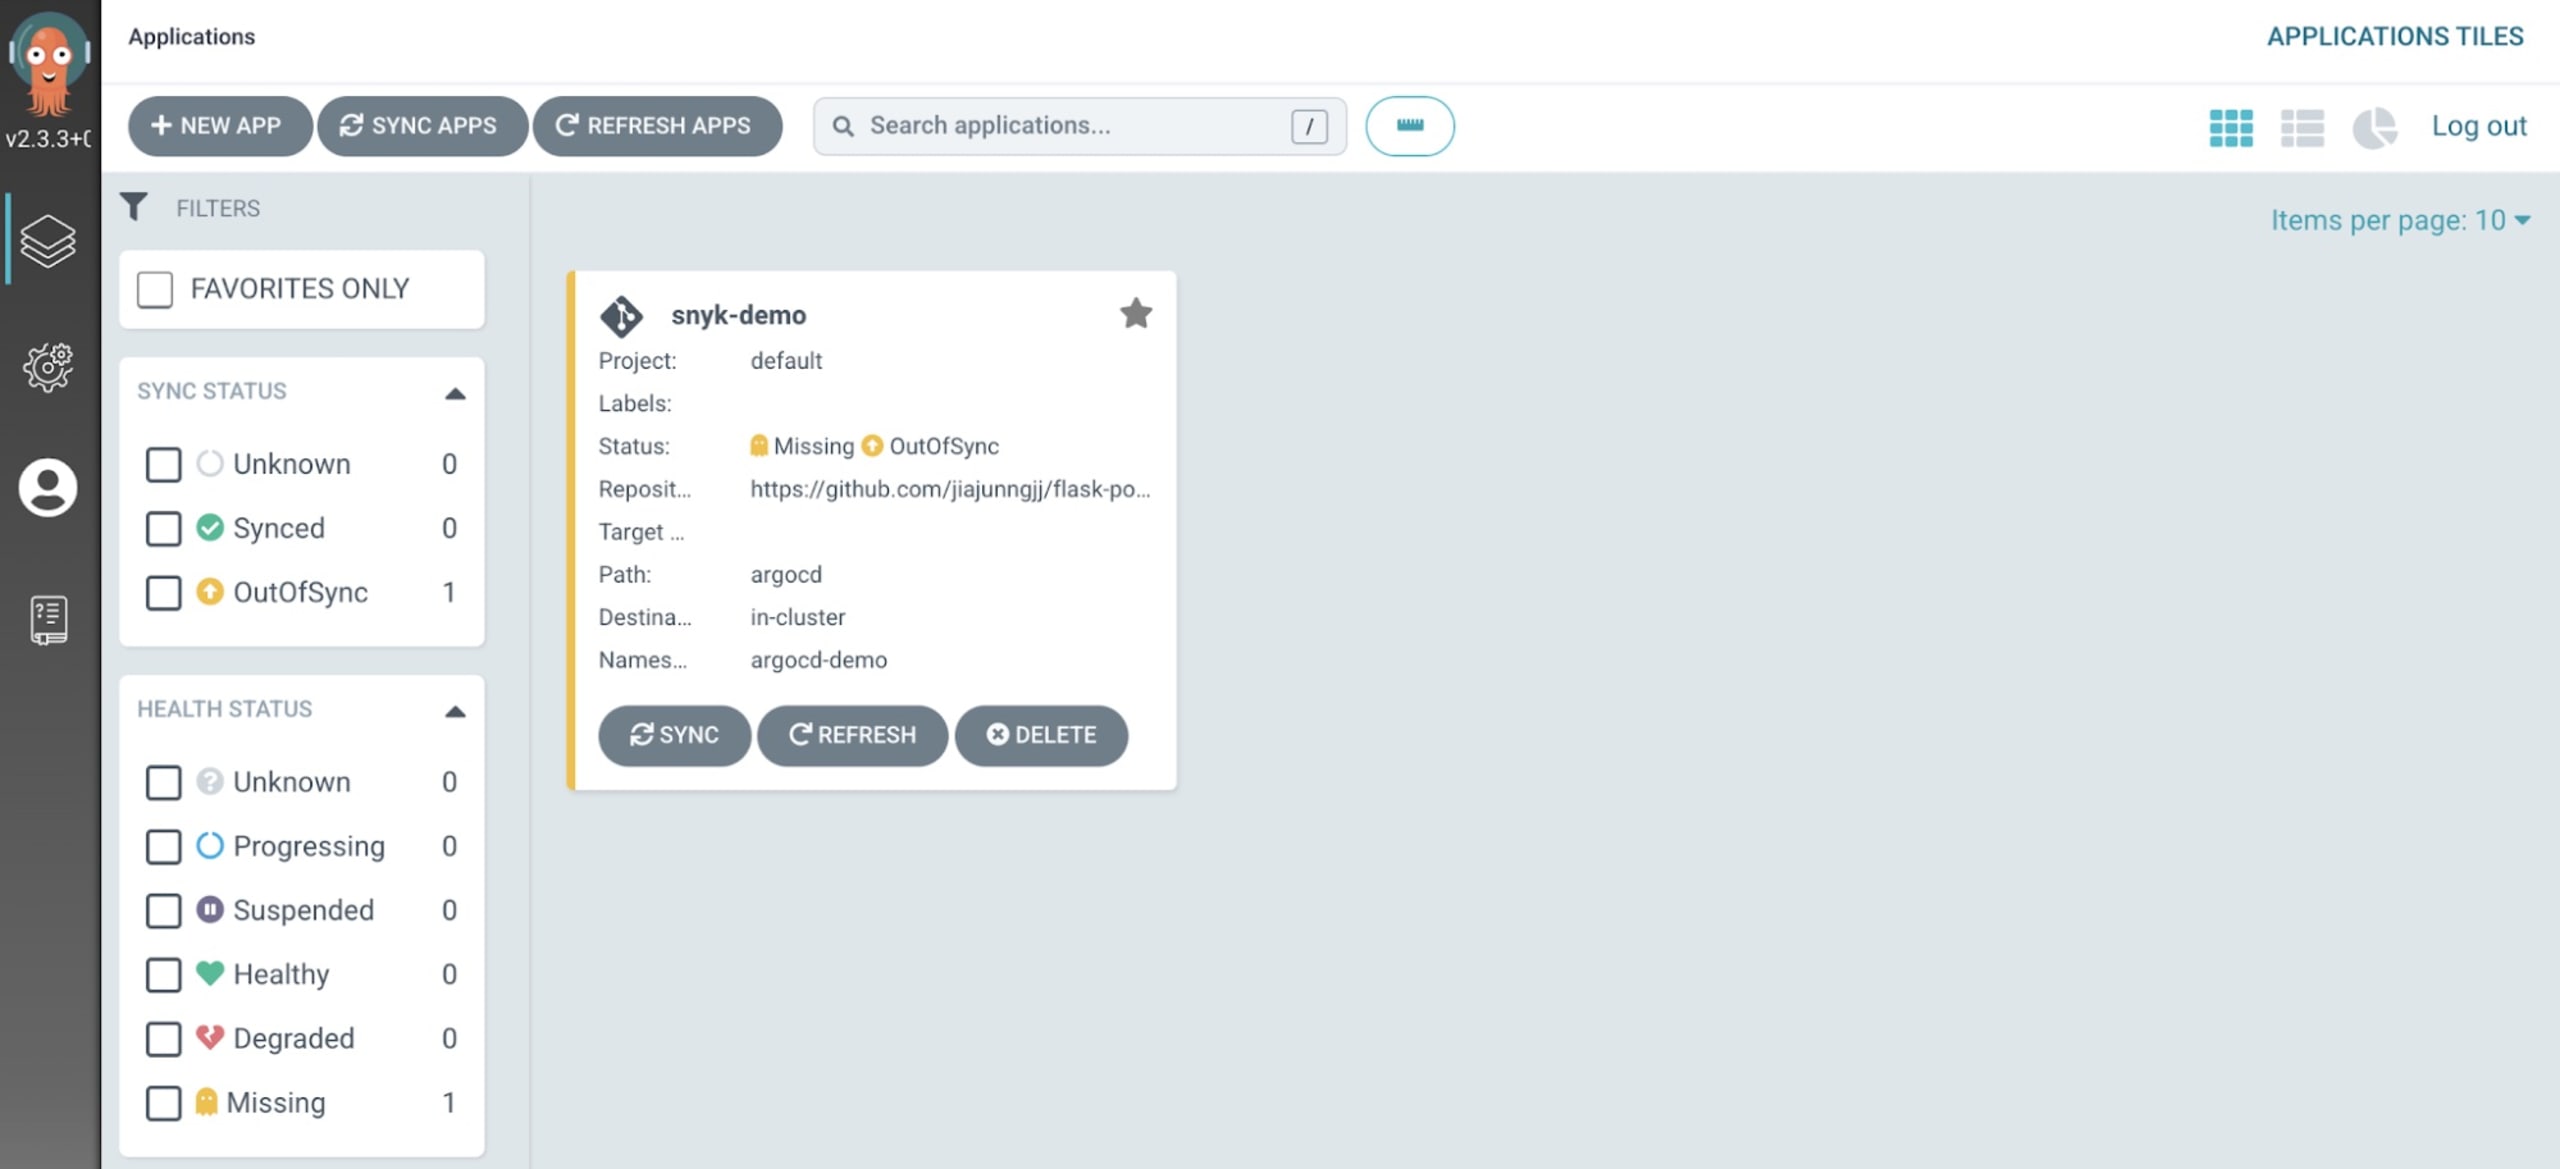
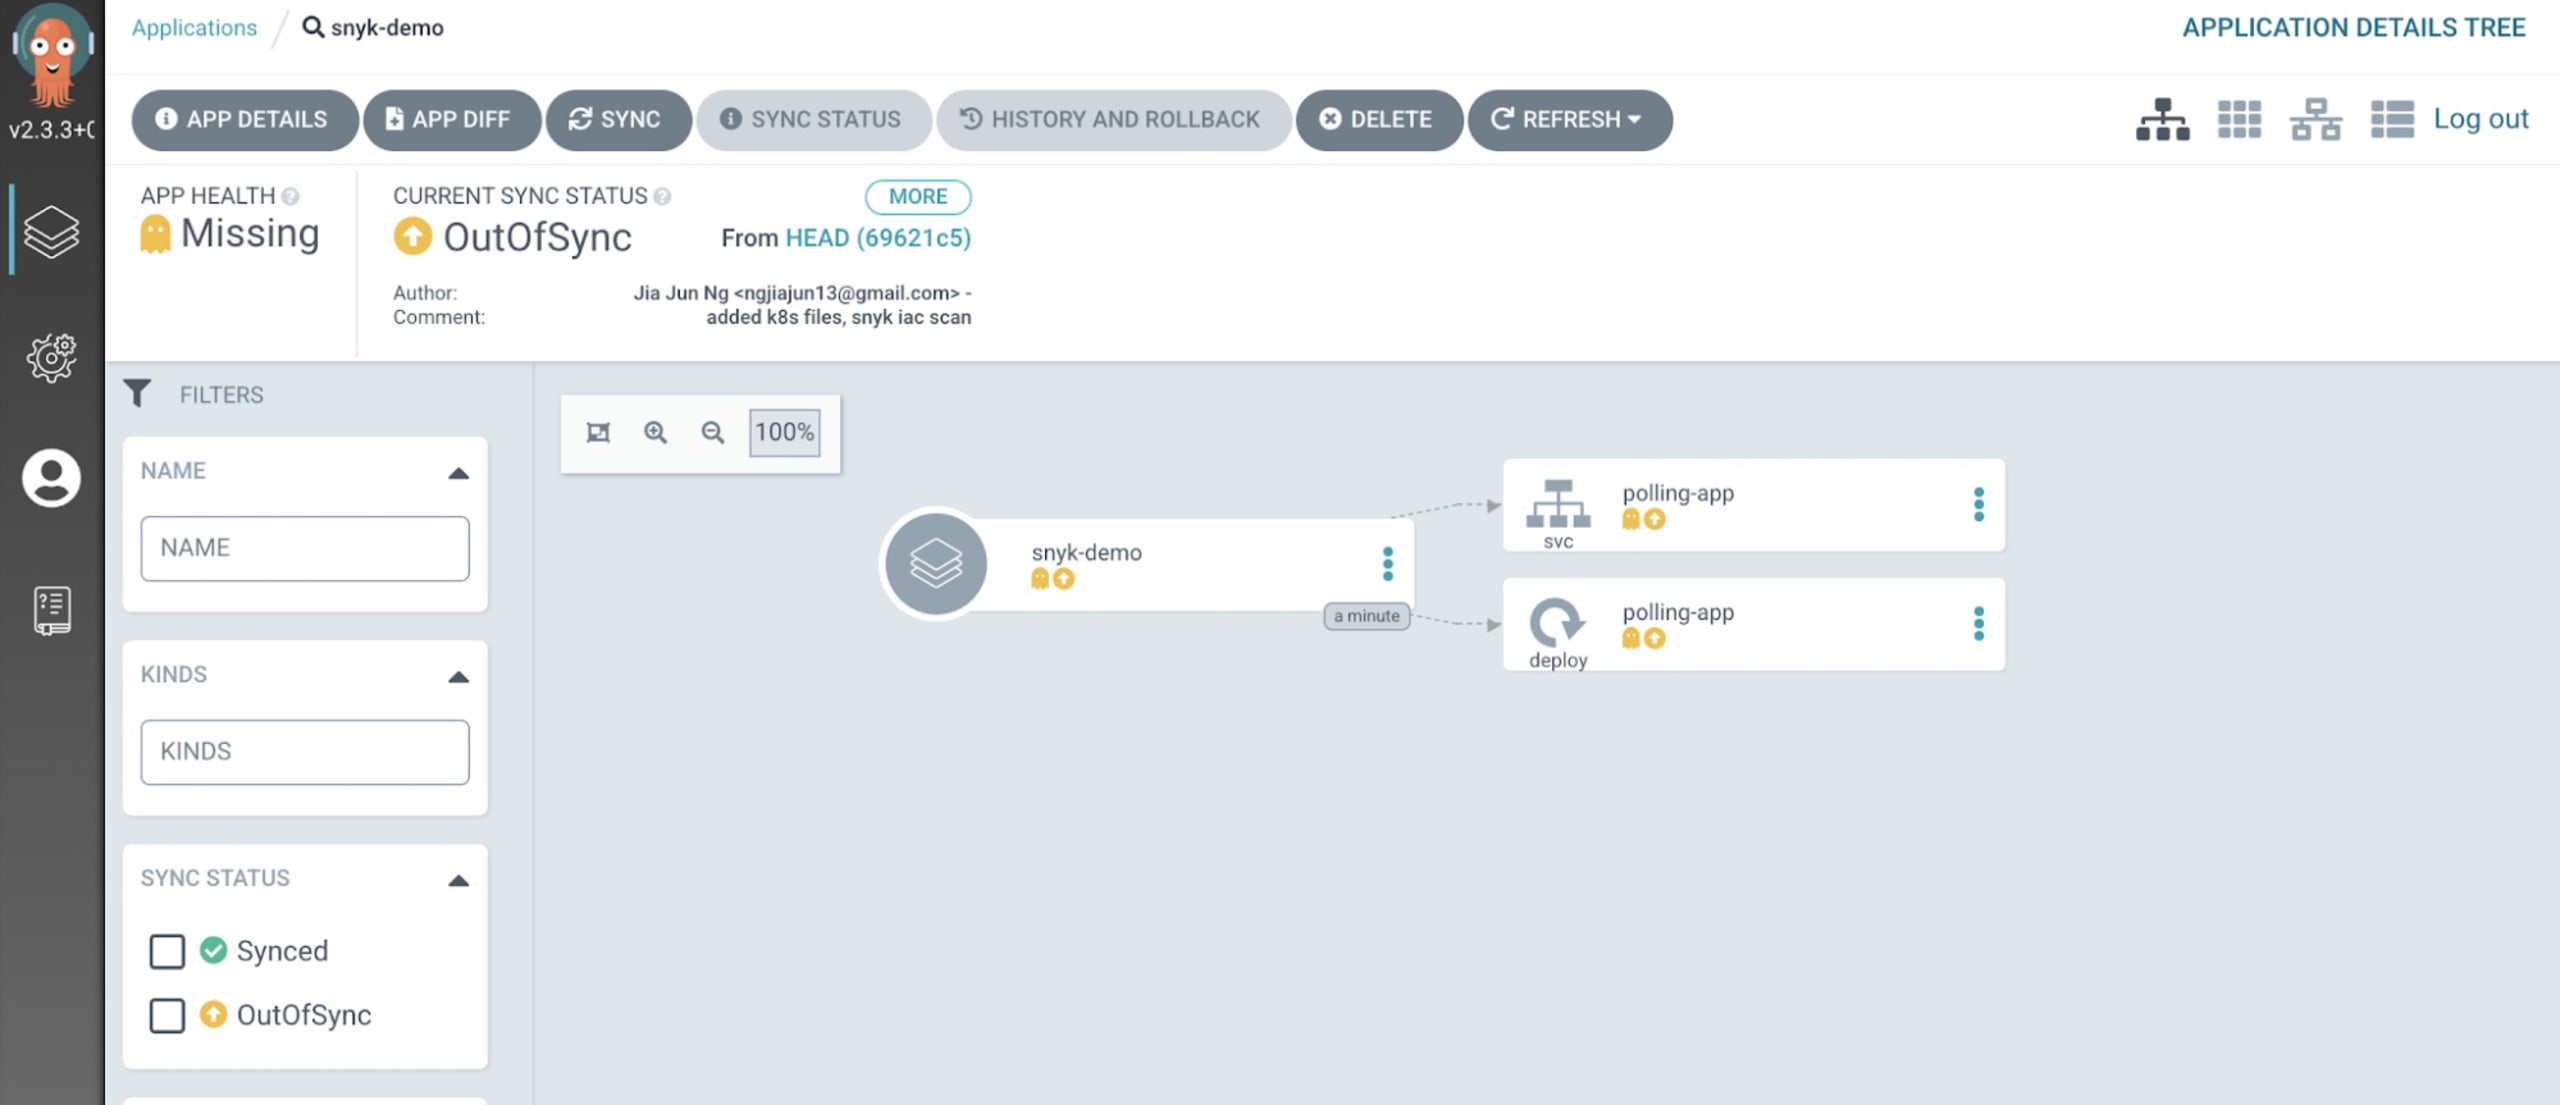
Next, run the Argo CD sync command to deploy the application:
argocd app sync snyk-demo
You should then see the application in the Argo CD UI:
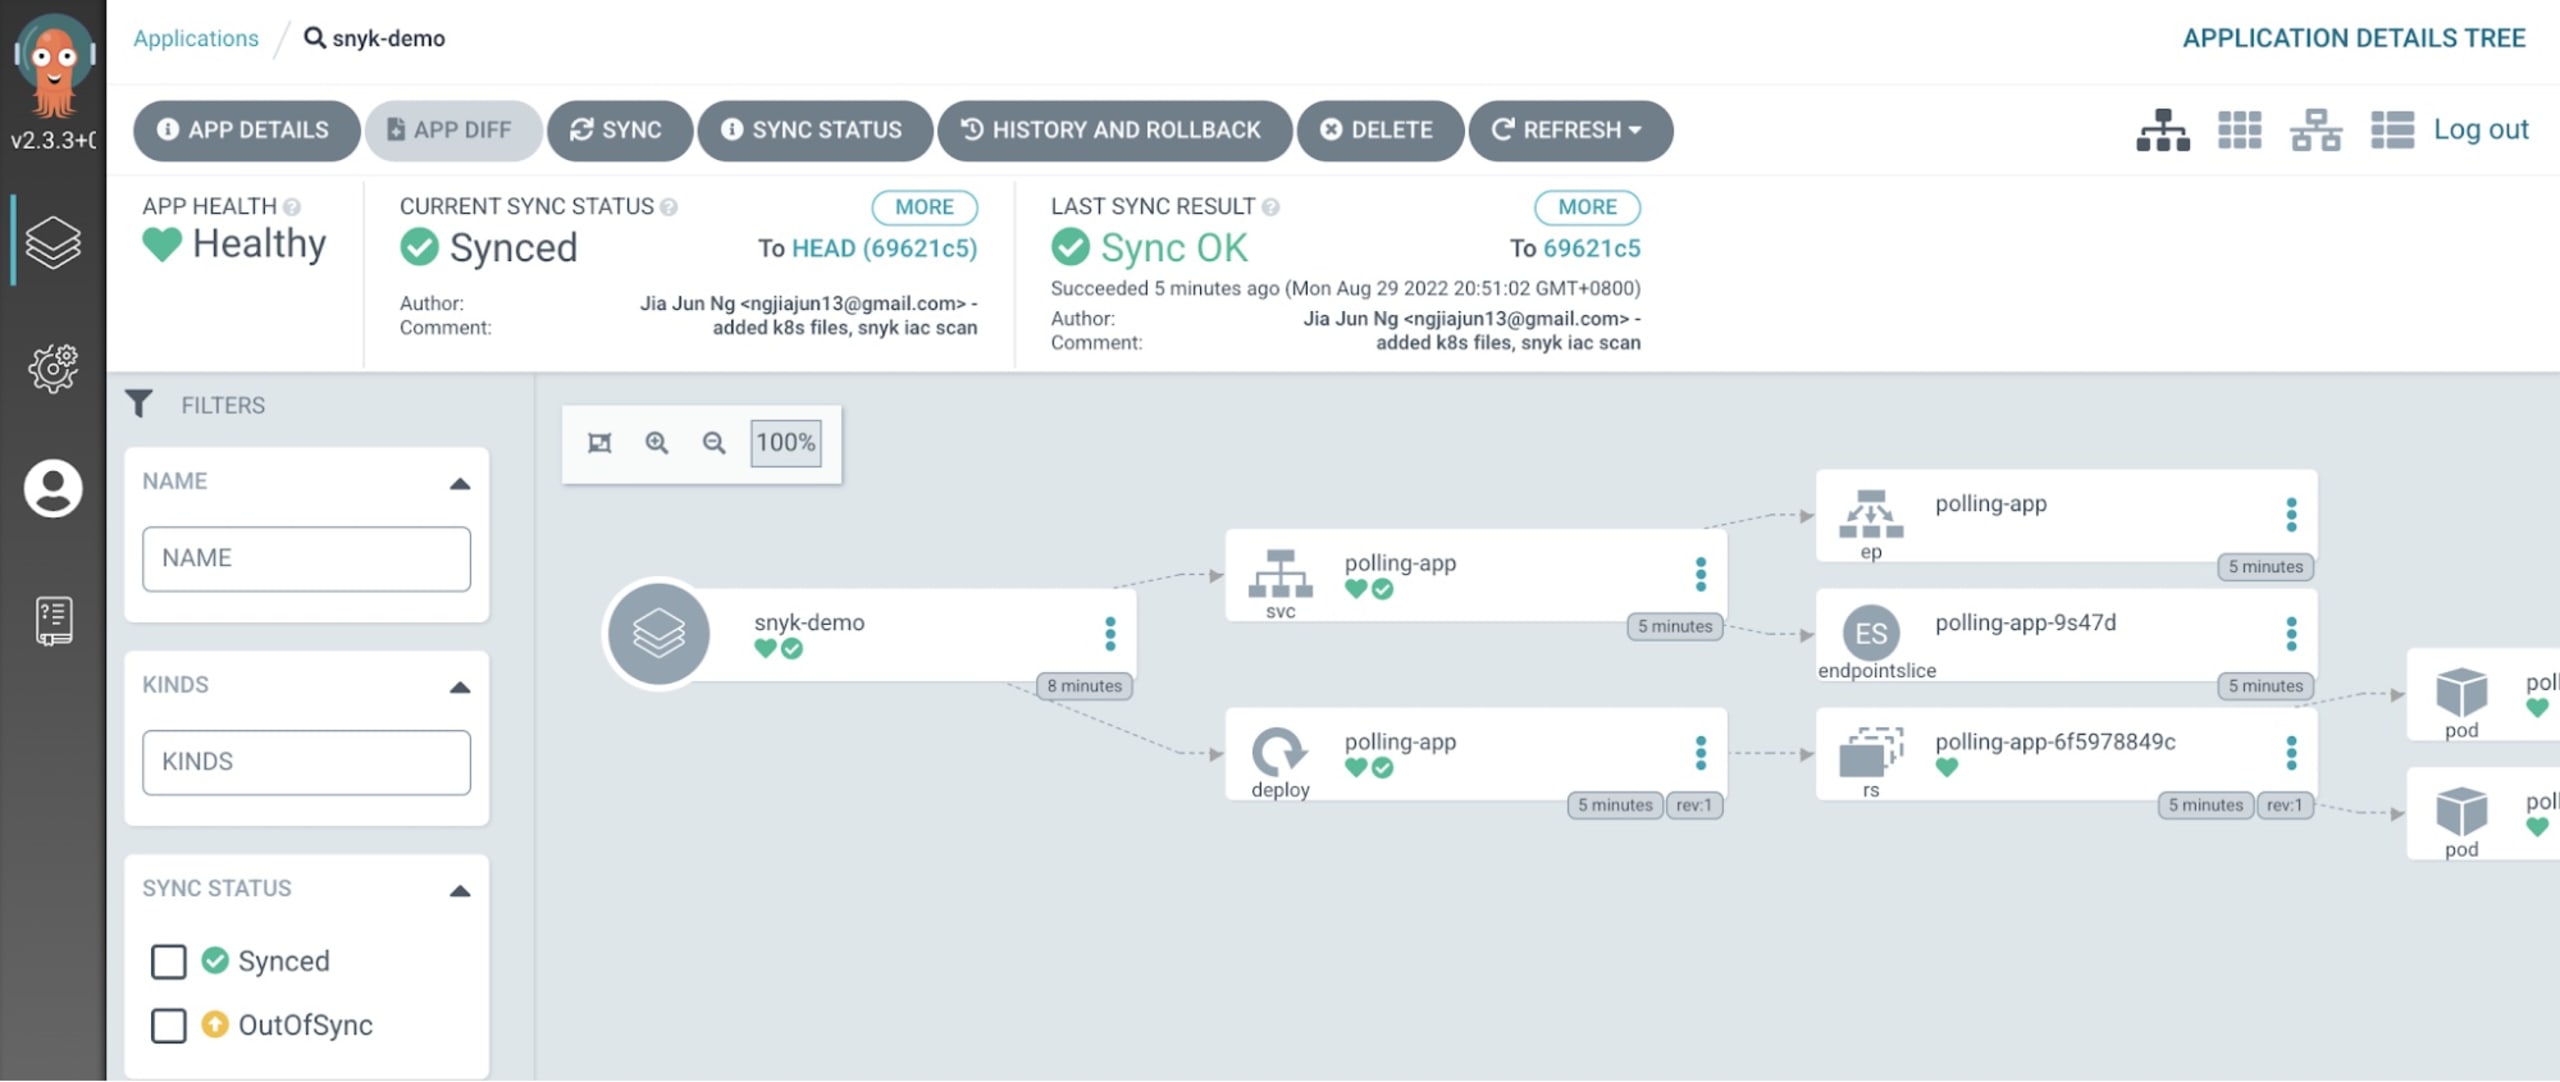
You should also be able to see that the app has started deploying to the Kubernetes namespace, argocd-demo:
1➜ kubectl get pods -n argocd-demoNAME READY STATUS RESTARTS AGEpolling-app-6f5978849c-pp8f4 1/1 Running 0 33spolling-app-6f5978849c-tqpd2 1/1 Running 0 33sStep 4: Create a Kubernetes secret object for your Snyk token
After the application has been successfully added to Argo CD, it’s time to include the Snyk IaC test in the Argo CD pipeline. Retrieve your Snyk token from the Snyk App and create a secret object in the argocd-demo namespace:
1➜ kubectl create secret generic snyk-token \ --from-literal=token=<XXXX-XXXXXX-XXXXXXXX> \ -n argocd-demoStep 5: Create an Argo CD PreSync resource hook
Create a file called snyk-scan.yaml in the same directory as the deployment YAML files, (argocd), containing the following content:
1apiVersion: batch/v1
2kind: Job
3metadata:
4  name: snyk-iac-scan
5  annotations:
6    argocd.argoproj.io/hook: PreSync
7spec:
8  ttlSecondsAfterFinished: 600
9  template:
10    spec:
11      containers:
12      - name: snyk-cli
13        image: snyk/snyk-cli:npm
14        command: ["/bin/sh","-c"]
15        args:
16          - git clone https://github.com/jiajunngjj/flask-polling-app.git;
17            snyk auth $SNYK_TOKEN;
18            snyk iac test flask-polling-app/argocd/polling-app.yaml || true;
19        env:
20          - name: SNYK_TOKEN
21            valueFrom:
22              secretKeyRef:
23                name: snyk-token
24                key: token
25      restartPolicy: Never
26  backoffLimit: 0
Edit the polling-app.yaml to trigger configuration drift detection (in this example, the number of replicas is changed to “1”):
1---
2apiVersion: v1
3kind: Service
4metadata:
5  name: polling-app
6spec:
7  ports:
8  - name: 8080-tcp
9    port: 8080
10    protocol: TCP
11    targetPort: 8080
12  selector:
13    app: polling-app
14  type: LoadBalancer
15
16---
17apiVersion: apps/v1
18kind: Deployment
19metadata:
20  name: polling-app
21spec:
22  replicas: 1
23  selector:
24  matchLabels:
25    app: polling-app
26  template:
27    metadata:
28      labels:
29        app: polling-app
30    spec:
31      containers:
32      - image: jiajunngjj/polling-app
33        name: polling-app
34        ports:
35        - containerPort: 8080
36      restartPolicy: "Always"
Run Git commands to send the file to the repository:
1➜ git add argocd/snyk-scan.yaml argocd/polling-app.yaml➜ git commit -m "added snyk-scan.yaml and edited polling-app.yaml"➜ git pushStep 6: Wait for Argo CD to detect the configuration drift
When Argo CD detects the configuration drift, it begins to sync to achieve the desired new state. You can see the Snyk IaC scan triggered before the application is deployed:
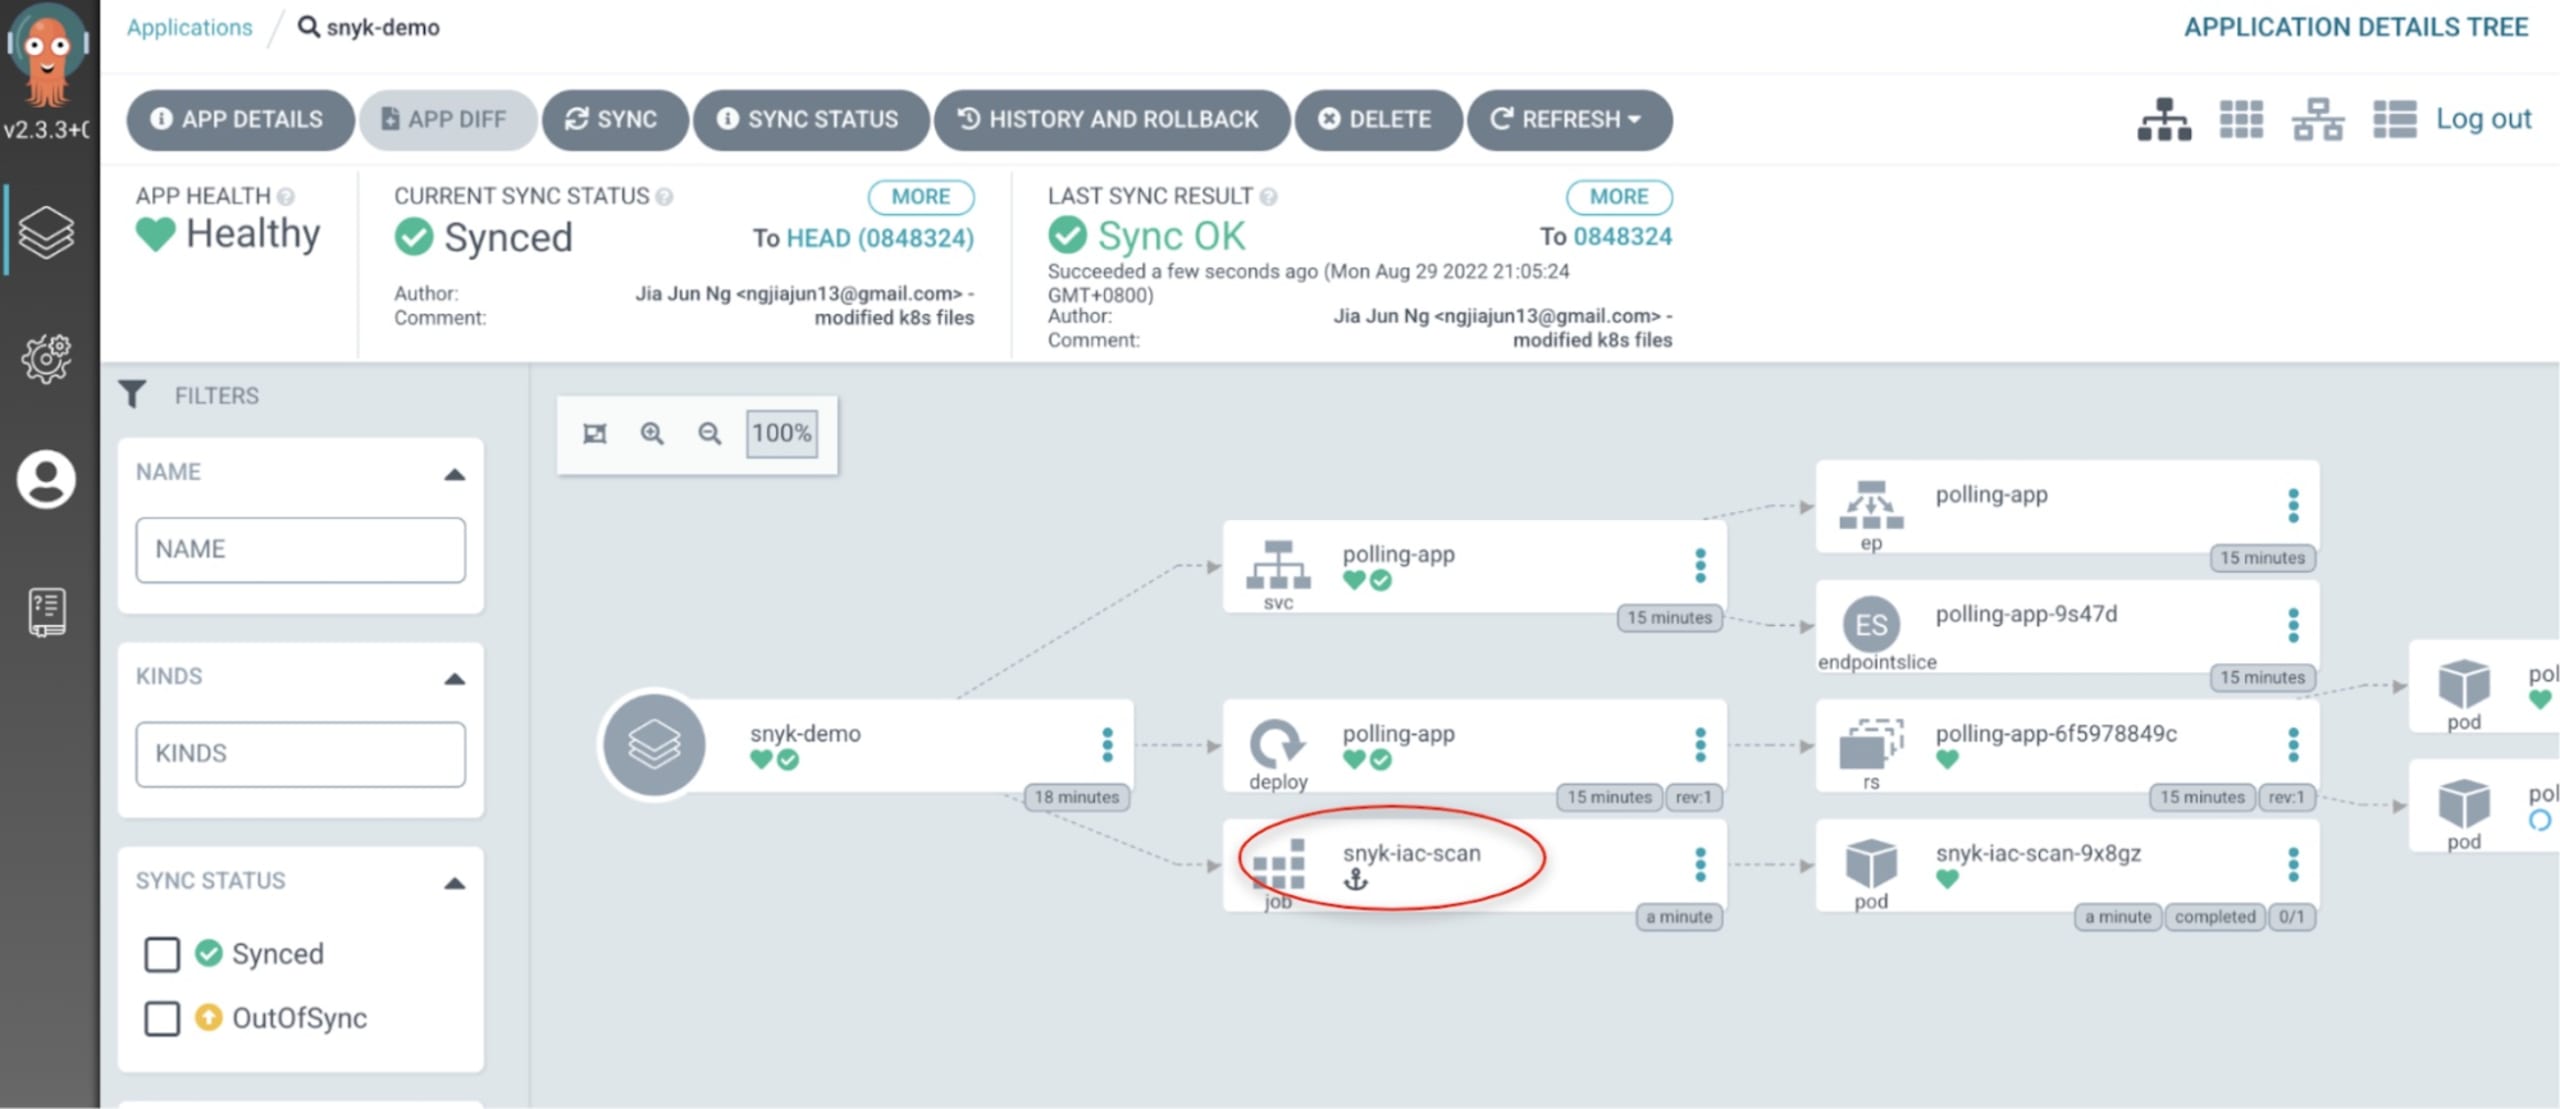
You can also see the snyk-iac-scan running as pod:
1➜ kubectl get pods -n argocd-demoNAME READY STATUS RESTARTS AGEpolling-app-6f5978849c-pp8f4 1/1 Running 0 16msnyk-iac-scan-9x8gz 0/1 Completed 0 2m32sFinally, you can see from the Argo CD UI that there is a snyk-iac-scan job:
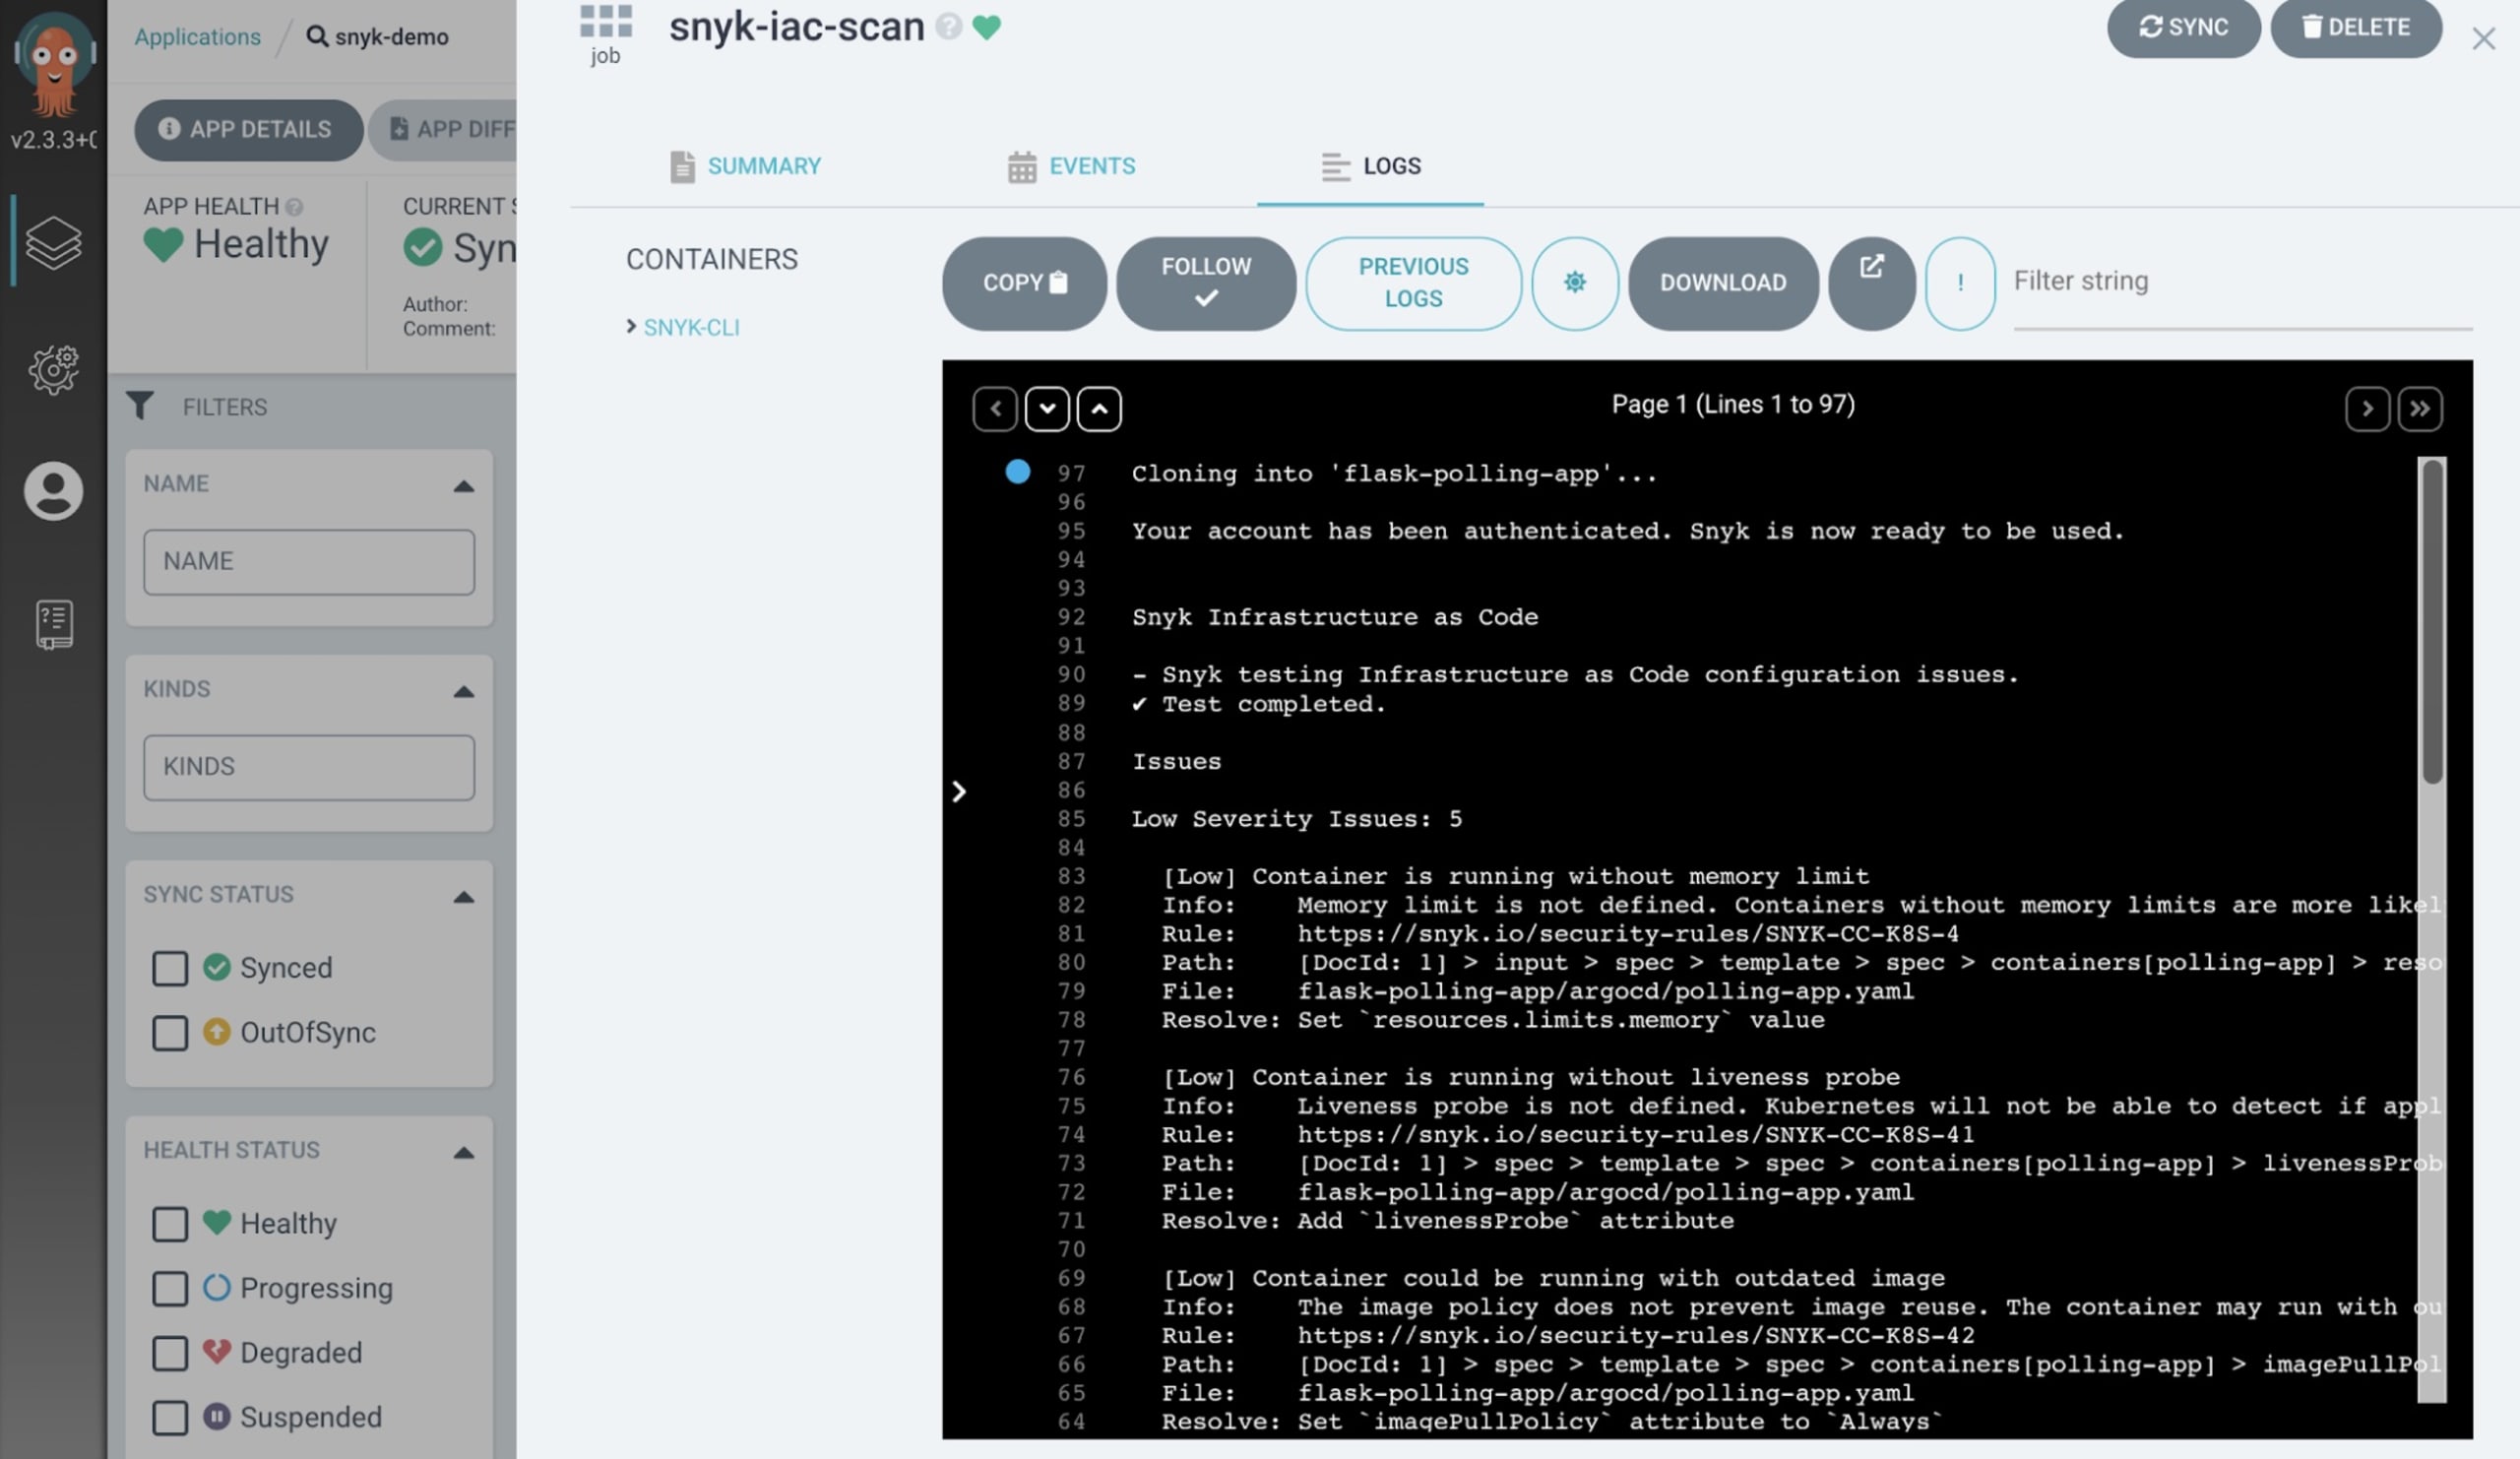
Step 7: Integrate with Kubernetes
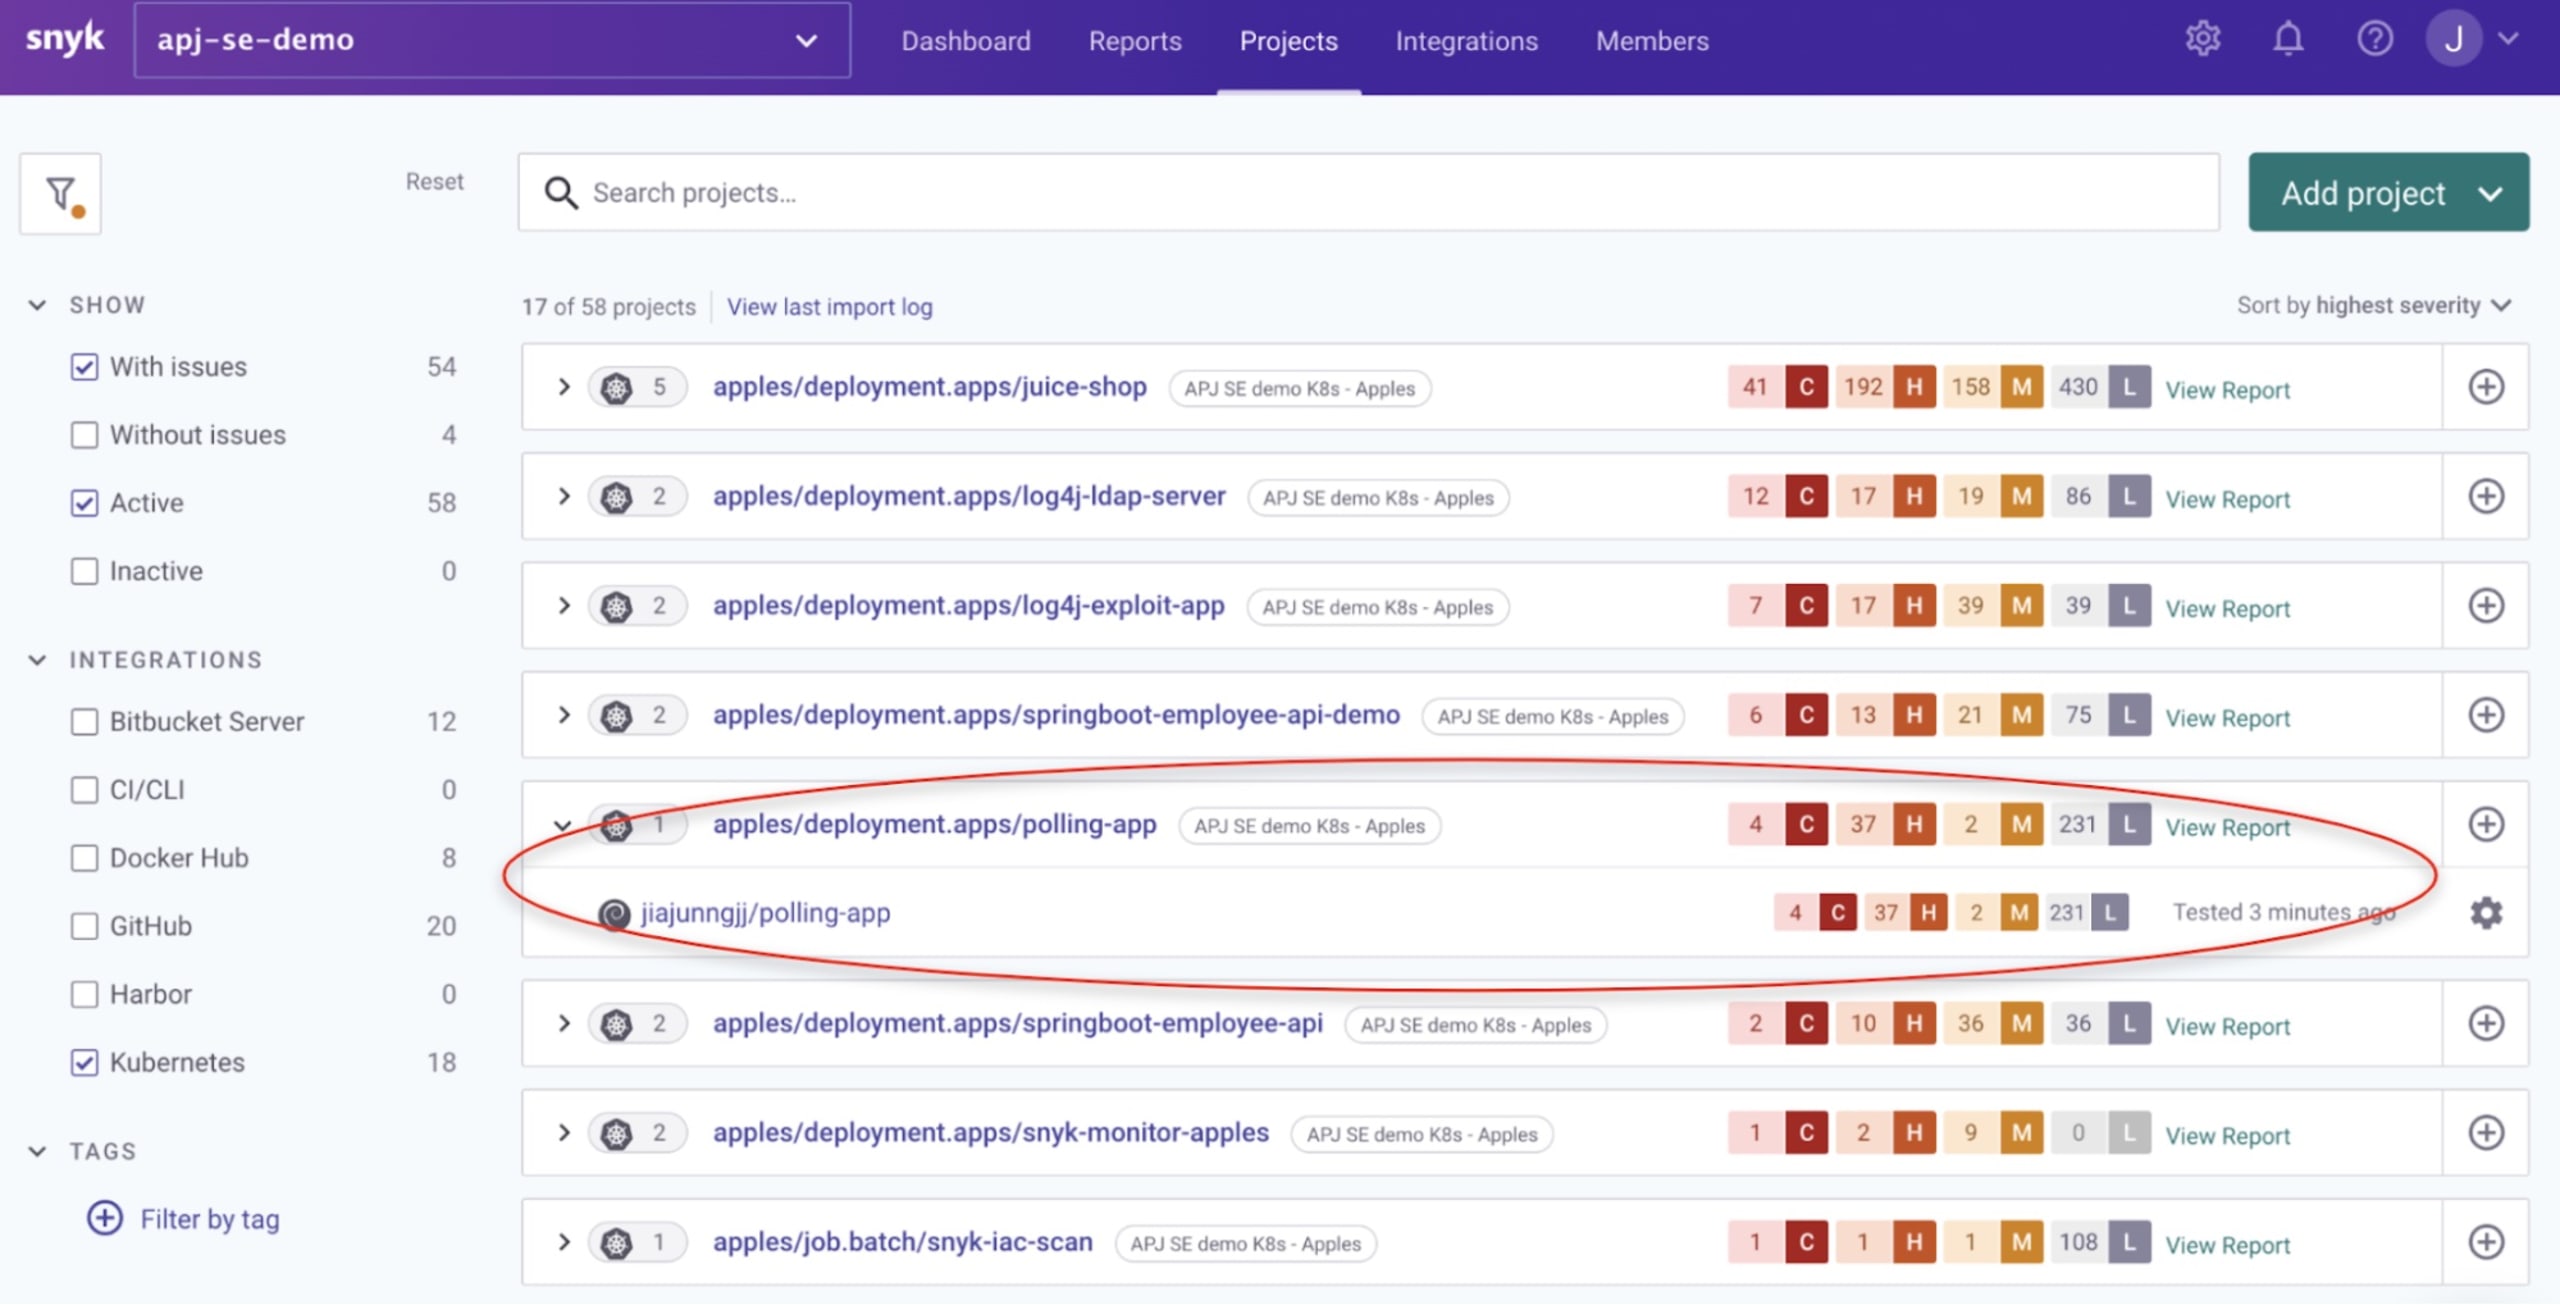
Snyk integrates with Kubernetes, enabling you to import and test your running workloads to identify vulnerabilities in their associated images and to identify configurations that might make those workloads less secure. After being imported, Snyk will continually monitor those workloads, identifying and prioritizing security issues as new images are deployed and the workload configurations change.
An advantage here is that your deployment YAML files don’t need any updating, as it is all done automatically through the Snyk Controller if you set it to auto import (as explained in the Snyk documnentation). Snyk supports the following workloads:
Deployments
ReplicaSets
DaemonSets
StatefulSets
Jobs
CronJobs
ReplicationControllers
Pods
Other Snyk blog posts illustrate how you can install multiple Snyk Kubernetes clusters into a single cluster, and how to use Pulumi to automate Snyk Kubernetes integration.
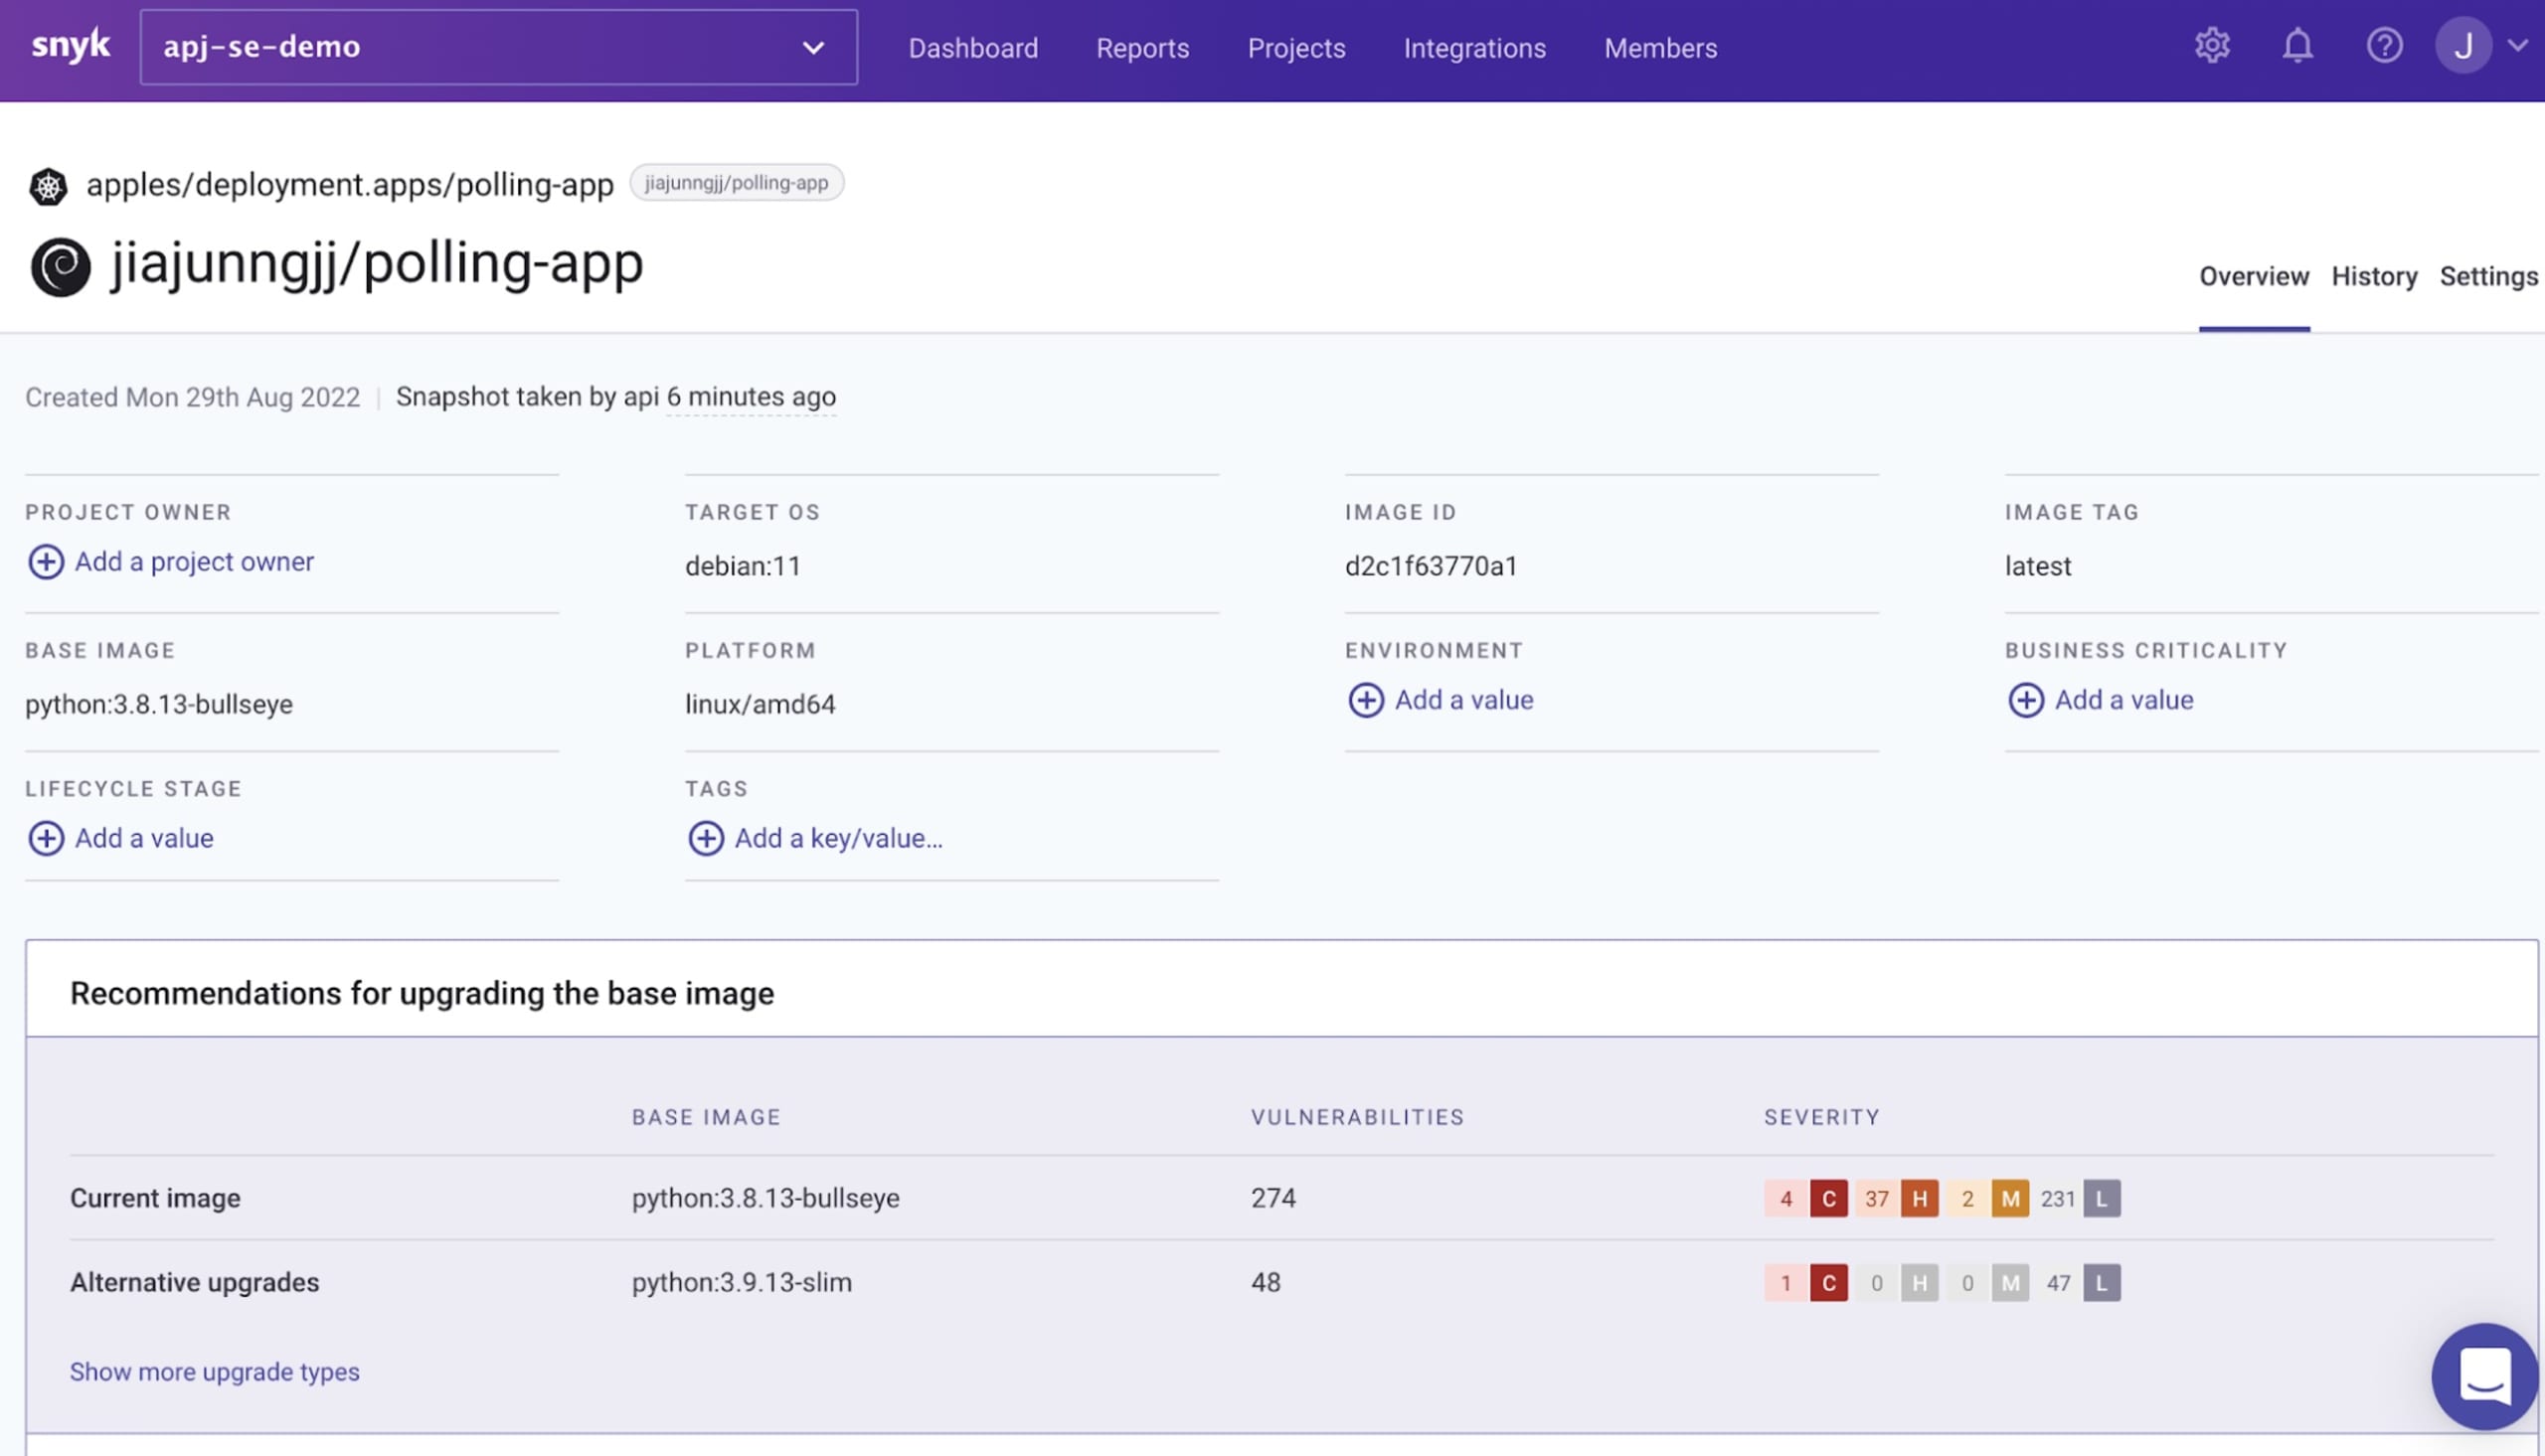
When Argo CD has deployed your application, Snyk’s Kubernetes integration imports that workload scan, all without manual intervention, into the platform:
Summary
This demo uses the resource hook from Argo CD to trigger a Snyk IaC scan whenever a change in the configuration is detected. As such, a GitOps workflow can be mandated with security, using Snyk to detect any vulnerabilities and stop the workflow whenever a detected vulnerability hits the defined severity threshold. This ensures that vulnerable code never reaches the production environment.
Learn more
Now that you have learned how to set up a Snyk IaC test with Argo CD and monitor workloads on Kubernetes, check out these resources for information on how to further secure your software development life cycle:
ソースからインフラを保護する
Snyk は、IaC のセキュリティとコンプライアンスをワークフローで自動化し、ドリフトしたリソースや不足しているリソースを検出します。
